2838 type 4 buildup

-
jonas_linder

- Posts: 1587
- Joined: Sun Sep 08, 2002 12:01 am
But the the tolerance you use when you fit the guides probably won't be the same before and after you cut the hole for the valve steam! Just one more thing to considerGetbackontrack wrote:Actually im thinkin about pushing in homemade guides "with no hole for the valve stem" and then put the head up in the same jig that I used for cutting the holes for the seat, center the inside seat area and cut the holes for the valve stems. That way im absolutely sure that the valve head is concentric with the seat.
Great thread! Please keep posting about your progress (with pictures!
-
Type 4 Unleashed

- Moderator
- Posts: 2202
- Joined: Tue Nov 08, 2005 10:43 pm
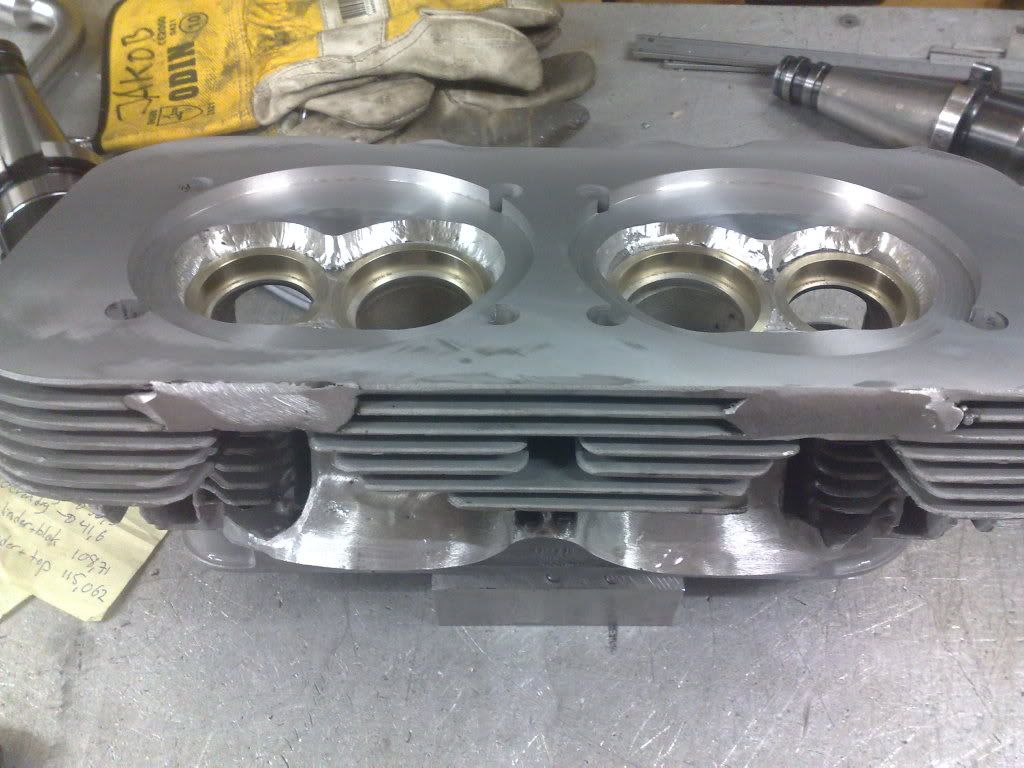
Getbackontrack wrote:Today I got the old guides out and cut the chamber to accept 105 mm pistons and barrels. I have only cut down 0,2 mm in the surface. The whole idea with the welding of the chamber was to be able to get the compression I needed without cutting down in the chamber. Now I need to grind the chambers to the desired cc.
Hey Richard, I really cant see your point. You cant deside the position of the seat weather you use an old guide or new guide for "centering" What desides the position of the seat is how the hole in the head is cut (and of which variables the hole is centered from).
If you want to be sure you would have to put in new guides before you cut the hole for the new seat. But who wants to put in new guides to cut a seat hole for thereafter pushing them out again for proper porting and be in the same position again?
Actually im thinkin about pushing in homemade guides "with no hole for the valve stem" and then put the head up in the same jig that I used for cutting the holes for the seat, center the inside seat area and cut the holes for the valve stems. That way im absolutely sure that the valve head is concentric with the seat.
Like you mention yourself there are to many variables. This way is (the way I see it) the only way to be sure its done right.
Regards, Jakob
I know you don't see my point, and thats OK...Hey Richard, I really cant see your point.
factor due to the variables & lack of experience, in the order you are doing the procedures in.
Let me ask you this ? Why aren't you doing the valve job from the old guides used as pilots, you've used them for the other procedures ?
Here you are wrong for several reasons and one being a factor that you haven't considered. And this factor that I hadn't mentioned, and wouldn't have been an issue, had youYou cant decide the position of the seat weather you use an old guide or new guide for "centering" What decides the position of the seat is how the hole in the head is cut (and of which variables the hole is centered from).
followed my suggested order of procedures.
So, you have basically reversed the order of procedures, and in doing so have moved the error factor from whether the valves will be centered on the seats, to now
will the rockers be centered on the valves ?
Side to side isn't an issue, that can be adjusted with shims or machining the stands. Up and down could be an issue ? And re-locating the rocker stands, I will say is a lot of
work, and would make my head hurt.
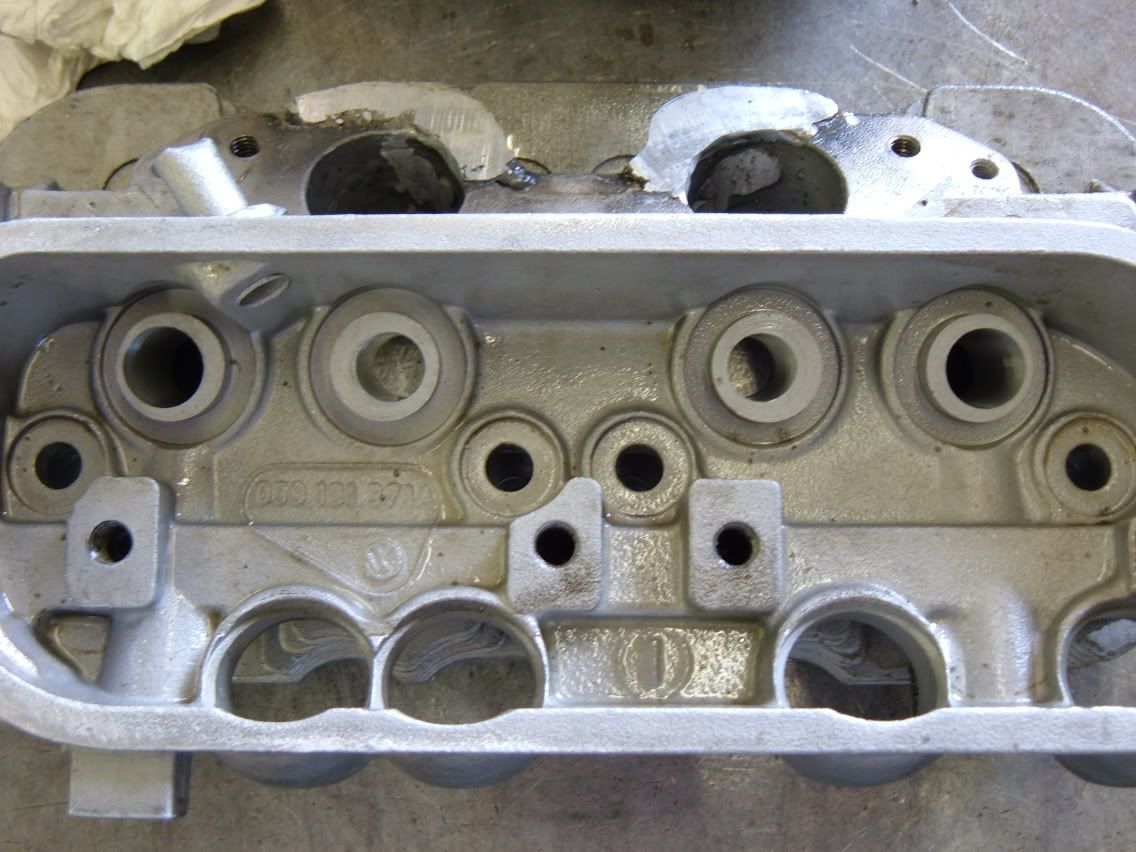
And here it has been done by using the new guides as the pilots to cut the heads for the new seats & to install the new seats, and thats after they have been re-located.
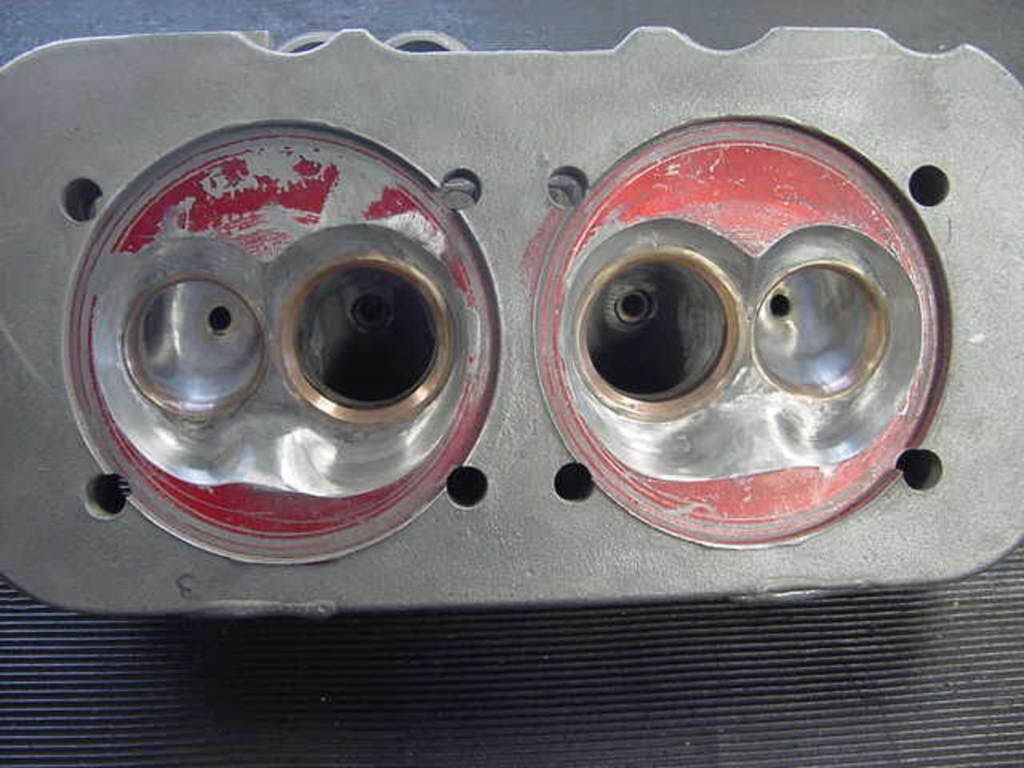
And this is to show you it can be done. And these aren't the only heads I have had over sized seats put in, but these are the first with re-located guides.
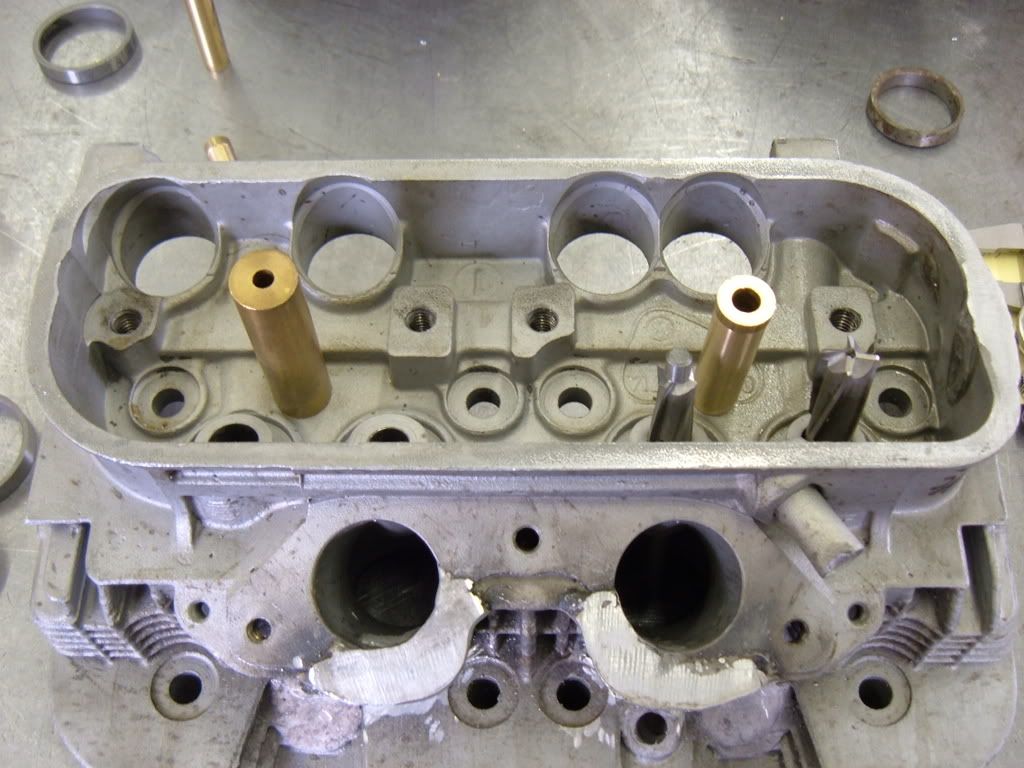
Here the center was found from the existing guide holes, then they were relocated wider, but still in line for the pivot length of the rockers. The 2.0 ltr exh guides, the head
was machined to fit those, and the bronze stock was machined to fit the new exh hole in the head. I only installed the new guides just before they came into the ports, so I was able to port
with them out of the way, and in this partially installed location, they were used as the pilots to machine the heads for the seats and the pilots to install the seats. After the seats were
installed & the ports ported I drove the guides the rest of the way in. Then the seats were cut. I was very happy with the out come to say the least.
The valve guides were relocated wider to make room for the larger valves, the 914 2.0 ltr Exh guide was used for the Int and the Bronze material was
used to make even a larger Exh guide.
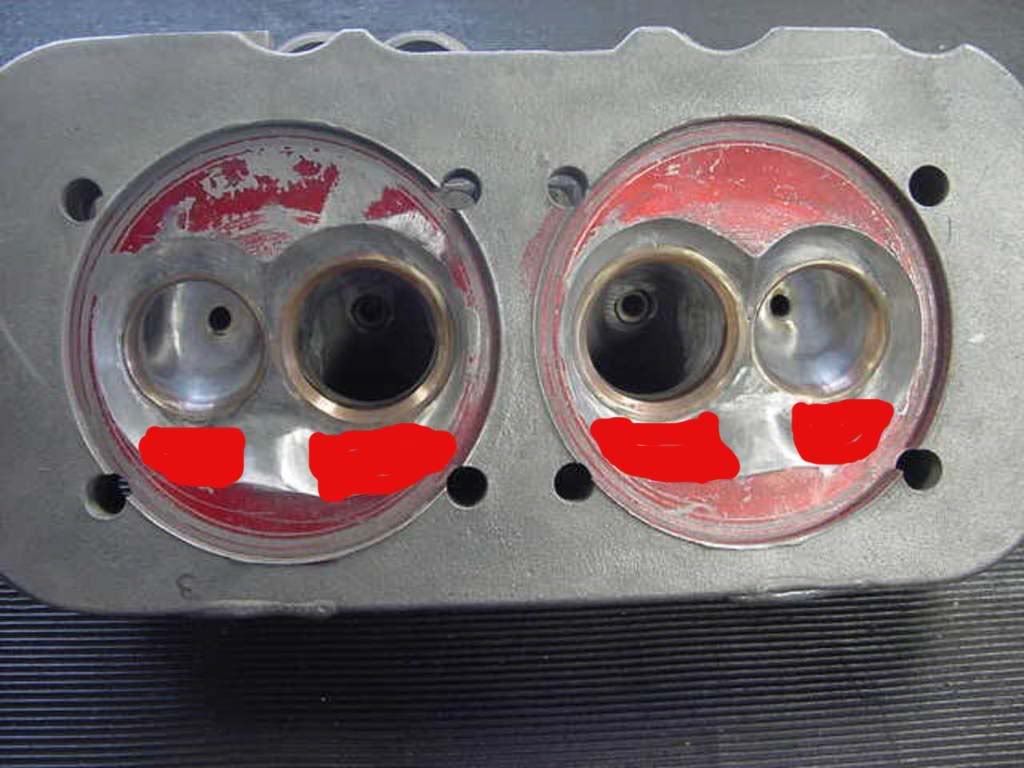
And when you do the welding on your heads weld up that little area between the ports over from the center manifold stud. And watch how much you weld in
between the ports, remember you have to get an extension with a socket by the ports to tighten up the head studs, bottom pic.
Actually im thinkin about pushing in homemade guides "with no hole for the valve stem" and then put the head up in the same jig that I used for cutting the holes for the seat, center the inside seat area and cut the holes for the valve stems. That way im absolutely sure that the valve head is concentric with the seat.
Go ahead and try it that way, and see how it comes out ? If it comes out with everything in line, then that would be great.
But if it doesn't, your still OK, just knock out those guides and put stock replacements in, and their are larger O.D. 8mm exh guides that fit the 2.0 ltr heads.
Your seats are thick enough to have the valves out of center and not really hurt anything. And I would rather have the valves a little off center on the seats,
than have the rockers off center on the valve tips.
Last edited by Type 4 Unleashed on Sat Sep 05, 2009 9:58 pm, edited 1 time in total.
Richard
EMW
“Have you ever noticed how some people never
have the money to do it right, but can always
find the money to do it twice ?”
EMW
“Have you ever noticed how some people never
have the money to do it right, but can always
find the money to do it twice ?”
-
fusername

- Posts: 6806
- Joined: Sun Jan 28, 2007 11:26 am
my head hurts. too much learning at once. I need to go sit down.
amazing thread, keep it going, glad to see it stay civil unlike so many other "armchair engineer" debates, not that I'd ever call you that Richard!
amazing thread, keep it going, glad to see it stay civil unlike so many other "armchair engineer" debates, not that I'd ever call you that Richard!
give a man a watch and he'll allways know what time it is. give him two and he can never be sure again.
Things are rarely just crazy enough to work, but they're frequently just crazy enough to fail hilariously.
Things are rarely just crazy enough to work, but they're frequently just crazy enough to fail hilariously.
-
Type 4 Unleashed
- Moderator
- Posts: 2202
- Joined: Tue Nov 08, 2005 10:43 pm
Hi Jakob
Thought I would check and see if you were able to get any more head work done ? I am sure I am not the only one interested in how the works comming along.
You get the chance post up some pic's, or at least an up date.
Thanks
Thought I would check and see if you were able to get any more head work done ? I am sure I am not the only one interested in how the works comming along.
You get the chance post up some pic's, or at least an up date.
Thanks
Richard
EMW
“Have you ever noticed how some people never
have the money to do it right, but can always
find the money to do it twice ?”
EMW
“Have you ever noticed how some people never
have the money to do it right, but can always
find the money to do it twice ?”
-
Getbackontrack
- Posts: 241
- Joined: Thu Oct 27, 2005 2:08 am
-
Getbackontrack
- Posts: 241
- Joined: Thu Oct 27, 2005 2:08 am
Re: 2838 type 4 buildup
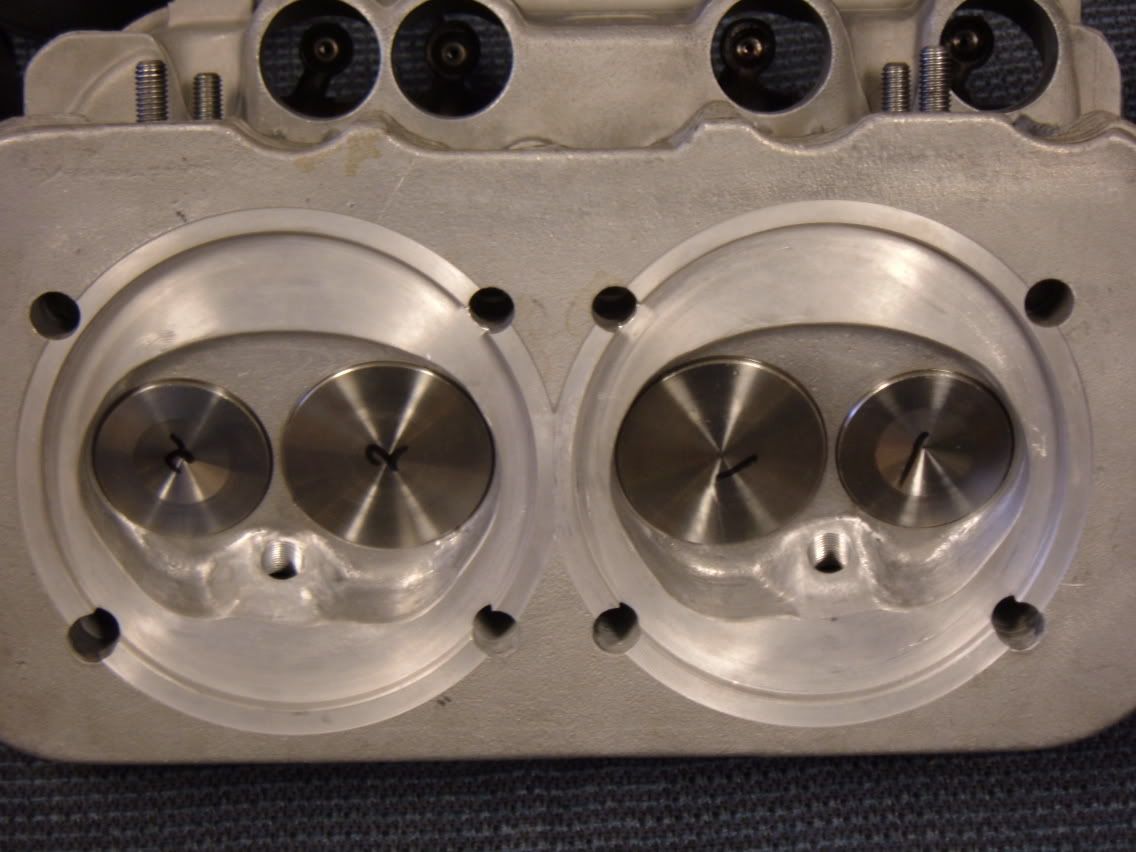
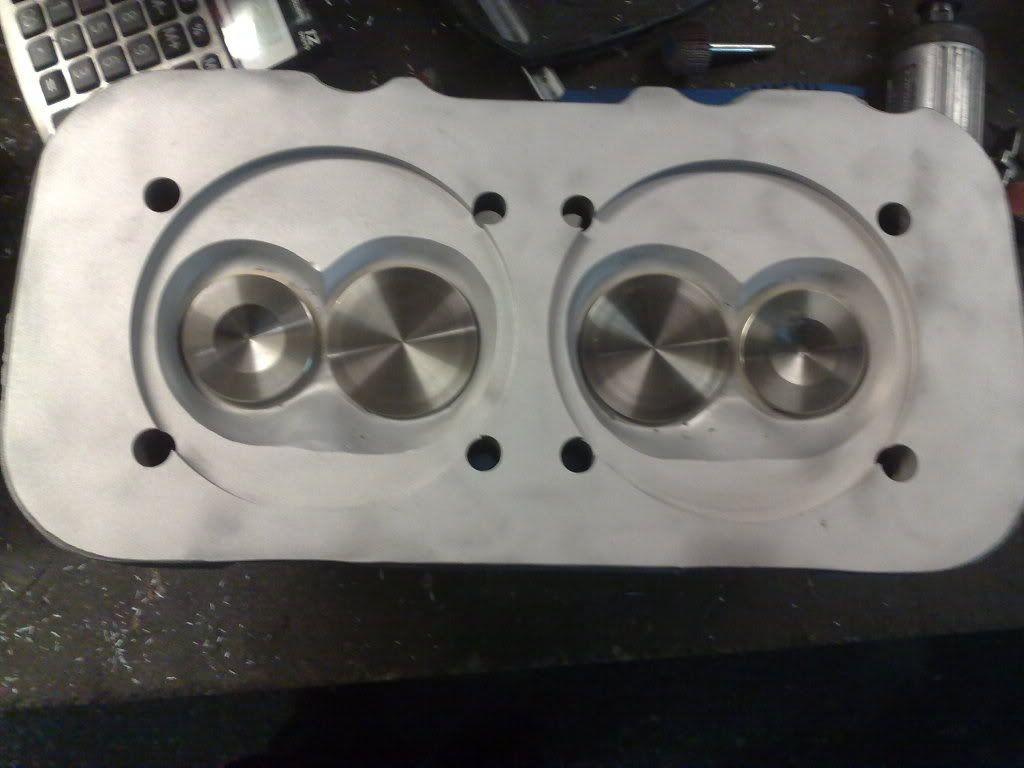
Had a little time to work on my heads today, so got the chambers shaped the way I wanted.
-
Getbackontrack
- Posts: 241
- Joined: Thu Oct 27, 2005 2:08 am
Re: 2838 type 4 buildup
Couldnt resist the fact that it actually was possible to install a 50 mm inlet valve, so cut new holes for the seat to the 50 mm valve also 
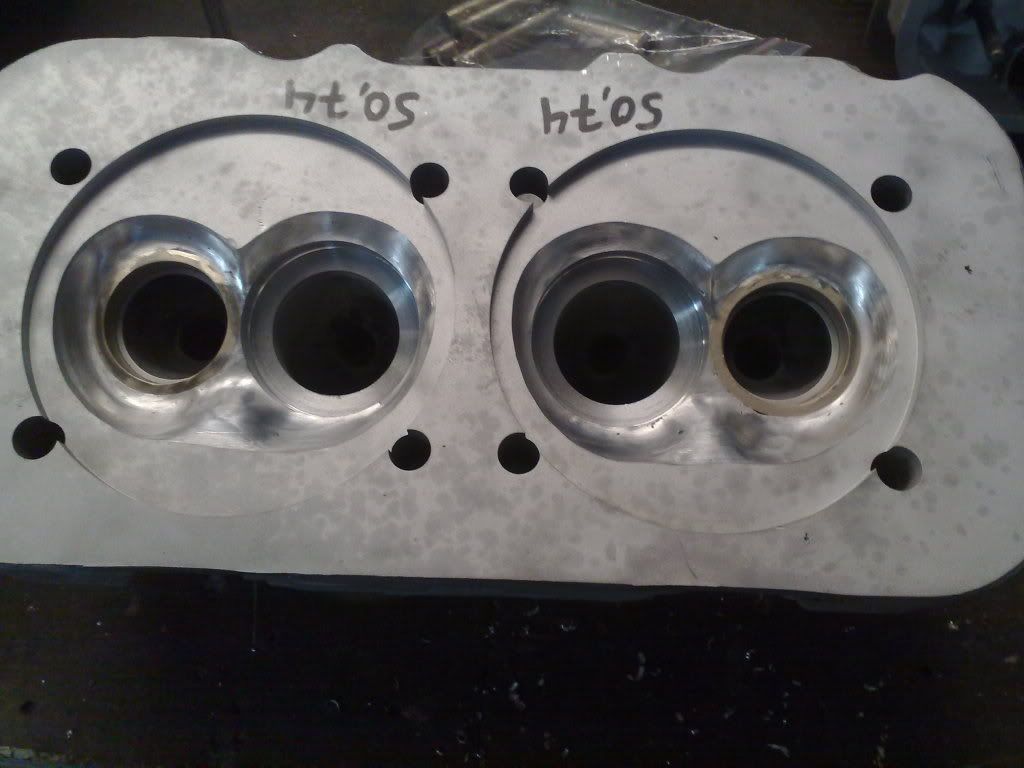
Regards, Jakob
Regards, Jakob
-
Arnoud
- Posts: 104
- Joined: Sun May 25, 2008 7:27 am
Re: 2838 type 4 buildup
Nice goin'!
Have you thought of a way to cut/grind the valveseats as well?
Machinist by trade I guess?
Regards,Arnoud
Have you thought of a way to cut/grind the valveseats as well?
Machinist by trade I guess?
Regards,Arnoud
-
Getbackontrack
- Posts: 241
- Joined: Thu Oct 27, 2005 2:08 am
Re: 2838 type 4 buildup
Actually im thinkin of makin my own tool to cut the seats, since its alubronze material its easy to cut with a sharp toolbit steel. The problem is that I want 3 angle valvejob done to them, maybe I will send them out to have it made by a profesional. Unless somebody have an idea how to do it!
Regards, Jakob
Regards, Jakob
-
Wally

- Posts: 4563
- Joined: Mon Oct 28, 2002 12:01 am
Re: 2838 type 4 buildup
I agree: VERY nice work on the chamber shapes. I like them that way too.
Anxious to see how the chambers will turn out once you know the chamber size you want.
Anxious to see how the chambers will turn out once you know the chamber size you want.
-
Type 4 Unleashed
- Moderator
- Posts: 2202
- Joined: Tue Nov 08, 2005 10:43 pm
Re: 2838 type 4 buildup
Hi JakobGetbackontrack wrote:Couldnt resist the fact that it actually was possible to install a 50 mm inlet valve, so cut new holes for the seat to the 50 mm valve also
Regards, Jakob
You made the same mistake I did, I should have drilled & tapped the holes for the spark plugs before any contouring was done around the plug boss.
Mine is not that bad, I was relocating the plugs anyways, and going to 10mm spark plugs.
But you may have to go smaller plugs if you hadn't already decided too.
And next time I will have these areas welded up also, then drill the plug holes.
-
Clatter

- Posts: 2035
- Joined: Sun Apr 28, 2002 1:01 am
Re: 2838 type 4 buildup
Why?drilled & tapped the holes for the spark plugs before any contouring was done around the plug boss.
-
Type 4 Unleashed
- Moderator
- Posts: 2202
- Joined: Tue Nov 08, 2005 10:43 pm
Re: 2838 type 4 buildup
If you don't know where the hole is, then how can you shape the boss around the hole that isn't there ? Well I did and wish I would of drilled the hole first, would of made it much easier.Clatter wrote:Why?drilled & tapped the holes for the spark plugs before any contouring was done around the plug boss.
For mine I will be changing the angle of the plugs and contoured the bosses to reflect that, stock location their currently angled toward the Int valve's, hopefully mine will end up more toward the Exh valve's when drilled, and I am going 10mm plugs which why I contoured the boss much smaller than it was originally.