Floor Pans and Heater Channel Replacement

Need help straightening that dent? Or painting your car? This is the place to be!
User avatar
doc
Site Admin
Posts: 3586
Joined: Thu Mar 31, 2005 2:38 pm

Floor Pans and Heater Channel Replacement

Post by doc »

Well, here's another fine mess I've gotten myself into. Started painting the '57 in my effort to get better at paint and, next thing you know, I'm all the way disassembled. I'll be replacing floors and heater channels and making all necessary repairs. Here's a few pics to let the group know where i am.

Image

Body off!! Two healthy people can lift the body off, once everything is disconnected. Getting the bolts out of the rocker panels was a grind it out experience. They broke off or the nut came loose inside the rocker on nearly every one.

Image
The frame. I've already cut out one side of the floor.

Image
Previous owner put in 2/3 floor panel and mostly riveted it in. He also left the bottom edge of the original floor, so he wouldn't have to deal with all the spot welds. You can see the floors are shot hidden under the carpet.

Image
Heater boxes are riddled with holes inside and out. Disaster!

Image
Heater box is rotted out up at the front wheel arch. Noted rotted away bottom of front firewall. I'll have to make a piece to weld in. It's symmetrical with the other side, so at least I'll have a pattern of sorts.

Image
Here's good spot up at the front where you can see the lip that the floor pan will be spot welded to. I have already cut the old floor out and ground out most of the spot welds. Looks decent.

Image
Here's a spot by one side of the frame extension that hold the rear edge of the floorpan. It was bent and torn from the rear floor damage in the battery area. I have bent it back and am welding the tear. My welding leaves room for a lot of practice with the grinder.

Image
More bad news at the back where the PO has already made a repair. More cutting and welding to come.

Image
A shot of the front where you can see that the nose has been hit and is pushed back a little. Don't know if I can fix this or not.

Image
What's that metal plate glued on the top of the trunk area? I'm sure it's another surprise for me.

Image
Here's the one I'm really worried about. The bulk head has some rot where it meets the triangle pan area underneath the master cylinder. Don't know what it will take to fix.

So, I'll continue to post as I go. It will be my first floor pans and heater channels. Big jobs for me. Continue to remember me in your prayers.

doc
User avatar
Lew
Posts: 529
Joined: Tue Feb 24, 2009 6:42 am

Post by Lew »

Doc,

Look at you!
Been there done that. I wish I had that much room to work in. So far so good. As they say "Soldier on Laddie". :)
Last edited by Lew on Fri Jul 03, 2009 3:32 pm, edited 2 times in total.
User avatar
david58
Moderator
Posts: 14101
Joined: Sun Oct 23, 2005 6:14 pm

Post by david58 »

Doc this is something that will make you wonder Why. :lol: You love that bug. 8) This is a big job take your time and take lots of pics. Once you get past this point of no return you will be a STFer for sure. :wink:
Hot, humid air is less dense than cooler, drier air. This can allow a golf ball to fly through the air with greater ease, as there won't be as much resistance on the ball.
User avatar
slowtwitch
Posts: 533
Joined: Mon Nov 08, 2004 9:38 am

Post by slowtwitch »

Doc, this is to funny :D You have almost have the same issues as I had on my 57. The PO on my car cut out the pan and left the same bit of material around the lip of the tunnel, only he butt welded the new pan to it. :lol: I wondered why the mounting holes, on the pans, where elongated.

As Dave mentioned, you'll wonder why, but, when you past that certain point you'll feel good about it all :D
pete
User avatar
EvilleT
Posts: 67
Joined: Sat Mar 15, 2008 10:50 am

I feel your pain

Post by EvilleT »

My areas were not quite as bad as you have (Floor pans, rusted out wheel wells, luggage shelf and two rusted floor pan bolts that had to be cut out) but I was dealing with a 67 not a 57 plus the PO didn't do any "repairs" he just let it go. It is my first project and allot of the work I do is a "hack job" but it is fun, it is therapeutic and I work on the project in short "jobs" no longer than 3 hours at a time and if I find myself getting frustrated I just pick up my tools walk away. Sure is funny how yesterdays frustration isn't quite as bad the next day. I just wish I had more spare time to work on my project, I can't wait to drive it.
take care and good luck
User avatar
doc
Site Admin
Posts: 3586
Joined: Thu Mar 31, 2005 2:38 pm

Post by doc »

Well, I'm already wondering why as i find the true extent of the damage. Like EvilleT, I try to take on a little at a time and walk away if I start cutting myself.

Here's some of the discoveries and some small progress.

Here's the front firewall. Note the absence of the bottom. Much worse than I originally thought. Either have to fabricate the bottoms or try to remove and replace the whole firewall. Both sound like big jobs for me. Arghh!!

Image

The firewall from the passenger cabin. No better on this side.

Image

Under that metal piece that was glued to the luggage compartment was this. I used a die grinder and cutoff wheel to cut back to bare metal and a workable shape.

Image

Here's the cut out.

Image

Here's the new piece to be welded in. Just a little more trimming to go. I'll weld it in when I can move the body over closer to the welder. We'll see how that goes. I measured the body gauge thickness and it is about .040".

Image

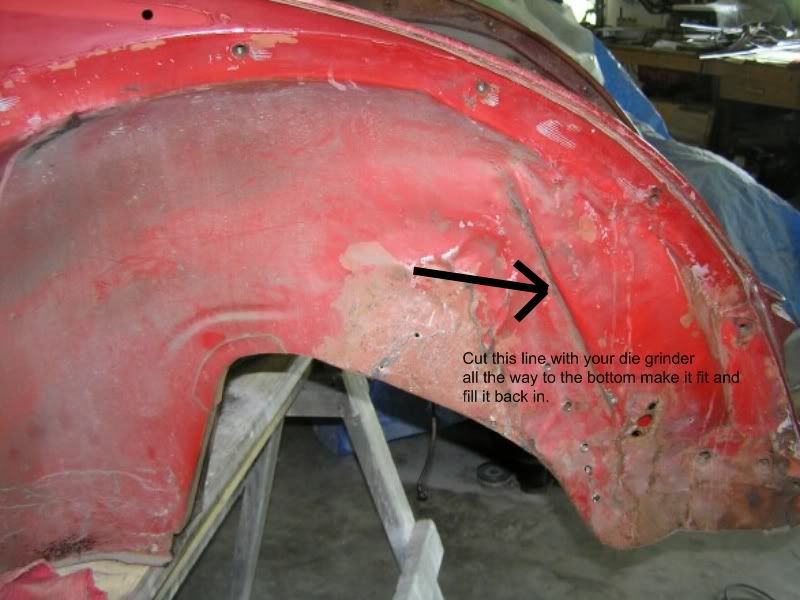
I've hammered on the inner fender til it is closer to the original shape. A little more work and some body filler and I can make it look fine. But, the passenger side of the car is about 13mm shorter than the drivers side. The drivers side is very close to the 1118mm specified in Bentley's as measured from the first fender bolt hole to the last fender bolt hole. Don't know how to fix this. I will probably try and refit the hood and see if the discrepancy can be "fudged".

Image

I' feeling rather in uncharted waters. Yikes!! :shock:

doc
User avatar
Lew
Posts: 529
Joined: Tue Feb 24, 2009 6:42 am

Post by Lew »

Soldier on Doc, we are with ya all the way. You can do it! :)
User avatar
david58
Moderator
Posts: 14101
Joined: Sun Oct 23, 2005 6:14 pm

Post by david58 »

Image
How is that for cheatin. :lol:
Hot, humid air is less dense than cooler, drier air. This can allow a golf ball to fly through the air with greater ease, as there won't be as much resistance on the ball.
User avatar
doc
Site Admin
Posts: 3586
Joined: Thu Mar 31, 2005 2:38 pm

Post by doc »

That's a thought!

When I built the shop, I had the cement guys set some big screw grommets in the cement floor. I have really big eye screws to screw into the grommets that create pull points across the garage floor. I am thinking of setting the body on the floor, chaining up both ends of the body and trying to pull the passenger side out with a come along.

An ambitious plan. But it's an excuse to use the floor pull points after no use in 7 years!

doc
User avatar
MNAirHead
Posts: 9570
Joined: Mon Sep 08, 2003 6:12 am

Post by MNAirHead »

Are you planning on fabbing the steel or buying brazillian etc?
User avatar
doc
Site Admin
Posts: 3586
Joined: Thu Mar 31, 2005 2:38 pm

Post by doc »

I am about settled on buying the Wolfsburg West floor pans. They are twice the price of the cheapies, but are the thickest and get good reviews.

The Dansk heater channels seem to be the ones to have available from many sources.

I have decided to replace the firewall as a piece. Still a little more homework to insure reasonable compatibility with the '57.

All other fixes, I'll fab from scrap.

Other suggestions welcome.

doc
User avatar
david58
Moderator
Posts: 14101
Joined: Sun Oct 23, 2005 6:14 pm

Post by david58 »

doc wrote:That's a thought!

When I built the shop, I had the cement guys set some big screw grommets in the cement floor. I have really big eye screws to screw into the grommets that create pull points across the garage floor. I am thinking of setting the body on the floor, chaining up both ends of the body and trying to pull the passenger side out with a come along.

An ambitious plan. But it's an excuse to use the floor pull points after no use in 7 years!

doc
If you have the body on the pan then I could see this working. Doing it with just the body is not a good idea.
Hot, humid air is less dense than cooler, drier air. This can allow a golf ball to fly through the air with greater ease, as there won't be as much resistance on the ball.
User avatar
doc
Site Admin
Posts: 3586
Joined: Thu Mar 31, 2005 2:38 pm

Post by doc »

Why? Don't think I can move just the front without moving everything else?

How about using a porta power to push between the nose and the firewall area?

doc
User avatar
david58
Moderator
Posts: 14101
Joined: Sun Oct 23, 2005 6:14 pm

Post by david58 »

Doc it is hard to look at one pic at one angle and know how it needs to be pushed or pulled. Just be careful.
Hot, humid air is less dense than cooler, drier air. This can allow a golf ball to fly through the air with greater ease, as there won't be as much resistance on the ball.
User avatar
doc
Site Admin
Posts: 3586
Joined: Thu Mar 31, 2005 2:38 pm

Post by doc »

I hear you. Just don't know how this is going to work out. I'm going to work on the pan/floors first. Then see if i can get through the firewall replacement. Then the heater channels. Then I can start worrying about the nose.

Geez, sounds like a prison sentence. :roll:

doc
Post Reply