I am looking for some suggestions on how to do my e-brake cable. I initially was thinking of getting some very large allthread. Drill 2 hold about a half inch apart. Weld that to the top of the e-brake handle. Then run the cables through the hole on each side and then put a nut on each end to pinch the cable in the holes.
Other idea's ?
RyanB's Buggy
-
bajaherbie

- Posts: 9967
- Joined: Sat Jul 15, 2006 7:07 pm
Re: RyanB's Buggy
so what if the rods bend a little....... its not the space shuttle pulling in for re-entry into earths atmosphere 
 seriously, you pull on the handle for a second or three and then release it?
Of all the paths you take in life, make sure a few of them are dirt.
-
bajaherbie
- Posts: 9967
- Joined: Sat Jul 15, 2006 7:07 pm
Re: RyanB's Buggy
RyanB wrote:I am looking for some suggestions on how to do my e-brake cable. I initially was thinking of getting some very large allthread. Drill 2 hold about a half inch apart. Weld that to the top of the e-brake handle. Then run the cables through the hole on each side and then put a nut on each end to pinch the cable in the holes.
Other idea's ?
i think that would work...
Of all the paths you take in life, make sure a few of them are dirt.
-
GDRBORETIRED
- Posts: 557
- Joined: Wed Sep 13, 2006 2:29 pm
Re: RyanB's Buggy
Nice job on the steering brakes! But why reinvent the E-brake? The stock pieces and a cable shortening kit will work. I think I saw a new type of shortener on The Samba, you might check it out.
-
RyanB

- Posts: 1466
- Joined: Wed Feb 26, 2003 12:01 am
Re: RyanB's Buggy
Thanks GDRBO! I wasn't aware they had one for E-brakes. I'll be looking into that!
Seems like there is never enough time in a weekend. I didnt really get as far as I wanted to this weekend, but I did get quite a bit done so overall I am happy. I was able to get all the holes in the body with the exception of the area above the transmission filled in with my resin paste. It is a mixture of Cabosil and Chopped fiberglass. I would say a few more hours of work to finish up the glassing on the inside. Once that is completed I want to add some more wood to the outside so the 'lift' is flush with the side fiberglass. Then I will glass those together as well. Once that is all complete, the body will be unbolted. Right now there are lag bolts going into the wood. These will be removed and glassed over as well to completely encase the wood. Then a new hole drilled through so a bolt will fit normally.
The plan once the body is finished is anytime I need to bolt something to the body I am going to use "Rivnuts". I'll get started on the hood after the body is complete. The hood needs work but it's not in too terribly bad shape.
The "completion" date is set for the most part. I have to have the car drivable by June 22nd. Taking it down to California to give my Grandmother a surprise ride in it to the hills to spread my Grandfathers ashes. He's the one who got me into VW buggies and they spent countless hours together roaming the hills and country in thier buggy. I am quite close now to that. I figure by the end of March it should be 'drivable'. The biggest project left I think will be the roll cage.
Test fit the captains hat area. Created a 2 piece cutout from cardboard and then drew it onto the wood to complete this.

Rear area, again made a cutout from cardboard and used it as a template to stack up some wood.

Here it is before the body goes on, permanently.

The original lips on the glass are cut back. The wood in the back area is bolted down.

Gelcoat and top paint is ground back to glass for a new coat of resin so I can apply new glass. Area's cut out for the bolts in the back.

Gelcoat ground down and new resin applied.

Front left corner is built up with a Fiberglass paste. All the holes in the main body are filled in. I Mixed up Chopped glass, with Cabosil into the resin after adding the MKEP.

Large crack near the battery area is filled in with the Resin paste, along with the corners and the middle crack.

A bit difficult to see, but I have a thick later of fiberglass layer over the wood and inside edge of the body. I have actually complete both the drivers side and passenger.

Seems like there is never enough time in a weekend. I didnt really get as far as I wanted to this weekend, but I did get quite a bit done so overall I am happy. I was able to get all the holes in the body with the exception of the area above the transmission filled in with my resin paste. It is a mixture of Cabosil and Chopped fiberglass. I would say a few more hours of work to finish up the glassing on the inside. Once that is completed I want to add some more wood to the outside so the 'lift' is flush with the side fiberglass. Then I will glass those together as well. Once that is all complete, the body will be unbolted. Right now there are lag bolts going into the wood. These will be removed and glassed over as well to completely encase the wood. Then a new hole drilled through so a bolt will fit normally.
The plan once the body is finished is anytime I need to bolt something to the body I am going to use "Rivnuts". I'll get started on the hood after the body is complete. The hood needs work but it's not in too terribly bad shape.
The "completion" date is set for the most part. I have to have the car drivable by June 22nd. Taking it down to California to give my Grandmother a surprise ride in it to the hills to spread my Grandfathers ashes. He's the one who got me into VW buggies and they spent countless hours together roaming the hills and country in thier buggy. I am quite close now to that. I figure by the end of March it should be 'drivable'. The biggest project left I think will be the roll cage.
Test fit the captains hat area. Created a 2 piece cutout from cardboard and then drew it onto the wood to complete this.
Rear area, again made a cutout from cardboard and used it as a template to stack up some wood.
Here it is before the body goes on, permanently.
The original lips on the glass are cut back. The wood in the back area is bolted down.
Gelcoat and top paint is ground back to glass for a new coat of resin so I can apply new glass. Area's cut out for the bolts in the back.
Gelcoat ground down and new resin applied.
Front left corner is built up with a Fiberglass paste. All the holes in the main body are filled in. I Mixed up Chopped glass, with Cabosil into the resin after adding the MKEP.
Large crack near the battery area is filled in with the Resin paste, along with the corners and the middle crack.
A bit difficult to see, but I have a thick later of fiberglass layer over the wood and inside edge of the body. I have actually complete both the drivers side and passenger.
-
Ol'fogasaurus
- Posts: 17881
- Joined: Mon Nov 13, 2006 10:17 pm
Re: RyanB's Buggy
Very interesting attack on this build, looking forward to seeing more. Other than the fix on my black buggy I haven't done much F/G work so it is quite interesting.
I still am impressed with your idea on the turning brake.
Lee
I still am impressed with your idea on the turning brake.
Lee
-
RyanB
- Posts: 1466
- Joined: Wed Feb 26, 2003 12:01 am
Re: RyanB's Buggy
Fiberglassing just takes longer then I expect I guess. I didnt get as far as I would have liked, however my wife was Ill so I only worked on the car half of Saturday and half of Sunday. I did however get the hood all prepped for repairs. I also got the exterior sides glassed in. They can use another coat though. You can probably also tell from the 4pc pic below that I used expanding foam in the cracks before I did the glass work. Trying to make it more solid. It's hard to tell from the pic but I did grind down to the original glass so that I wasnt trying to fiberglass to paint.
No pictures of it yet, but I did get in my windshield and my mirrors. Once I have the repairs done on the hood I can begin to fit the windshield.
I need to start to figure out how to do my rollcage. I want it to be removable but I havent figured out yet how I'll end up doing it.
Beginning to fit the side boards to bring it flush with the sides.

Cutting and fitting PVC to help shape the rear bolt area's. also cut a thin piece of wood to go in the battery tray area to help support.

both sides are now glassed. Some of these area's I just couldn't get it to lay down. I'll probably grind them back to wood and use my resin filler on these area's

Battery tray area has been glassed and the PVC's are "glued" into place with resin

No pictures of it yet, but I did get in my windshield and my mirrors. Once I have the repairs done on the hood I can begin to fit the windshield.
I need to start to figure out how to do my rollcage. I want it to be removable but I havent figured out yet how I'll end up doing it.
Beginning to fit the side boards to bring it flush with the sides.
Cutting and fitting PVC to help shape the rear bolt area's. also cut a thin piece of wood to go in the battery tray area to help support.
both sides are now glassed. Some of these area's I just couldn't get it to lay down. I'll probably grind them back to wood and use my resin filler on these area's
Battery tray area has been glassed and the PVC's are "glued" into place with resin
-
Ol'fogasaurus
- Posts: 17881
- Joined: Mon Nov 13, 2006 10:17 pm
Re: RyanB's Buggy
For some reason I can't post pictures today. How about I email you some of how my cage was done. It mounts on top of the body mount flange and will come out w/o removing the body. Supposedly the mounting flanges are available already cut.
You do not have the required permissions to view the files attached to this post.
-
Ol'fogasaurus
- Posts: 17881
- Joined: Mon Nov 13, 2006 10:17 pm
Re: RyanB's Buggy
I can email you if you need more pictures.
Lee
Lee
-
RyanB
- Posts: 1466
- Joined: Wed Feb 26, 2003 12:01 am
Re: RyanB's Buggy
Thanks Lee. That is basically what my old buggy had as well. I wanted to avoid putting the cage on top of the glassed area (and thus on top of the lift) but looks like I am probably going to have to do this.
-
Ol'fogasaurus
- Posts: 17881
- Joined: Mon Nov 13, 2006 10:17 pm
Re: RyanB's Buggy
 .
.
This is the other way but it might take some plain and fancy doing to make the cage removable.
Lee
-
RyanB
- Posts: 1466
- Joined: Wed Feb 26, 2003 12:01 am
Re: RyanB's Buggy
A fairly productive weekend for me. I prepped Things on Saturday such as the hood & the spare tire well. I missed an after pic of the hood. I'll have that the next update. Glassed in all the holes in the hood and glassed in the weird cut area between the dash and the hood. It looks like it originally was 2 pieces maybe. Looking at the back though it's obvious they were joined together when it was originally made however. Not after. So I dont understand why the deep gap. I am filling it in.
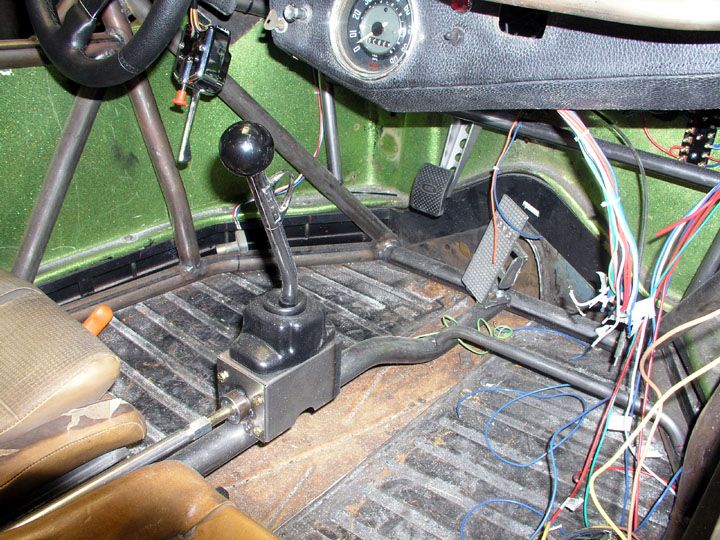
Sunday I fixed a cracked area near the passenger front area, no pics of that. Then moved on to wheel well area. After laying down my initial layer of goop to fill the crack between the wood panel and the glass and layering it to make it a smoother transition I worked on the E-break and the throttle cable while waiting for it to set up. The e-brake I needed to measure and cut the lines to put the cable shortening kit on each line. I hate doing this as a bad measurement means a whole new cable if it is too short. I erred on the side of caution and they are a tad bit longer than what they should be but thats better than too short. After all said and done, it is working well! One hiccup was I put it all together and grabbed the handle to test it and when I let go, the damn black button went flying off. ARG! Damn chinese made junk. I had to pull everything back apart. When I went to screw the button back onto the threaded rod it was pretty obvious that the threads were too large in the button. I had to glue the damn thing together. I used high strength super glue. That Effer is never coming off again... Took a half hour just to pull it all apart!
Once I had the E-brake taken care of I tackled the throttle cable. I used a piece of the old previously removed E-brake cable sheath to make an extension going from the throttle cable tube coming out of the tunnel to the fan shroud. Once that was done I had to pull apart the linkage to the carb at the cable arm. There was no indent for the allen to key into and it would just swing around and not actuate the linkage. Used my dremel to make the indent in the right place and got it all buttoned up. Everything is connected and working well.
I also put on the drivers side replacement tie rod. I measured from the front and back treads on the tires to give it a poor mans alignment.
After all that I finished up my glassing for the day on the wheel well area.
Here are some pics.
Cleaning up the hood for filling in the strange almost cut through the glass.

Cutting back the PVC, these will keep the foam/glass from coming through the back when I do the other side.

PVC's are glassed in.

This is the horrible job the previous owner tried to do to remove the "spare tire area"

This is my completed emergency brake. I went with a new handle, sadly it is chrome. It also came apart on me. Damn chinese made junk.

Beginning the repair. A thin 1/8" wood sheet was cut to fit the area I removed. Glassed in the edges with my Cabosil/Chopped glass.

90% done now. Needs another layer of glass. Then do the underneath.

Sunday I fixed a cracked area near the passenger front area, no pics of that. Then moved on to wheel well area. After laying down my initial layer of goop to fill the crack between the wood panel and the glass and layering it to make it a smoother transition I worked on the E-break and the throttle cable while waiting for it to set up. The e-brake I needed to measure and cut the lines to put the cable shortening kit on each line. I hate doing this as a bad measurement means a whole new cable if it is too short. I erred on the side of caution and they are a tad bit longer than what they should be but thats better than too short. After all said and done, it is working well! One hiccup was I put it all together and grabbed the handle to test it and when I let go, the damn black button went flying off. ARG! Damn chinese made junk. I had to pull everything back apart. When I went to screw the button back onto the threaded rod it was pretty obvious that the threads were too large in the button. I had to glue the damn thing together. I used high strength super glue. That Effer is never coming off again... Took a half hour just to pull it all apart!
Once I had the E-brake taken care of I tackled the throttle cable. I used a piece of the old previously removed E-brake cable sheath to make an extension going from the throttle cable tube coming out of the tunnel to the fan shroud. Once that was done I had to pull apart the linkage to the carb at the cable arm. There was no indent for the allen to key into and it would just swing around and not actuate the linkage. Used my dremel to make the indent in the right place and got it all buttoned up. Everything is connected and working well.
I also put on the drivers side replacement tie rod. I measured from the front and back treads on the tires to give it a poor mans alignment.
After all that I finished up my glassing for the day on the wheel well area.
Here are some pics.
Cleaning up the hood for filling in the strange almost cut through the glass.
Cutting back the PVC, these will keep the foam/glass from coming through the back when I do the other side.
PVC's are glassed in.
This is the horrible job the previous owner tried to do to remove the "spare tire area"
This is my completed emergency brake. I went with a new handle, sadly it is chrome. It also came apart on me. Damn chinese made junk.
Beginning the repair. A thin 1/8" wood sheet was cut to fit the area I removed. Glassed in the edges with my Cabosil/Chopped glass.
90% done now. Needs another layer of glass. Then do the underneath.
-
Ol'fogasaurus
- Posts: 17881
- Joined: Mon Nov 13, 2006 10:17 pm
Re: RyanB's Buggy
-
RyanB
- Posts: 1466
- Joined: Wed Feb 26, 2003 12:01 am
Re: RyanB's Buggy
With spring in the air I just couldnt get away from working on things around the house. but I did put some time into the Buggy this weekend. I managed to get some test fitting done with the windshield. Also, I need to work out my idea for the support for the steering wheel. It's hard to describe so once i have it more in place I'll have to post it up. I need to make sure it's not going to interfere with the windshield wiper assembly as well as the speedometer.
Angle of the sunlight kinda screwed up the pic. But you can see I filled in that large groove.

Test fitting the windshield.

Windshield is mostly in place. Starting to look like a car!

Angle of the sunlight kinda screwed up the pic. But you can see I filled in that large groove.
Test fitting the windshield.
Windshield is mostly in place. Starting to look like a car!
-
Leatherneck

- Moderator
- Posts: 17104
- Joined: Sat Jul 01, 2006 6:47 pm
Re: RyanB's Buggy
Looking good, first wood lift I have seen, is it treated wood? Hope you make your time line as it is for a great reason.