My ongoing Turbobaja build

-
turbobaja

- Posts: 2826
- Joined: Fri Sep 14, 2007 4:56 pm
Thanks Greg.
I wish I had a VW HPjunkie for a neighbor too. I moved away from one of my best VW companions just about 5 years ago. I miss him (and his badass '58 ragtop). His project took over 10 years to get on the road. He had some very impressive fab skills as well. I still see him once in a while. He refers to my build as the Lam-Baja, he's a Lamborghini freak too. I consider it a compliment.
I'll keep the pics coming for sure. Damn car is like a drug to me too.
Karl
I wish I had a VW HPjunkie for a neighbor too. I moved away from one of my best VW companions just about 5 years ago. I miss him (and his badass '58 ragtop). His project took over 10 years to get on the road. He had some very impressive fab skills as well. I still see him once in a while. He refers to my build as the Lam-Baja, he's a Lamborghini freak too. I consider it a compliment.
I'll keep the pics coming for sure. Damn car is like a drug to me too.
Karl
-
turbobaja
- Posts: 2826
- Joined: Fri Sep 14, 2007 4:56 pm
I can hardly wait to get this thing drivable so I can cruise around with some of my "neighbors". About a week ago I had the baja as assembled as it's ever been. No brake lines and not a single strand of wiring on the car. Otherwise that engine break-in was going to happen  ! I wish.
Robbie, what do got left? Slap some panels on and button up a couple things here and there? Are you doing all the body and paint yourself too. I'm about to round the bend to that step here pretty soon.
Surely, you're going to tune that beast on a chassis dyno (where?).
Should be interesting
The EFI thing has been nibbling at me slowly. I'm determined to give my carbs a chance first, though. Then we'll see. Every step in the project costs at least a grand now anyway.
Thanks for the neighborly welcome guys!
Karl
! I wish.Robbie, what do got left? Slap some panels on and button up a couple things here and there? Are you doing all the body and paint yourself too. I'm about to round the bend to that step here pretty soon.
Surely, you're going to tune that beast on a chassis dyno (where?).
Should be interesting
The EFI thing has been nibbling at me slowly. I'm determined to give my carbs a chance first, though. Then we'll see. Every step in the project costs at least a grand now anyway.
Thanks for the neighborly welcome guys!
Karl
-
turbobaja
- Posts: 2826
- Joined: Fri Sep 14, 2007 4:56 pm
Finally got the tank completed. 2 good coats of POR-15 on everything. Brushed on, wish I would have tried spraying it. Brush bristles everywhere. Gloss black should not be applied in a dusty garage, after dark. All things considered, I'm callling it done.


It's about as black as you can get.
Got bored trying to not make more dust while still actually doing something productive. So I decided to tear into my carbs.
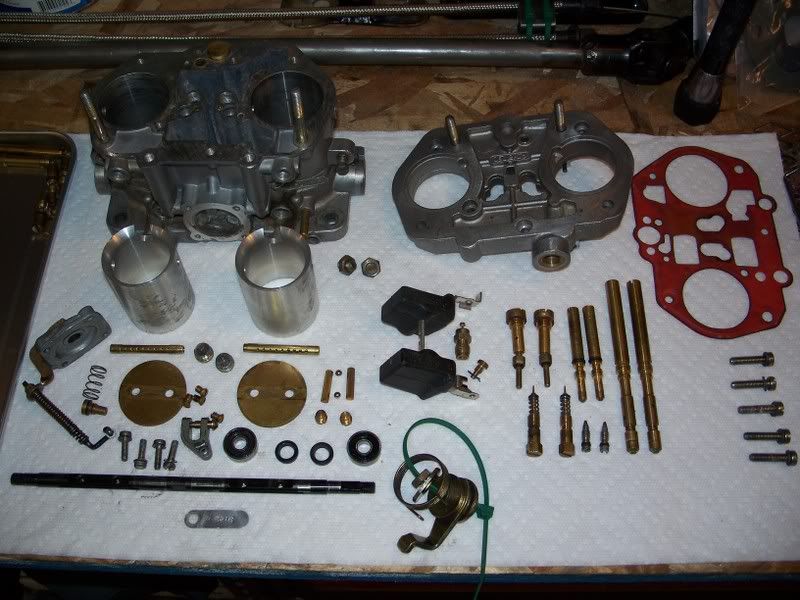
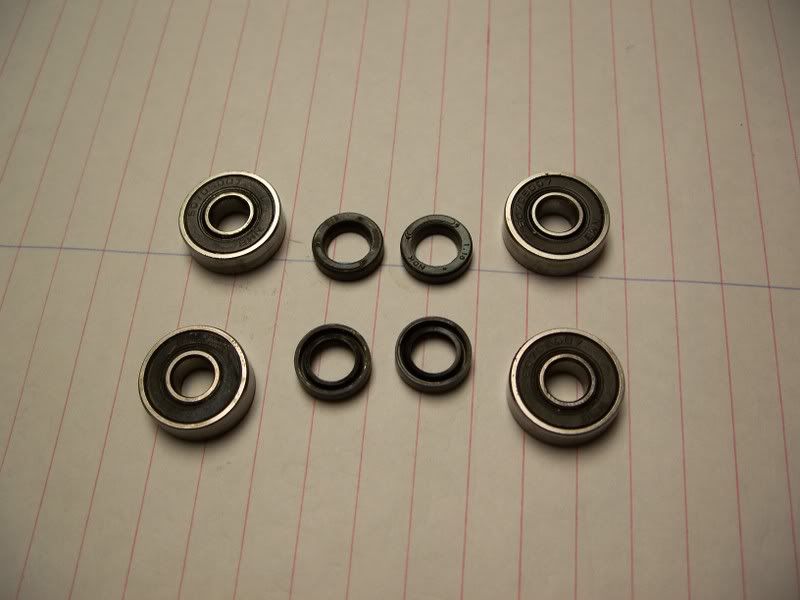
These little guys are apparently getting very hard to find. The bearings were shot on both carbs and the little inner seals pretty much just fell out of the housing once the shaft was removed. They still have good tension around the shaft, just loose in the housing. I'm afraid I've damaged both the seals and bearings by solvent tanking them at least twice now with them installed. Rookie mistake
I think I'll just start another post about the carbs so it's not so buried in my build. Hopefully it will get more hits that way and help more people who run these carbs. I don't see much talk about the CB update kit for them, maybe there's a reason why?
Karl
It's about as black as you can get.
Got bored trying to not make more dust while still actually doing something productive. So I decided to tear into my carbs.
These little guys are apparently getting very hard to find. The bearings were shot on both carbs and the little inner seals pretty much just fell out of the housing once the shaft was removed. They still have good tension around the shaft, just loose in the housing. I'm afraid I've damaged both the seals and bearings by solvent tanking them at least twice now with them installed. Rookie mistake
I think I'll just start another post about the carbs so it's not so buried in my build. Hopefully it will get more hits that way and help more people who run these carbs. I don't see much talk about the CB update kit for them, maybe there's a reason why?
Karl
-
turbobaja
- Posts: 2826
- Joined: Fri Sep 14, 2007 4:56 pm
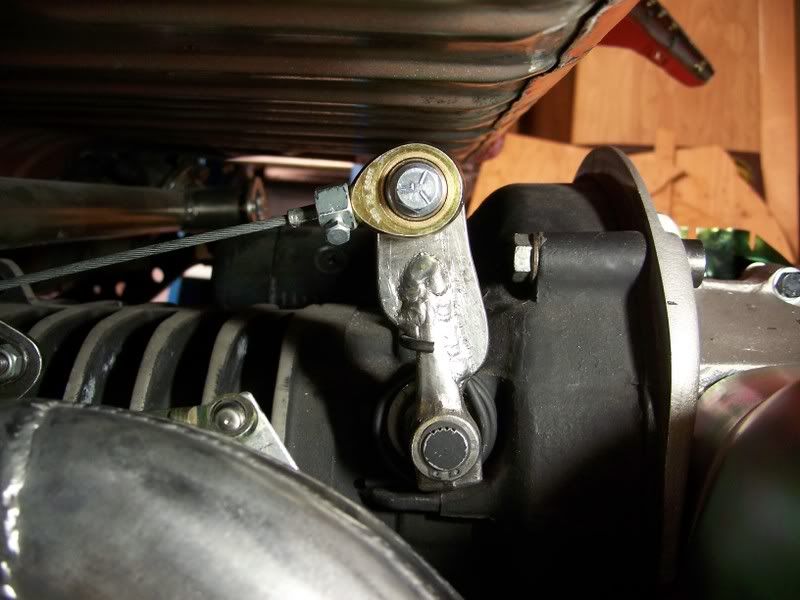
Well here's a little update on the progress. Been finishing up a few odds and ends. I didn't like the looks of the clutch lever on the trans so I decided to beef it up and lengthen it to match the stock T-1 arm. I'm using a KEP stage 3 pres plate (rec by Pat) so I want to keep pedal effort and cable life withing reason. Aslo had to make an adapter bracket for the tube ancor. I used a 3/8" heim joint that I 'modified' to accept the 7m x 1.0 (odd) clutch cable end threads. Then I had to shorted the cable enough to give correct pedal travel and clutch engagement. Feels smooth and stop and go traffic won't kill me now.

Also made a little steering shaft extension housing for the pass-thru up front. It bolts to the kick panel with a foam gasket. Keeps weather out and still allows easy shaft install/removal.

Here's something I did a while back but don't think I've mentioned it. I decided to bore the head temp sensor right into the meat on the top of #3 cyl. By all my measurements it is the thickest part of the head. I didn't want to thread into the fins like I've seen done before. I 'modified' a 1/8" NPT tap little by little as I tapped the hole so that the sensor would completely bottom out in the hole. No air gap under it. If I crack my head from this bonehead move, so be it. I've never seen it done, and was too afraid to ask what the pros thought about it. So, I'll see how it works.


The rear bumper is off now and being prepped for reinforcements
Karl
Also made a little steering shaft extension housing for the pass-thru up front. It bolts to the kick panel with a foam gasket. Keeps weather out and still allows easy shaft install/removal.
Here's something I did a while back but don't think I've mentioned it. I decided to bore the head temp sensor right into the meat on the top of #3 cyl. By all my measurements it is the thickest part of the head. I didn't want to thread into the fins like I've seen done before. I 'modified' a 1/8" NPT tap little by little as I tapped the hole so that the sensor would completely bottom out in the hole. No air gap under it. If I crack my head from this bonehead move, so be it. I've never seen it done, and was too afraid to ask what the pros thought about it. So, I'll see how it works.
The rear bumper is off now and being prepped for reinforcements
Karl
-
turbobaja
- Posts: 2826
- Joined: Fri Sep 14, 2007 4:56 pm
It makes a pretty good S-curve around the nose cone of the trans, if that counts. I didn't know I needed my tube to sag. There's definately more than 1" of deflection as it curves around the trans over the mid-mount plate. I 'fine tuned' the adapter bracket to mount the tube ancor such that the cable was coming out of the center and not rubbing on the edge of the tube al all. Hopefully I didn't waste my time. Let me know what you think.Coyote wrote:Good job Karl !
but I noticed that your clutch bowden tube is straight. it has no sag. I think you will have some clutch clatter with no sag or deflection. It need at least 1'' in the middle...
Karl
-
Coyote

- Posts: 305
- Joined: Tue Aug 24, 2004 2:19 am
I don't know if that's enough compared to the stock "sag" ! 
So, have a read here :
http://www.thebugshop.org/bsfqbwdn.htm
this guy explain a lot better than me !
So, have a read here :
http://www.thebugshop.org/bsfqbwdn.htm
this guy explain a lot better than me !
-
turbobaja
- Posts: 2826
- Joined: Fri Sep 14, 2007 4:56 pm
Thanks Coyote. That site has some helpfull info for sure. From what I understand as long as the tube has at least 1" of deflection from straight and doesn't go completely straight under load, everthing should be OK. I have experienced clutch chatter before, not in this bug, but my old '66 baja would chatter real bad. I never would have guessed the bowden tube cold have been the problem. I always figured I'd overheated the pres plate or flywheel and warped it.
I think my tube will be OK as is. If I have that much engine movement under load, I'll have more that just clutch problems .
Thanks for the heads up.
Karl
I think my tube will be OK as is. If I have that much engine movement under load, I'll have more that just clutch problems
.Thanks for the heads up.
Karl
-
turbobaja
- Posts: 2826
- Joined: Fri Sep 14, 2007 4:56 pm
Latest update on the slowest build ever. Made use of the bender a little and got the cage all beefed up for towing. Just tacked up for now, had to check fit a couple places. The 2 longest pipes that pass through the wheel wells had to be bent slightly to clear the 40" rear bench. The previous "modification" at the sides of the seat was done pre-bender, obviously. Oh, well, should hold up good enough.


Got the rear engine mount done too. There's a total of 6 of those little black pucks holding this thing together now, plus the stock nose-cone mount. Don't want it solid mounted, but trying to control movement as much as possible. Also part of the reason I reinforced the rear bumper.


I put the seats back in for the first time in a while to check for seat belt anchor locations. This is how I made the passenger seat tilt and slide. The tilt mechanism that came with the seats didn't look strong enough for a full sized person. So I rigged up this sliding pin lock mechanism that keeps the seat locked in place. Both driver and passenger slide.


I'm about 6 foot 205lbs and I can sit pretty comfortably by myself back there. Even got a couple inches of headroom. The seat bottom is quite a bit higher than the front seats, so even short people can see out well.


Karl
Got the rear engine mount done too. There's a total of 6 of those little black pucks holding this thing together now, plus the stock nose-cone mount. Don't want it solid mounted, but trying to control movement as much as possible. Also part of the reason I reinforced the rear bumper.
I put the seats back in for the first time in a while to check for seat belt anchor locations. This is how I made the passenger seat tilt and slide. The tilt mechanism that came with the seats didn't look strong enough for a full sized person. So I rigged up this sliding pin lock mechanism that keeps the seat locked in place. Both driver and passenger slide.
I'm about 6 foot 205lbs and I can sit pretty comfortably by myself back there. Even got a couple inches of headroom. The seat bottom is quite a bit higher than the front seats, so even short people can see out well.
Karl