https://www.bing.com/search?q=how+does+ ... lang=en-US Videos of English wheel working of metal.
"An English Wheel is a simple machine that stretches metal by reducing material thickness as it passes between the upper and lower wheels under pressure. The result is similar to what happens when a hammer and dolly are used but the English Wheel is quieter and less work... " http://www.experts123.com/q/how-does-an ... -work.html
Don't forget that there is also a powered planishing hammer to smooth things out. https://www.bing.com/search?q=how%20doe ... B10FEF2689
Never used either of these but would have liked to learn.
Lee
Tucking metal on the edge/Wheel well test piece
-
Ol'fogasaurus
- Posts: 17881
- Joined: Mon Nov 13, 2006 10:17 pm
-
theKbStockpiler

- Posts: 600
- Joined: Sun Jul 15, 2012 10:25 am
Re: Tucking metal on the edge/Wheel well test piece
Going back to using the rubber hammer, it worked just as well as a sand bag with good results. In this case substituting a rubber hammer for a sand bag was done. I'll get back to my experience with those methods in another thread.
Alight. I re-read some of the tucking threads and watched some more videos on it. There is a lot of disagreements on how to do it,some may say controversy.
If you go very slowly and carefully about working the tuck down it might work some but it is very slow. I think I had better luck with the first method I posted how to tuck by making a small tuck and smacking it down with one blow by a hammer that is large in diameter as compared to the tuck. When I re-did this I was not doing it in one blow. The pressure of the hammer blow seems to keep the tuck from spreading back out with out shrinking. After doing it this way , there is still evidence of the tuck after the one hard blow so it's known that the entire rotten tuck did not just get pushed down without shrinking.
I have actually managed to shape/shrink a sphere shaped edge around the circumference of a circle WITH OUT EVEN CREATING bulges to tuck. This does not work with just a angled edge around a outside curved shape. A bulge is a tuck anyways so if you have a bulge ( or a distortion else where) because of a lack of shrinking, there is no reason to put one in.
To do this you need a hard flat surface; a vice ,HF anvil or whatever, and a rounded shaped hammer is preferred. The plastic HF teardrop hammer ($9) is really a great tool and I used it for this. I used the smaller side of the head. The round head is needed so you are not trying to make straight. flat, hammer head sized sections while you are doing this. I'll try a small flat head for a test later. Angle your piece of steel on the flat surface ,press down slightly to moderately and strike the steel 'hammer off style' just slightly above where the steel is being supported. It will both shrink and put a sphere shape into it. Here are pics that show almost a 90 degree curve this method produced.
Super beetle with attitude
-
Bad Bob
- Posts: 112
- Joined: Wed Nov 12, 2014 10:47 pm
Re: Tucking metal on the edge/Wheel well test piece
Looks like you’re getting it right. If you don’t have a stump yet, scrounge one up somewhere. With a saw and a sander,you can make whatever shapes you need.
-
SCOTTRODS

- Posts: 631
- Joined: Sun Nov 07, 2010 7:15 am
Re: Tucking metal on the edge/Wheel well test piece
If you don't have a stump... make one out of 2x12 boards and bolt/strap and screw them together and dish out the end grain and clean it up... Works a charm. Also, if you have some thick wall tubing about 1.5" diameter or larger and have means to curl it into donut, a Steel donut will make a great stump, or there is a product called a Tuck Puck out there, made of Delrin, that the guy selling it has several versions of how to mount/use, etc... He sells The Puck and Mallets with interchangeable faces and all are relatively affordable in and of themselves...http://www.tuckpuck.com He also has several videos on the web to see how it works..
I have found them completely missing more than once. - PILEDRIVER
Some pics of My Powder Coating work
http://s244.photobucket.com/albums/gg6/terrellster/
My Facebook Page for Powder Coating
http://www.facebook.com/profile.php?id=100001788886297
Some pics of My Powder Coating work
http://s244.photobucket.com/albums/gg6/terrellster/
My Facebook Page for Powder Coating
http://www.facebook.com/profile.php?id=100001788886297
-
Ol'fogasaurus
- Posts: 17881
- Joined: Mon Nov 13, 2006 10:17 pm
Re: Tucking metal on the edge/Wheel well test piece
Bob, Scott, KB you guys are doing a great job on spreading information on this and I appreciate it not only for myself but others too.
My knowledge of hand forming metal is very old and somewhat limited: add to that I did not keep up with the actual bending/forming of metal that much. Design of parts made from forming metal other than drawing up what you want and following the dictated rules and specs is one thing but "getting your hands dirty" is another
 . Keep it up... good string!
Lee
My knowledge of hand forming metal is very old and somewhat limited: add to that I did not keep up with the actual bending/forming of metal that much. Design of parts made from forming metal other than drawing up what you want and following the dictated rules and specs is one thing but "getting your hands dirty" is another
Lee
-
theKbStockpiler
- Posts: 600
- Joined: Sun Jul 15, 2012 10:25 am
Re: Tucking metal on the edge/Wheel well test piece
If I don't convince myself that I'm a body panel working martyr, I could not stand to go on with this. I'm suffering for the good of others.
At this point I'm a antagonist of tuck shrinking. I have tried every recommendation and it almost always just gets pushed back out. Spending hours trying every method out will do this to you. Whether if the hammer is off by a few degrees makes a go or not go difference , I can't tell. Trying to trap it was fruitless as well. Something I notice in the utube vids is when the metal is hit with the hammer it does not sound a lot like it when I do it. The tonality is totally different.
Inspired by scottrods ; and sick and tired of effing around , I made a shaping/shrinking stump. I had a suitable piece of timber and lots of power tools so I went for it. I thought that if I could spin a circular saw in place ,I could do a succession of depths until a suitable bowl was cut out. I do not recommend anyone try this and it did not work that good anyways. As a chain saw was actually safer, I went with that next. I roughed it out with a chain saw and then finished it with a slotted/diamond metal cut off blade in a grinder using multiple techniques. For doing it by hand ,it turned out decent.

So I tried it out just for a jig while hammering out a tuck and it actually showed evidence that it worked. I moderately pressed the piece into the curve with out having the tuck bottom out so it was hammer off tucking sort of speak. The tuck resisted pushing out at every impact and got lumpy on the way down. The sad fact is that just using something with a hole big enough to stick the piece into or using scottsrods recommendation of using two pieces of wood clamped to a table should work as well. I tried the wood idea but abandoned it too soon before.Thank you to scottrods for being the muse for the stump. The best thing in my opinion about the stump is that it's heavy. The stump does not seem any better than other methods to cause metal to bulk up but it is faster if you can just hammer the bulge down instead of purposely creating a tuck/bulge. I don't think I will be able to shrink a flange down without turning it into a curve first but I'll do a test on that next with the stump. In my experience so for the stump is really only better for shrinking a tuck and staying in one place easily.
At this point I'm a antagonist of tuck shrinking. I have tried every recommendation and it almost always just gets pushed back out. Spending hours trying every method out will do this to you. Whether if the hammer is off by a few degrees makes a go or not go difference , I can't tell. Trying to trap it was fruitless as well. Something I notice in the utube vids is when the metal is hit with the hammer it does not sound a lot like it when I do it. The tonality is totally different.
Inspired by scottrods ; and sick and tired of effing around , I made a shaping/shrinking stump. I had a suitable piece of timber and lots of power tools so I went for it. I thought that if I could spin a circular saw in place ,I could do a succession of depths until a suitable bowl was cut out. I do not recommend anyone try this and it did not work that good anyways. As a chain saw was actually safer
So I tried it out just for a jig while hammering out a tuck and it actually showed evidence that it worked.
Super beetle with attitude
-
Ol'fogasaurus
- Posts: 17881
- Joined: Mon Nov 13, 2006 10:17 pm
Re: Tucking metal on the edge/Wheel well test piece
You can use the stump for a comfortable chair now and it even has a capture tank if you get too tired to get up and …  .
.
Question: are you whacking the pudding out of the flat stock to form it or using lighter blows around in a pattern to form the material? I have seen it done both ways but usually the gentle technique works better. The idea of working from the center out is what I have seen done... in most cases.
Remember you are stretching metal and the heat and cool water is for shrinking but not sure just how much.
https://www.bing.com/search?q=heating%2 ... 50745eed35
I did a quick (https://www.bing.com/search?q=heating%2 ... 50745eed35) search on heating and shrinking metal and came up with some ideas.
https://www.metalsupermarkets.com/how-h ... roperties/
This came up as part of the last URL and I thought was interesting. I knew that there was some electrical changes and this verified some of what I remembered hearing. There is more to this... I think but it is a good start to understanding things.
Lee
-
theKbStockpiler
- Posts: 600
- Joined: Sun Jul 15, 2012 10:25 am
Re: Tucking metal on the edge/Wheel well test piece
Quote
Question: are you whacking the pudding out of the flat stock to form it or using lighter blows around in a pattern to form the material? I have seen it done both ways but usually the gentle technique works better. The idea of working from the center out is what I have seen done... in most cases.
Hit hard enough to bend it without stretching a bulge in it. Hammer off hammering will stretch an area if you do it too hard. If the blow does not exceed the metals elastic limit , the force does not accumulate and produce a bend if you do it enough times. It's like hitting a spring. I think the 'center out' is for shrinking a bulge down away from the edge. As far as marking goes I mark the the path I want and do the rest by imagination. I'm not replicating a factory part at this point so it's not critical.
Super beetle with attitude
-
Ol'fogasaurus
- Posts: 17881
- Joined: Mon Nov 13, 2006 10:17 pm
Re: Tucking metal on the edge/Wheel well test piece
The elasticity of the material is what I was driving at: If you over do it then you can have more of a problem when you try to get the dents out. The working of the center out while covering the whole piece of material at the same time is also part of it. Believe me it is hard to stay on pattern when you focus on the small vs. the overall.
Not any where near an expert but I hve done enough to know a lot, but not all, of the pitfalls.
Lee
Not any where near an expert but I hve done enough to know a lot, but not all, of the pitfalls.
Lee
-
theKbStockpiler
- Posts: 600
- Joined: Sun Jul 15, 2012 10:25 am
Re: Tucking metal on the edge/Wheel well test piece
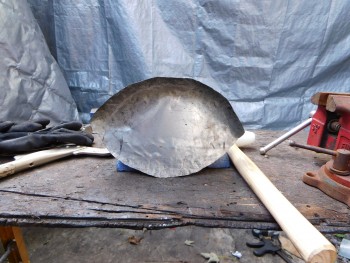
I had the need to shrink a tuck that could only be done a on simple flat surface so I gave it another shot. As I felt that I wasted a lot of time trying methods that were not very effective I decided to include all of the elements that HAD to exist for it to be successful whether or not it was recommended. Well it worked and now I can get tucks shrunk down and it's repeatable. Here’s how I’m doing it.
If the sides of a tuck are straight up and down and are too tall they are going to be very prone to buckle and not flatten out well. If the sides are lower than a 45 degree angle it is gong to be difficult to force them down and have any shrinking effect. The sides will mostly flatten out. Getting the sides at more than a 45 degree angle might even produce more stretch. This method will use something around a 45 decree angle of the sides mostly because that’s what I end up with with my home made tucker.
With my tucker the tuck that it puts in needs to be refined. I did this one ;see picture 1 ,extra big to try to get the maximum amount shrunk so it is easier to see the difference. The first refinement I made was to make the tuck ‘tighter’ (picture 2) by hammering the bottom of the sides in and down at the same time.. This in turn makes the tuck narrower but the sides steeper. I push them in until I can tell it’s creating tension and stop so the metal is not stretched even more. I used the chisel like end of a body hammer to do this. It has a blunt dull edge. Anything that can get in close can be used. This can be done pretty well with a rounded end hammer but I like to use the mentioned hammer.
Picture 1
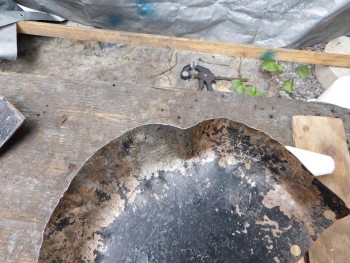
PIcuture 2
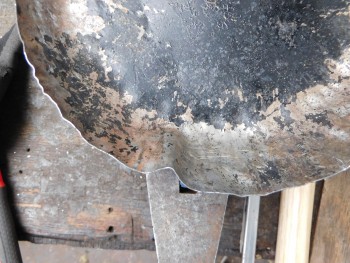
In this picture the sides of the 'V' are hammered in closer to each other to help close the end of the tuck
The last refinement was to hammer the top front corner down. The tuck is now ready to be forced down. I don’t think that this refinement actually ‘locks’ any thing but it helps maintain the sides at an angle in my opinion. Locking the tuck does help so I’m not going to experiment with it in the near future. Maybe there is a best way to do this. I don’t know.
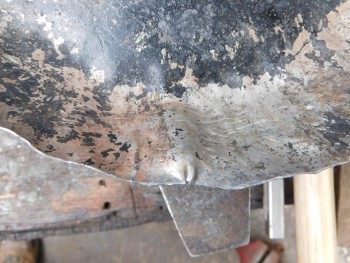
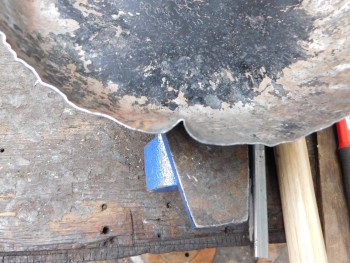
So we would like to put force on the angled sides as much as possible. If we were to hammer straight down they would not be compressed and would only just straighten out. That means we have to hammer down with as much as a angle with the sides as we can. The perfect point to hit is the very top of the crest of the tuck or the lump as it will later turn into. We want to have the direction of the hammer as little as possible towards the flat surface that is possible but in line with the sides. As the sides get distorted and the tuck turns in to basically a lump ,we continue to hit it at the sides with the same angle. When the tuck gets quite low then it can just be worked down from the inside toward the outside edge by working at the far end then each of the sides and progressing to the outside edge. As you work lastly from the the inside out you SHOULD notice that as your move along that the lump is disappearing blow by blow in stead of just vanishing on the first couple of hits as would happen if the tuck is not shrinking and is just getting pushed down.
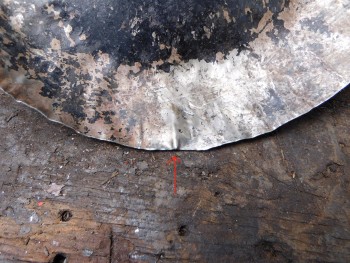
So first the sides are hammered at as close to a sides ways motion as is possible (the crest) until it can’t be done any more. Than lastly the remaining lump is worked flat from the inside to the outside. I like the plastic hammer a lot and it does not mar as much but I have a small ball-peen hammer that is easier to pin point the hit so I have been using that.
I'm sure some of this can be varied ,but this is the process that worked for me..
If the sides of a tuck are straight up and down and are too tall they are going to be very prone to buckle and not flatten out well. If the sides are lower than a 45 degree angle it is gong to be difficult to force them down and have any shrinking effect. The sides will mostly flatten out. Getting the sides at more than a 45 degree angle might even produce more stretch. This method will use something around a 45 decree angle of the sides mostly because that’s what I end up with with my home made tucker.
With my tucker the tuck that it puts in needs to be refined. I did this one ;see picture 1 ,extra big to try to get the maximum amount shrunk so it is easier to see the difference. The first refinement I made was to make the tuck ‘tighter’ (picture 2) by hammering the bottom of the sides in and down at the same time.. This in turn makes the tuck narrower but the sides steeper. I push them in until I can tell it’s creating tension and stop so the metal is not stretched even more. I used the chisel like end of a body hammer to do this. It has a blunt dull edge. Anything that can get in close can be used. This can be done pretty well with a rounded end hammer but I like to use the mentioned hammer.
Picture 1
PIcuture 2
In this picture the sides of the 'V' are hammered in closer to each other to help close the end of the tuck
The last refinement was to hammer the top front corner down. The tuck is now ready to be forced down. I don’t think that this refinement actually ‘locks’ any thing but it helps maintain the sides at an angle in my opinion. Locking the tuck does help so I’m not going to experiment with it in the near future. Maybe there is a best way to do this. I don’t know.
So we would like to put force on the angled sides as much as possible. If we were to hammer straight down they would not be compressed and would only just straighten out. That means we have to hammer down with as much as a angle with the sides as we can. The perfect point to hit is the very top of the crest of the tuck or the lump as it will later turn into. We want to have the direction of the hammer as little as possible towards the flat surface that is possible but in line with the sides. As the sides get distorted and the tuck turns in to basically a lump ,we continue to hit it at the sides with the same angle. When the tuck gets quite low then it can just be worked down from the inside toward the outside edge by working at the far end then each of the sides and progressing to the outside edge. As you work lastly from the the inside out you SHOULD notice that as your move along that the lump is disappearing blow by blow in stead of just vanishing on the first couple of hits as would happen if the tuck is not shrinking and is just getting pushed down.
So first the sides are hammered at as close to a sides ways motion as is possible (the crest) until it can’t be done any more. Than lastly the remaining lump is worked flat from the inside to the outside. I like the plastic hammer a lot and it does not mar as much but I have a small ball-peen hammer that is easier to pin point the hit so I have been using that.
I'm sure some of this can be varied ,but this is the process that worked for me..
Last edited by theKbStockpiler on Tue Sep 24, 2019 7:50 pm, edited 1 time in total.
Super beetle with attitude
-
Bad Bob
- Posts: 112
- Joined: Wed Nov 12, 2014 10:47 pm
Shrinking on the stump.
Here’s my stump. I used a plane to get it flat, but a belt sander or sanding disk will work. I cut a 4” bowl and a wedge shape in the top.
You do not have the required permissions to view the files attached to this post.
-
Bad Bob
- Posts: 112
- Joined: Wed Nov 12, 2014 10:47 pm
Re: Tucking metal on the edge/Wheel well test piece
Here’s another way to make tucks.
Place the spot where you want your tuck over a hollow spot (in this case, the wedge) and give it a wack.
You can use the edge to narrow the tuck. You want to make the sides of the tuck as vertical as possible, but without them folding over when the tuck is crushed. Remember to lift up on the panel as you crush the tuck.
If you are working over a soft surface like a stump, a metal hammer works well for shrinking.
You do not have the required permissions to view the files attached to this post.
-
theKbStockpiler
- Posts: 600
- Joined: Sun Jul 15, 2012 10:25 am
Re: Tucking metal on the edge/Wheel well test piece
I was going to ask why you didn't just re-cut the log but that would take a pretty big saw.
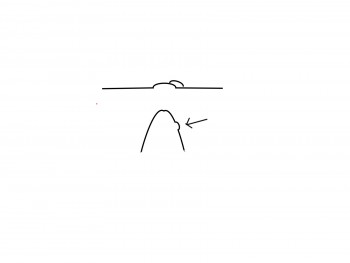
Here's a quick drawing of the E wheel thing I was talking about. If you roll the would be fender in the center it starts to make a shape like a fender for you. It gets curved both ways at the top but now it you roll the sides it bends the sides down but also makes the other curve that a EW makes. The EW always makes a complete sphere shape as far as I know.
https://thumbs2.imagebam.com/8d/10/a0/7 ... 377294.jpg
Super beetle with attitude
-
Bad Bob
- Posts: 112
- Joined: Wed Nov 12, 2014 10:47 pm
Re: Tucking metal on the edge/Wheel well test piece
An English Wheel will always stretch a panel in both directions unless a soft top wheel or a rubber band is used over the top wheel. If you can see “bent lines” where wheel is tracking, you’re using too much pressure. Just like using a hammer, the pressure should be applied moderately and close together.
-
theKbStockpiler
- Posts: 600
- Joined: Sun Jul 15, 2012 10:25 am
Re: Tucking metal on the edge/Wheel well test piece
Thank you for the clarification on that! There's more videos on that subject now than the last time I searched so I'll get acquainted with those before I post another question on them.I'm exposed to more shapes and transitioning to different shapes than before. I should have my real patch piece started soon! I have a old XJ Cherokee and I want a few more years out of it plus gain experience tor apply to a beetl e that needs a lot of sheet metal work. The Cherokee needs the rear wheel housings replaced/patched. I'm going to make the patches as big as practical and weld them in one by one.
Super beetle with attitude