Page 3 of 15
Re: FI Build-up - German Plenum/TB & MS-1
Posted: Thu Dec 31, 2009 5:11 am
by Vee Dub Nut
Panel, thanks for the suggestion. I may looking into finding one of those.
Re: FI Build-up - German Plenum/TB & MS-1
Posted: Thu Dec 31, 2009 7:27 pm
by ToRy 70
Vee Dub Nut wrote:miniman82 wrote:Good luck reading that guage when the engine's in the car.

Thats why I put mine on a AN line coming off the regulator, so I can position it where it's easy to see when setting base fuel pressure.
you may be right about that... I'll find out for sure when I get the engine in the car I guess.
Don't worry, you can see it from there no problem as long as the decklid's open. You only need it for initial setup anyway, as long as your pump and regulator are in good working order. I was going to remove mine after setup, but it wasn't in the way and it didn't leak, so I left it in. It also serves as a good diagnostic tool when your fuel system isn't doing its job properly.
Re: FI Build-up - German Plenum/TB & MS-1
Posted: Fri Jan 01, 2010 6:48 pm
by Vee Dub Nut
Love having days off of work... since I actually had a good bit of uninterrupted time, I made a lot of headway with a couple of the big tickets tasks left to do.
My number one job today was getting the new supply line run from the front to the back of the car. I went back and forth on how I was going to run it, and on where I wanted to terminate it. I really wanted to run it through the tunnel like the factory line, but couldn't come up with any good way to run it through with the car assembled. I know there are folks that have replaced the factory line without the car apart, but adding another line was bringing up too many challenges. I didn't want to just run it through the tunnel with out being able to fasten it down securely, and I couldn't come up with a good way to do that. So after much debating on where else to run it, I settled on running it along the outside edge of the drivers side pan. This let me get it up and out of the way, and also let me get my supply and return lines close together at the back of the car.
I ran it in the channel where the body is bolted down. I only had a few line clips in my stash, so I'll be adding a few more clips to the line when I get some more. That should get it pulled up next to the channel all the way down the line (its still a little wavy looking from unrolling the tubing)


I popped out of the channel in the front fender well which left the line terminating right at where I mounted the new fuel pump


In the back I just rounded the corner of the pan and terminated it with my AN fitting. I'll be running from here up to my fuel rail with stainless braided line.

Got my cross over hose made up as well. I wanted to run stainless braided line with AN fittings for as much as the high pressure system as I could. The kit came with rubber fuel injection rated lines and clamps, but I wanted to take it a step further with the AN fittings. The only place I've used the rubber lines is the jumper between the pump and supply line, and the jumper to the fuel pressure regulator

I used some existing threaded holes on the puma shroud to mount up my fuel pressure regulator. I fabbed a little bracket out of some aluminum plate. Should make it easy to adjust fuel pressure with easy access to the gauge and regulator.


My return from the the regulator crosses back over through some stainless tubing to the other side of the engine compartment and terminates near the supply side on the opposite rail. That way both supply and return lines are in one spot for easy maintenance or engine removal.

Anyways.. making some progress. Engine is just about ready to be put back in the car. All that's really left is wiring wiring wiring..
Re: FI Build-up - German Plenum/TB & MS-1
Posted: Fri Jan 01, 2010 9:38 pm
by MarioVelotta
Nice work! Looks like any future service work will be cake. The AN parts are a nice little upgrade too

Re: FI Build-up - German Plenum/TB & MS-1
Posted: Sat Jan 02, 2010 7:49 am
by Vee Dub Nut
MarioVelotta wrote:Nice work! Looks like any future service work will be cake. The AN parts are a nice little upgrade too
Yea.. thats one of the number one priorities when I'm building. There are some things that I could do to unclutter the engine compartment, but I've been down that road before, and the first time you have to work on the engine you find out just how difficult you made everything for yourself.
Re: FI Build-up - German Plenum/TB & MS-1
Posted: Fri Jan 08, 2010 4:05 am
by JSL56
Absolutely loving this build dude! VERY nice!!
I would like to do something similar! Im slowly gathering parts!

Would like it ready for this year too is possible

Can I as a few questions...
1) Your trigger wheel, how did you get that centered on you crank pully? How did you get it lined up to know you were drilling the mounting holes in the right place?
2) The crank trigger - Can that be mounted anywhere? Ive seen them mounted at both 12 o'clock position and 3 o'clock position. Can they be mounted at any position?
3) If the answer to question 2 is YES - How does the MS system know where it is mounted? Does it work this out itself? Maybe you set the system with the crank is at TDC and then it figures this out itself?
4) What size trigger wheel did you use?
Seriously looking forward to the next update!!

Cheers,
J
Re: FI Build-up - German Plenum/TB & MS-1
Posted: Fri Jan 08, 2010 6:49 am
by Vee Dub Nut
JSL56 wrote:Absolutely loving this build dude! VERY nice!!
I would like to do something similar! Im slowly gathering parts!
Would like it ready for this year too is possible
Can I as a few questions...
1) Your trigger wheel, how did you get that centered on you crank pully? How did you get it lined up to know you were drilling the mounting holes in the right place?
I have access to a milling machine and hole indexer. The most important thing is that the pulley is centered. I did this by using a dial indicator that was chucked up in the mill and running it around the outer diameter of the pulley and making adjustments so that the dial indicator would no longer move on the dial. What this did is centered the pulley in respect to the mill head. When this was done, all I had to do is zero out the mill and then adjust the x or y plane until I had the desired radius on the hole spacing. Then with the indexer I just rolled it around every 37 degrees to get a five hole pattern.
Now this can be done by hand as long as you take LOTS of time to measure everything up real well before hand. The quality of the job will be directly proportional to how much time you spend measuring and marking the pulley correctly.
2) The crank trigger - Can that be mounted anywhere? Ive seen them mounted at both 12 o'clock position and 3 o'clock position. Can they be mounted at any position?
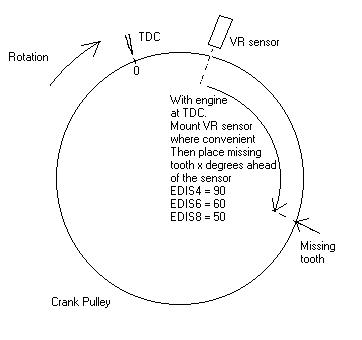
The VR sensor can be mounted anywhere its convenient. See the rest of the answer below.
3) If the answer to question 2 is YES - How does the MS system know where it is mounted? Does it work this out itself? Maybe you set the system with the crank is at TDC and then it figures this out itself?
The 36-1 wheel is the key. All you need to do is make sure that the missing tooth is leading the sensor by 90 degrees (for a four cylinder). The missing tooth is what the MS and EDIS module sees and knows that you have passed top dead center.
4) What size trigger wheel did you use?
I used the factory trigger wheel off of the EDIS donor car
Seriously looking forward to the next update!!
Cheers,
J
I put my answers in bold. Thanks for the props!
Re: FI Build-up - German Plenum/TB & MS-1
Posted: Fri Jan 08, 2010 4:49 pm
by klatin
JSL56 wrote:Absolutely loving this build dude! VERY nice!!
I would like to do something similar! Im slowly gathering parts!
Would like it ready for this year too is possible
Can I as a few questions...
1) Your trigger wheel, how did you get that centered on you crank pully? How did you get it lined up to know you were drilling the mounting holes in the right place?
2) The crank trigger - Can that be mounted anywhere? Ive seen them mounted at both 12 o'clock position and 3 o'clock position. Can they be mounted at any position?
3) If the answer to question 2 is YES - How does the MS system know where it is mounted? Does it work this out itself? Maybe you set the system with the crank is at TDC and then it figures this out itself?
4) What size trigger wheel did you use?
Seriously looking forward to the next update!!
Cheers,
J
With regards to trigger wheel and sensor, I use a slightly different setup on a Type 1.
But it should also work well with EDIS and/or Megasquirt.
I got some pics in this thread:
http://www.shoptalkforums.com/viewtopic ... 2&start=30
German Plenum/TB & MS-1 : Good "pictorial"
Posted: Sun Jan 10, 2010 10:01 am
by Redline Weber
First, this is a great "pictorial" of a how to fuel injection conversion.
These are some observations:
1. The Rochester electronic fuel injectors have the poorest spray pattern of all the ones available to choose.
2. The 36-1 target is fitted to the outside of the pulley.
We fit our 36-1 behind the pulley.
The benefit is "safety" if the belt is thrown and a more solid mount for the crank sensor.
3. The cost of a brass/steel "freeze plug" is much lower than the quality billet distributor plug pictured.
As for the question of "missing tooth location", the slot should be ahead of the crank position sensor by six (6) teeth at TDC.
Lance
Re: FI Build-up - German Plenum/TB & MS-1
Posted: Sun Jan 10, 2010 10:32 am
by WickedWagens
Redline Weber wrote:
As for the question of "missing tooth location", the slot should be ahead of the crank position sensor by six (6) teeth at TDC.
Lance
Actually,
The 36-1 wheel is the key. All you need to do is make sure that the missing tooth is leading the sensor by 90 degrees (for a four cylinder). The missing tooth is what the MS and EDIS module sees and knows that you have passed top dead center.
90 deg would be 9 teeth.
Re: German Plenum/TB & MS-1 : Good "pictorial"
Posted: Sun Jan 10, 2010 12:22 pm
by Vee Dub Nut
Redline Weber wrote:First, this is a great "pictorial" of a how to fuel injection conversion.
Thanks. I hope it will be helpful for others.
Redline Weber wrote:
These are some observations:
1. The Rochester electronic fuel injectors have the poorest spray pattern of all the ones available to choose.
They were included in the kit. I'll reserve judgment until I actually try and use them.
Redline Weber wrote:
2. The 36-1 target is fitted to the outside of the pulley.
We fit our 36-1 behind the pulley.
The benefit is "safety" if the belt is thrown and a more solid mount for the crank sensor.
I've seen folks mount it that way, but fittament was too tight for me since I was trying to use the factory Ford wheel. (plus I'm a techie kind of guy and and engineer to boot, so I like functional look of everything on display
)
I'm not worried about the belt issue, although I know a lot of people have that same opinion. I personally have NEVER thrown a belt on these cars, and although you statement is true, I just decided to take my chances since that's where I wanted to mount everything.
Redline Weber wrote:
3. The cost of a brass/steel "freeze plug" is much lower than the quality billet distributor plug pictured.
Also considered that (in fact that was my first plan), but I wanted something a little prettier and more easily removable/reusable. Plus, I didn't pay anything for my aluminum plug, I turned it myself.
Redline Weber wrote:
As for the question of "missing tooth location", the slot should be ahead of the crank position sensor by six (6) teeth at TDC.
Lance
Not for EDIS:
Thanks for the comments sir!
Re: FI Build-up - German Plenum/TB & MS-1
Posted: Sun Jan 10, 2010 6:21 pm
by Vee Dub Nut
Made some more progress:
Engine is back in the car


Got the right hand rail back in. I can still see the gauge fine.

Some basic construction done on my ECM and relay board mount. I'm going to test fit everything, and then I'll be covering it in black vinyl.


It will be located behind the rear seat.

Also got my gauge panel done. Everything is mounted and the wiring is run to the back.

Here is the wiring mocked up in the engine compartment. Ignore the yellow zip ties, I was using them for mock up. Once I get everything located where I want, I'll replace them with black ones.

Making good progress, but the inside of the car looks like it threw up a bunch of wires.


And the wifey caught an action shot

Re: FI Build-up - German Plenum/TB & MS-1
Posted: Sun Jan 10, 2010 7:16 pm
by miniman82
Only a matter of time till it's turbo...
MUHAHAHAHAHA!!!

Re: FI Build-up - German Plenum/TB & MS-1
Posted: Sun Jan 10, 2010 7:35 pm
by CLKWRK
very clean install
Re: FI Build-up - German Plenum/TB & MS-1
Posted: Sun Jan 10, 2010 7:38 pm
by Vee Dub Nut
miniman82 wrote:Only a matter of time till it's turbo...
MUHAHAHAHAHA!!!