Safari Turbo/Megasquirt Fuel Injection Project
-
turbobaja

- Posts: 2826
- Joined: Fri Sep 14, 2007 4:56 pm
Re: Safari Turbo Project
Hey Art, thanks for the express hooch delivery!! I almost stepped on it heading out the door yesterday on our way to a holiday/parade party, so I figured I'd bring it along and share some of it with friends. Very tasty and definitely packing some power  . We downed about 1/4 of the bottle so I'm saving the rest of it for us at home through the holidays. It'll be great for filling the flask up on snowboarding trips too
  .
.
Karl
DON'T QUIT
DON'T QUIT
-
Clonebug
- Posts: 4745
- Joined: Thu Feb 15, 2007 9:28 pm
Re: Safari Turbo Project
Update,
My parts showed up from CB Performance so I went out in the cold cold garage and proceeded to pull the body off my buggy.
If I really hurry I can have the body ready to pull in an hour of work.
Pulled the hood
Pulled the tank
Unhooked the brake wires
Unhooked the Steering shaft

Removed the Ms-1 and LM-1 wires
Pulled the eight wires that go to the engine from the terminal block after removing my speaker for more room to the wires.

The above are the only wires that need to be unhooked to remove the body except for the license plate light wires in back. Everything else is on the buggy body and stays on when the body is removed.
Removed one seat to clear the body when raising it up.

Removed the body mount bolts and unplugged the MAP line from the engine that is run along the body to the Boost Gauge and the Map sensor.
Got my neighbor and his Son to help me lift off the body and now I am ready to pull the engine parts to replace the intake boot.

We will see if the wife will let me out there tomorrow since I have the day off. If I can get tout there I might be able to get the intake boost replaced.
I also have to replace a swing axle boot that is ripped so that will take a bit.
I haven't decided if I want to do some rewiring in the back yet. I might have to leave that for a later project.
I also need to pull the engine out to check the flywheel seal but that might have to wait too.
Clonebug
My parts showed up from CB Performance so I went out in the cold cold garage and proceeded to pull the body off my buggy.
If I really hurry I can have the body ready to pull in an hour of work.
Pulled the hood
Pulled the tank
Unhooked the brake wires
Unhooked the Steering shaft
Removed the Ms-1 and LM-1 wires
Pulled the eight wires that go to the engine from the terminal block after removing my speaker for more room to the wires.
The above are the only wires that need to be unhooked to remove the body except for the license plate light wires in back. Everything else is on the buggy body and stays on when the body is removed.
Removed one seat to clear the body when raising it up.
Removed the body mount bolts and unplugged the MAP line from the engine that is run along the body to the Boost Gauge and the Map sensor.
Got my neighbor and his Son to help me lift off the body and now I am ready to pull the engine parts to replace the intake boot.
We will see if the wife will let me out there tomorrow since I have the day off. If I can get tout there I might be able to get the intake boost replaced.
I also have to replace a swing axle boot that is ripped so that will take a bit.
I haven't decided if I want to do some rewiring in the back yet. I might have to leave that for a later project.
I also need to pull the engine out to check the flywheel seal but that might have to wait too.
Clonebug
-
Clonebug
- Posts: 4745
- Joined: Thu Feb 15, 2007 9:28 pm
Re: Safari Turbo Project
Update,
I was able to get into the garage this afternoon and pull the cooling shroud and alternator off in order to get at the intake boots.
It was interesting to say the least.
Here is what I found.

No wonder it was running like crap!!
Both boots are blown out. I am now wondering if these boots are worse and lower quality than the original black boots.
I am thinking that they can't handle the pressure.
What is everyone else running that could replace these??
I had ordered new ones from CB Performance but now I am having second thoughts and I should find something heavier duty than these.
It is quite the pain in the ass to replace these things so if there is something better out there I would be willing to wait and reorder a better product if someone can point me to them.
Clonebug
I was able to get into the garage this afternoon and pull the cooling shroud and alternator off in order to get at the intake boots.
It was interesting to say the least.
Here is what I found.
No wonder it was running like crap!!
Both boots are blown out. I am now wondering if these boots are worse and lower quality than the original black boots.
I am thinking that they can't handle the pressure.
What is everyone else running that could replace these??
I had ordered new ones from CB Performance but now I am having second thoughts and I should find something heavier duty than these.
It is quite the pain in the ass to replace these things so if there is something better out there I would be willing to wait and reorder a better product if someone can point me to them.
Clonebug
-
CobraJet
- Posts: 430
- Joined: Sun Oct 31, 2010 11:12 pm
Re: Safari Turbo Project
What are the sizes of the two different tubings these boots clamp to? Outside diameter?
-
miniman82
- Posts: 3944
- Joined: Sun Apr 27, 2008 3:36 pm
Re: Safari Turbo Project
Just get a section of 1 5/8" rubber hose, that's what I use. The intake is smaller than that though, so you'll have to get the clamps tight.

-
Clonebug
- Posts: 4745
- Joined: Thu Feb 15, 2007 9:28 pm
Re: Safari Turbo Project
Intake end pieces are close enough to 1 5/8 inches and the cross piece is close to 1 3/8 inches.CobraJet wrote:What are the sizes of the two different tubings these boots clamp to? Outside diameter?
I might look in the local FLAPS and see if I can find some hose that will work.
Clonebug
-
vdubinluvin
- Posts: 60
- Joined: Tue Apr 24, 2007 10:21 am
Re: Safari Turbo Project
Go to dougsbnb.com they have 5ply silcone replacments that are lifetime boots! There in the store.Clonebug wrote:Update,
I was able to get into the garage this afternoon and pull the cooling shroud and alternator off in order to get at the intake boots.
It was interesting to say the least.
Here is what I found.
No wonder it was running like crap!!
Both boots are blown out. I am now wondering if these boots are worse and lower quality than the original black boots.
I am thinking that they can't handle the pressure.
What is everyone else running that could replace these??
I had ordered new ones from CB Performance but now I am having second thoughts and I should find something heavier duty than these.
It is quite the pain in the ass to replace these things so if there is something better out there I would be willing to wait and reorder a better product if someone can point me to them.
Clonebug
-
CobraJet
- Posts: 430
- Joined: Sun Oct 31, 2010 11:12 pm
Re: Safari Turbo Project
The reason I asked is I'm a retired Plumber and I see something that reminds me of these boots, only better. The 1st thing that came to my mind when I saw this was a Fernco Coupler used to transition different sized pipes. They have a neoprene insert and a stainless steel band wrapped around and encasing it with two stainless hose clamps to hold it all in place.Clonebug wrote:Intake end pieces are close enough to 1 5/8 inches and the cross piece is close to 1 3/8 inches.CobraJet wrote:What are the sizes of the two different tubings these boots clamp to? Outside diameter?
I might look in the local FLAPS and see if I can find some hose that will work.
Clonebug
I know that the Fernco specs say that they're only good for so many PSI but I have personally tested these with head pressure from a 4 story building under construction with all 4 stories of the plumbing drainage system stack filled with water. That works out to 4 X 13 ft. X (.43 PSI/ft.) = ~22.36 PSI
I have something like this that holds the intake manifold on my Harley and it's been doing well for many years. I cant remember what brand those clamps are. I'm sure that someone here has seen these and knows what brand they are in automotive/motorcycle parts.
You can find these at the local Home Depot.
This is just to show what they look like.
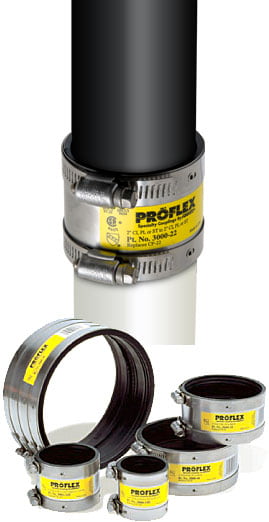
3003-150 1-1/2" Copper to 1-1/2" Copper or 1-1/4" PL. K-150
-
Clonebug
- Posts: 4745
- Joined: Thu Feb 15, 2007 9:28 pm
Re: Safari Turbo Project
Thanks Cobra,
I might have to go to the local Plumbing store and check that out!!! I don't know if they would be fuel resistant but it might be worth a try.
I really like the Silicon ones too and at $39.95 they are probably worth it. That will be my second choice since I am headed to the unemployment line in the next week or so.
Thanks everyone for the tips. I will find something today I hope.
Clonebug
-
durfeec

- Posts: 37
- Joined: Wed Dec 07, 2011 11:21 pm
Re: Safari Turbo Project
i believe the black intake boots are better than those anyways. id personally try the black ones. like you said, all the things mentioned above may work but are they gas resistant?
1981 Brazilian 14 Window
-
Clonebug
- Posts: 4745
- Joined: Thu Feb 15, 2007 9:28 pm
Re: Safari Turbo Project
The only problem I had with the black ones is they seemed to leak too.
I had one that had a little oil spilled on it I had replaced with the red ones earlier this summer.
I was getting a funny rough surge at 2000 to 2500 rpm in third gear. That is my cruising gear and speed on city streets that are 35 mph.
It was annoying as heck when it would do that and I couldn't tune it out.
When I replaced the intake seals....it went away. I couldn't really find any actual holes in them but they seemed to be leaking.
That is why I went to the red silicon ones but they did seem to be a lot softer.
I will look around a bit... it is colder than crap around here right now and I find it hard to get in the buggy to test drive it anyways......
Clonebug
-
Clonebug
- Posts: 4745
- Joined: Thu Feb 15, 2007 9:28 pm
Re: Safari Turbo Project
I went to the local plumber and checked out their fernco supply but they didn't have anything that would fit really tight.
For the money and peace of mind I just went ahead and ordered the 5 layered silicon ones that vdubin pointed me to.
Thanks
Clonebug
For the money and peace of mind I just went ahead and ordered the 5 layered silicon ones that vdubin pointed me to.
Thanks
Clonebug
-
Clonebug
- Posts: 4745
- Joined: Thu Feb 15, 2007 9:28 pm
Re: Safari Turbo Project
Update,
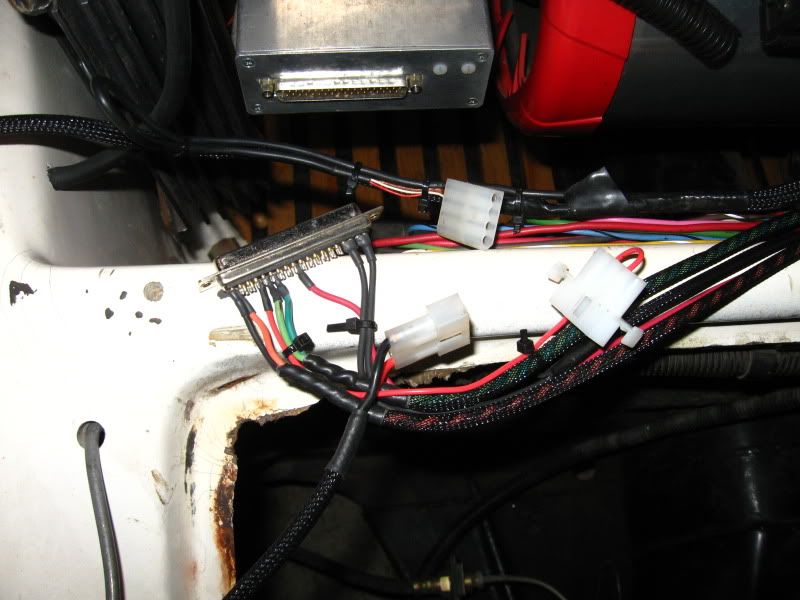
I am waiting for some parts to show up so I thought I would do a little updating on my 7 year old wiring harness.
When I originally did the wiring all I had was 14 gauge wire and for most of the electrical load it is a bit of overkill.
I needed to up the size of my main ground wire to the back of the buggy so in order to accommodate a bigger wire I had to downsize the harness to be able to fit them in the same size sleeve.
I have 8 wires running from a terminal strip to the back of the buggy only for the engine. All I have to do is pop the 8 screws out of one side of the terminal and my wiring is disconnected and I can pull the body. There are a couple wires I have to unplug for the brake light switches on the master cylinder and the license light in the back. The rest all stay on the body.
I did add a separate harness on top of the original for the MS1 computer but that is easy to unplug too.
I pulled the old harness completely out and stripped the covering off and proceeded to build a new harness out of new wiring.
Main power = 10 ga. Red
Alt charge light = 16 ga. yellow
Coil power = 12 ga. white
Starter Solenoid = 16 ga. Blue
Oil light = 18 ga. Red
Tach signal = 18 ga. Green
Oil Pressure Gauge = 16 ga. Orange
Main Ground = 10 ga. Black
Here I am shaping it to the terminal strip and taping it all together. If I could find that cool wire covering that Mario uses I would love to use it but no one carries it in my area.


Excuse the mess..... I need a bigger work area.
I should have this finished tomorrow night and then I might pull the engine to check the clutch and the main seal.
I might as well put a clutch in it while I am at it if I can find one that will play well with my turbo.
Clonebug
I am waiting for some parts to show up so I thought I would do a little updating on my 7 year old wiring harness.
When I originally did the wiring all I had was 14 gauge wire and for most of the electrical load it is a bit of overkill.
I needed to up the size of my main ground wire to the back of the buggy so in order to accommodate a bigger wire I had to downsize the harness to be able to fit them in the same size sleeve.
I have 8 wires running from a terminal strip to the back of the buggy only for the engine. All I have to do is pop the 8 screws out of one side of the terminal and my wiring is disconnected and I can pull the body. There are a couple wires I have to unplug for the brake light switches on the master cylinder and the license light in the back. The rest all stay on the body.
I did add a separate harness on top of the original for the MS1 computer but that is easy to unplug too.
I pulled the old harness completely out and stripped the covering off and proceeded to build a new harness out of new wiring.
Main power = 10 ga. Red
Alt charge light = 16 ga. yellow
Coil power = 12 ga. white
Starter Solenoid = 16 ga. Blue
Oil light = 18 ga. Red
Tach signal = 18 ga. Green
Oil Pressure Gauge = 16 ga. Orange
Main Ground = 10 ga. Black
Here I am shaping it to the terminal strip and taping it all together. If I could find that cool wire covering that Mario uses I would love to use it but no one carries it in my area.
Excuse the mess..... I need a bigger work area.
I should have this finished tomorrow night and then I might pull the engine to check the clutch and the main seal.
I might as well put a clutch in it while I am at it if I can find one that will play well with my turbo.
Clonebug
-
Clonebug
- Posts: 4745
- Joined: Thu Feb 15, 2007 9:28 pm
Re: Safari Turbo Project
Update,
I ordered a new 1700 lb. Kennedy pressure plate from CB Performance today and Turbobaja sold me a CB super disc so I am on my way to a new Clutch.
I had a free day today so I went to work in the garage.
I pulled the turbo and the rear bumper off then removed the engine. A nice thing about working on it on a Saturday is I can go to my neighbor and get him to come over and help me with the heavy lifting.
He gave me a hand dropping the engine to the floor and then left me to my duties.


I removed the original PP and clutch disc and upon inspection both seemed to be in pretty decent shape yet. No heat related marking or any warpage that I could see. The Pressure plate was nice and flat when I put a straight edge on it. The clutch disc has some wear but there is plenty of life in it yet.
I will have to keep them around for a spare backup.


Even the flywheel looks good.

I noticed a little bit of oil in the bellhousing and with closer inspection it seems that the transmission main seal was leaking just a little bit.
I had a new one in my stash so I drilled a couple holes in the seal and put a screw in it..... grabbed it with a visegrip and tapped on the vicegrip with the claw end of a hammer to persuade the seal to come out.

After a bunch of pounding and a few new holes for the screw it came out. It was a lot easier to tap the new one in then pulling the old one.
All I have to do now is pull the flywheel and replace the seal since I am there already. I am thinking it wasn't what was leaking and that it was the transmission leaking instead. I will check it closer tomorrow or Monday if I don't have to work.
Now it is just a waiting game.
My new intake seals should be here Monday also so I will get them installed then I can put the cooling shroud back on.
I am planning on changing the wiring to the EDIS also while I have everything torn apart. I want to mount a wiring box to hold all my connections but I haven't found a good box that fits my needs or a good place since it is pretty tight under the body in back.
I do have an idea but I have to mount the shroud before I can see if it will work.
Clonebug
I ordered a new 1700 lb. Kennedy pressure plate from CB Performance today and Turbobaja sold me a CB super disc so I am on my way to a new Clutch.
I had a free day today so I went to work in the garage.
I pulled the turbo and the rear bumper off then removed the engine. A nice thing about working on it on a Saturday is I can go to my neighbor and get him to come over and help me with the heavy lifting.
He gave me a hand dropping the engine to the floor and then left me to my duties.
I removed the original PP and clutch disc and upon inspection both seemed to be in pretty decent shape yet. No heat related marking or any warpage that I could see. The Pressure plate was nice and flat when I put a straight edge on it. The clutch disc has some wear but there is plenty of life in it yet.
I will have to keep them around for a spare backup.
Even the flywheel looks good.
I noticed a little bit of oil in the bellhousing and with closer inspection it seems that the transmission main seal was leaking just a little bit.
I had a new one in my stash so I drilled a couple holes in the seal and put a screw in it..... grabbed it with a visegrip and tapped on the vicegrip with the claw end of a hammer to persuade the seal to come out.
After a bunch of pounding and a few new holes for the screw it came out. It was a lot easier to tap the new one in then pulling the old one.
All I have to do now is pull the flywheel and replace the seal since I am there already. I am thinking it wasn't what was leaking and that it was the transmission leaking instead. I will check it closer tomorrow or Monday if I don't have to work.
Now it is just a waiting game.
My new intake seals should be here Monday also so I will get them installed then I can put the cooling shroud back on.
I am planning on changing the wiring to the EDIS also while I have everything torn apart. I want to mount a wiring box to hold all my connections but I haven't found a good box that fits my needs or a good place since it is pretty tight under the body in back.
I do have an idea but I have to mount the shroud before I can see if it will work.
Clonebug
-
Ol'fogasaurus
- Posts: 17881
- Joined: Mon Nov 13, 2006 10:17 pm
Re: Safari Turbo Project
With the heat checking and bluing I see I would have the flywheel turned. You could end up with noise (squalling) and maybe the chance of chattering.
Lee
Lee