Sorry, my reply disappeared into the bit universe I guess.
You need two adjusters, one for each beam.
You choose how to position them and how to elongate the bolt hole on the beam: if you elongate it both up and down from the bolt hole, you will be able to adjust ride height both lower and higher than stock. Since the stock ride height is already pretty darn high, only off-road people would benefit from higher than stock settings. So most people would only elongate the bolt hole in one direction, to get as low as possible.
I don't know how good (if any) instructions different vendors offer with the adjusters.
Usually the adjusters offer a range wide enough to slam the front end so low that it becomes undriveable....
If you are comfortable with mechanical work and welding, it is not a difficult task to weld in adjusters. Just takes some time. With Avis type, you don't need to cut the entire beam apart, so there's no risk of losing beam alignment.
How to lower bug?
-
fletchman919

- Posts: 85
- Joined: Sun Mar 22, 2009 7:52 pm
-
fletchman919
- Posts: 85
- Joined: Sun Mar 22, 2009 7:52 pm
-
david58

- Moderator
- Posts: 14100
- Joined: Sun Oct 23, 2005 6:14 pm
-
fletchman919
- Posts: 85
- Joined: Sun Mar 22, 2009 7:52 pm
-
fletchman919
- Posts: 85
- Joined: Sun Mar 22, 2009 7:52 pm
I found this: http://beetle.cabriolets.online.fr/tech ... ation.html
I would like to see pics though to make it more clear. Anyone have any pics?
I would like to see pics though to make it more clear. Anyone have any pics?
-
fletchman919
- Posts: 85
- Joined: Sun Mar 22, 2009 7:52 pm
Well I installed the drop spindles after work and went for a test drive. I heard rubbing when I turned the wheel, but when I got out and checked it was fine. I decided to go for a drive around the block and noticed the brakes were grinding. So I check slammed them. LOL, I don't know why I did that!  But the keeper for the brake shoe broke and busted my wheel cylinder. So I had no brakes. I nursed it home safely.
Question: Was this in any way related to dropping the bug? I'm thinking I might have knocked the shoe off of it's slot or something prior to installing the drum. I hope it was just something minor.
BTW, the car looks better lowered in the front. From what I could tell, it drove pretty good, but I didn't go faster than 35 mph. I can't wait until I get some wheels!
But the keeper for the brake shoe broke and busted my wheel cylinder. So I had no brakes. I nursed it home safely.Question: Was this in any way related to dropping the bug? I'm thinking I might have knocked the shoe off of it's slot or something prior to installing the drum. I hope it was just something minor.
BTW, the car looks better lowered in the front. From what I could tell, it drove pretty good, but I didn't go faster than 35 mph. I can't wait until I get some wheels!
-
Lonnie1952
- Posts: 2
- Joined: Mon Apr 20, 2009 8:15 pm
When done by a Certified welder and the Welds Pass a Mag inspection the Beam will be as strong and depending on the procedure used the beam may be stronger.....Weaker beams from welding are from the lack of Knowledge in welding and Improper proceduresBugfuel wrote:I would look for more information and experienced on AVIS adjusters. They don't require cutting the beams, which is not a job for a beginner.
Avis adjusters are welded on top of the existing beam, and only the set screw hole on the original beam gets elongated to allow adjustment range. Stock parts remain inside the beam.
The page you linked to doesn't show pictures or tell you what type adjusters they are.
The "other" type adjusters are a complete adjuster assembly built into a piece of tubing, and you are expected to be able to cut identical lenght piece out of your old beam and weld the new center section in, and position it in a way that gives you the adjustment range you need.
If you weld them on in the wrong position, you may only be able to adjust the ride height HIGHER from stock!Or you may have a range from Ridiculously Low to Pavement Scraping Low.
A cut beam, no matter how well it was welded back up, will not be as strong as the original. The end result depends entirely on the skill and equipment of the welder. Therefore it is illegal in some places to cut & weld vw front beams.
If welded beams are Illegal somewhere...(don't know where) But if they are it is due to the lack of Quality welders doing the work..
IF proper welding made things weaker then No welding of Structures..or frames of any kind would be legal...proper welding procedure..
Proper Filler rod and Sheilding gas all make for Strong welds without destroying the parent Metals
1952
-
fletchman919
- Posts: 85
- Joined: Sun Mar 22, 2009 7:52 pm
I'm actually a union ironworker and a certified welder so I know what you're saying. I'm confident I could have cut the beams and welded them back up, but the drop spindles seemed like the way to go to me. This way the front suspension still has it's full travel and rides just as smooth as before. Thanks for the advise though!
-
david58
- Moderator
- Posts: 14100
- Joined: Sun Oct 23, 2005 6:14 pm
Re: How to lower bug?
Hot, humid air is less dense than cooler, drier air. This can allow a golf ball to fly through the air with greater ease, as there won't be as much resistance on the ball.
-
Marc
- Moderator
- Posts: 23741
- Joined: Thu May 23, 2002 12:01 am
Re: How to lower bug?
Castor beans:

Castor oil:

Caster shims:

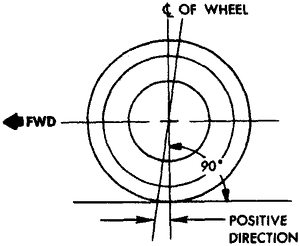
Caster is analogous to "trail" on a bike or motorcycle - positive caster makes the wheel(s) want to stay pointed straight ahead. When the wheel is turned, caster causes the front end of the vehicle to rise slightly - in effect the weight of the car keeps the wheels going straight. Too little caster causes a loss of directional stability, particularly objectionable at highway speeds, although it does reduce steering effort so parallel-parking is easier.
Whenever the front of the car is lowered in relation to the rear, the chassis is tilted down so the beam is tilted forward and caster is lost. It does not matter how the front end is lowered - even smaller-diameter tires have the same effect.
Caster shims can be slipped in between the lower beam tube and the chassis to push the beam back forward, restoring its original relationship with the pavement. One set of thin (~¼") shims won't require any longer bolts, but beyond that they'll be needed. Simply loosen the beam bolts, pry the beam away at the bottom and slide the shims into place (yes, it's usually harder than that makes it sound, but the principle is simple). You've slightly changed the relationship of the steering box and column, too, which stresses the rag joint. Loosen the steering box clamp bolts, shift the box to align it with the column, and retighten the bolts. You may have to remove the clamp to open up its indexing notch slightly with a file - note which way goes towards the front of the car. The same clamp is reversed in Karmann-Ghia applications since their steering column is slightly more horizontal, the effect is opposite of what you're after when adding caster shims to a Bug.
Castor oil:
Caster shims:
Caster is analogous to "trail" on a bike or motorcycle - positive caster makes the wheel(s) want to stay pointed straight ahead. When the wheel is turned, caster causes the front end of the vehicle to rise slightly - in effect the weight of the car keeps the wheels going straight. Too little caster causes a loss of directional stability, particularly objectionable at highway speeds, although it does reduce steering effort so parallel-parking is easier.
Whenever the front of the car is lowered in relation to the rear, the chassis is tilted down so the beam is tilted forward and caster is lost. It does not matter how the front end is lowered - even smaller-diameter tires have the same effect.
Caster shims can be slipped in between the lower beam tube and the chassis to push the beam back forward, restoring its original relationship with the pavement. One set of thin (~¼") shims won't require any longer bolts, but beyond that they'll be needed. Simply loosen the beam bolts, pry the beam away at the bottom and slide the shims into place (yes, it's usually harder than that makes it sound, but the principle is simple). You've slightly changed the relationship of the steering box and column, too, which stresses the rag joint. Loosen the steering box clamp bolts, shift the box to align it with the column, and retighten the bolts. You may have to remove the clamp to open up its indexing notch slightly with a file - note which way goes towards the front of the car. The same clamp is reversed in Karmann-Ghia applications since their steering column is slightly more horizontal, the effect is opposite of what you're after when adding caster shims to a Bug.
-
vwcpr

- Posts: 3
- Joined: Mon Mar 25, 2013 8:32 am
Re: How to lower bug?
How do you know where 0 is if your rear end is already pulled apart and you need to put the torsions and spring plates back in? I want to raise the rear for my dune buggy a couple notches, just want to know where to start, as I bought the chassis with no rear end just the frame. thanks for our help
-
Marc
- Moderator
- Posts: 23741
- Joined: Thu May 23, 2002 12:01 am
Re: How to lower bug?
They could have a trick at the factory, maybe a female splined jig that they poke the bar into at a spot which yields a certain spline orientation at the outboard end. Some sort of index mark made there would make it simple to insert the bar on the line and have every chassis start out at the same point. Then again, that would only be of value if every splined collar on every pan and every springplate was welded in at the exact same orientation...so maybe Hans & Fritz, doing the same job all day long, just get it right based upon their experience.
Without such a device and lacking instinct, trial-and-error works with some simple math. Because there are 40 splines on the inboard end and 44 on the outboard, one inner spline is "worth" 360÷40= 9° and each outer is worth 360÷44= 8.182°. Move the inner end "up" by one spline and the outer "down" by one and the net change is .8182° up.
The spec for the unladen springplate angle on an IRS Bug is 20°30' + 50' - let's call 21° the target, with the pan level.
Slap it together without the torsion bar cap, with the springplate off the stop; wriggle the springplate around in the inner rubber bush to center it as best as you can. Measure the springplate angle. Just for an example, let's say you get 18½° (with the top of the tunnel at 0°). You'd need to go "down" by 2½° to get to 21.
Divide 2.5 by .8182, you get 3.0556. Move the inner end of the torsion bar "down" by 3 splines (27°) and put the control arm back on the outer end 3 splines (~24½°) higher and the result will be 2½° down.
Make sense?
I can't vouch for the accuracy of David's chart (there are unaddressed variables, like the weight of the car and the length & springrate of the torsion bars) but going by that, to change the ride height by ~2" (4.95cm) you've got to go 9 splines in opposite directions.
Note that the relationship between the inner splines and the outers repeats every quarter-turn of the torsion bar (every 10 inner/11 outer) so for any ride height there are actually four possible correct positions of the bar. The two points on the chart which show turning the inner by +10 and the one for +11 could also be shown as 0 and -1 respectively. Similarly, -10 on the outer could also be expressed as +1.
So, 9 splines down on the inner and 9 splines up on the outer would be the same as 1 up on the inner and 2 down on the outer. Either way, it's 7.364° down...Hans & Fritz probably know this.
Without such a device and lacking instinct, trial-and-error works with some simple math. Because there are 40 splines on the inboard end and 44 on the outboard, one inner spline is "worth" 360÷40= 9° and each outer is worth 360÷44= 8.182°. Move the inner end "up" by one spline and the outer "down" by one and the net change is .8182° up.
The spec for the unladen springplate angle on an IRS Bug is 20°30' + 50' - let's call 21° the target, with the pan level.
Slap it together without the torsion bar cap, with the springplate off the stop; wriggle the springplate around in the inner rubber bush to center it as best as you can. Measure the springplate angle. Just for an example, let's say you get 18½° (with the top of the tunnel at 0°). You'd need to go "down" by 2½° to get to 21.
Divide 2.5 by .8182, you get 3.0556. Move the inner end of the torsion bar "down" by 3 splines (27°) and put the control arm back on the outer end 3 splines (~24½°) higher and the result will be 2½° down.
Make sense?
I can't vouch for the accuracy of David's chart (there are unaddressed variables, like the weight of the car and the length & springrate of the torsion bars) but going by that, to change the ride height by ~2" (4.95cm) you've got to go 9 splines in opposite directions.
Note that the relationship between the inner splines and the outers repeats every quarter-turn of the torsion bar (every 10 inner/11 outer) so for any ride height there are actually four possible correct positions of the bar. The two points on the chart which show turning the inner by +10 and the one for +11 could also be shown as 0 and -1 respectively. Similarly, -10 on the outer could also be expressed as +1.
So, 9 splines down on the inner and 9 splines up on the outer would be the same as 1 up on the inner and 2 down on the outer. Either way, it's 7.364° down...Hans & Fritz probably know this.