rear sway bar question

For road racing, autocrossing, or just taking that curve in style. Oh yea, and stopping!
User avatar
turbobaja
Posts: 2826
Joined: Fri Sep 14, 2007 4:56 pm

Post by turbobaja »

mikemck wrote:Karl,

Thanks for continuing this discussion.

In the top picture, did the bushings start at the outer bend and migrate to the inner bend?

Exactly. The bushing should stay near the outer bends of the sway bar to do the job right. The 'migration' is slow and noisy at first. It gets queiter over time, that's when you know they've worked their way in again. The handling can give it away too. The more you cycle the suspension (used to have this setup on my Baja) the quicker it will happen too.

Karl
User avatar
turbobaja
Posts: 2826
Joined: Fri Sep 14, 2007 4:56 pm

Post by turbobaja »

OK, finally wrapped up the side project and this is what I ended up doing on the rear sway bar. As it turned out, the end links from Energy suspension worked pretty good. You can get them in all sorts of lengths. I got ones too short and had to shim them with some washers to get the right length. About 4" would do good. Flipping the brackets from side to side and upside-down on the trailing arms worked well to reposition them. Be aware, though, that they could bind against the shock tower arm under compression, so keep the top half of the end link as lo-pro as possible to get clearance. You'll see what I mean. The little collars did NOT clear the torsion housing, so an 1/8" shim was made from scrap aluminum and shaped to the torsion housing.

The links fit really close to the trailing arms at full droop (on jack stands), but the clearance increases @ ride height.

Image

I didn't take many pics during the process cause I needed to get a lot of work done as quickly as possible. Let me know if you have any questions. You've probably got yours all figured out by now :)

Karl
mikemck
Posts: 97
Joined: Tue May 30, 2006 6:01 pm

Post by mikemck »

Nope, I don't have mine figured out yet. I was waiting for your update.

I wonder if there is something else I could use instead of the collar that would be thinner and wouldn't require the shim.

Thank you very much for the update and picture.
User avatar
turbobaja
Posts: 2826
Joined: Fri Sep 14, 2007 4:56 pm

Post by turbobaja »

The sky is the limit if you're willing to do some fab work. I was looking for a bolt-on application here. I did some small heim-joint end links for the front of my baja. Welded some ears on the end of the bar and made some brackets that bolt on to the lower control arms to bolt the link to.

Image

For the rear bars like we're talking about here, maybe some rib-shaped links that can contour around the inside of the trailing arm for better clearance. As long as the end of the arm has room to move slightly front/back smoothly and transfer the load from the bar to the trailing arm. The collars and shims I used on the links really just bulked up the whole assembly. You could get away with just a long bolt with washers welded to either end, and threaded on the ends.

Lots of options.

Karl
mikemck
Posts: 97
Joined: Tue May 30, 2006 6:01 pm

Post by mikemck »

Karl,

In your message of 12/16 you say the links you used were too short.

The sizes near 4" seem to be 3 3/8", 3 9/16" and 4 1/2".

Which do you think would be best?
User avatar
turbobaja
Posts: 2826
Joined: Fri Sep 14, 2007 4:56 pm

Post by turbobaja »

The 4 1/2" ones should be just about right without hanging down below trailing arm too much. You should be able to bolt them on right out of the package :) . Although, I ended up cutting the top grommet in half with a hack saw to give more room for downward (compression) movement in the suspension. Otherwise the top of the link will contact the shock tower/body mount structure before the bump stops hit. If your ride height is lowered at all your going to need to make sure there's clearance for the top of that link for sure. The grommets are pretty firm, so just chuck each one up on the vise and saw through it halfway at a time. Then flip and cut the other way. Deck them flat on a piece of sandpaper on a flat surface just to level off any ridges and you're good to go. You could cut more than half off even for more clearance. Leave enough meat in the grommet to allow some rocking movement in the link though.

Our bug is at stock ride height and so far (couple weeks now....) every thing is working smooth and quiet without any signs of shifting. The collars are keeping the bar nice and centered and the shims under the bushings seem to be staying put. So I think the links are doing a good job.

let us know how yours ends up working.

Karl
User avatar
Greg Rickard
Posts: 153
Joined: Fri Sep 05, 2003 8:23 pm

Post by Greg Rickard »

Very helpful thread!

I just installed 3/4 inch front and rear sway bars on my '71 Ghia, and what a difference. It drive and handles like I originally expected. :D

About the torsion tube bushing migrating toward center over time, I am considering installing split shaft collars against each bushing as suggested.

Though...I had an idea :shock: ...why not just weld a short bead (say about 1/2 to 1 inch long) on each torsion tube right next/inward to each band clamp? The weld beads should stop the band clamps from working their way toward inward along the torsion tubes.

:?: Comments :?:
User avatar
turbobaja
Posts: 2826
Joined: Fri Sep 14, 2007 4:56 pm

Post by turbobaja »

Greg Rickard wrote:Very helpful thread!

I just installed 3/4 inch front and rear sway bars on my '71 Ghia, and what a difference. It drive and handles like I originally expected. :D

About the torsion tube bushing migrating toward center over time, I am considering installing split shaft collars against each bushing as suggested.

Though...I had an idea :shock: ...why not just weld a short bead (say about 1/2 to 1 inch long) on each torsion tube right next/inward to each band clamp? The weld beads should stop the band clamps from working their way toward inward along the torsion tubes.

:?: Comments :?:
Glad to hear your Ghia is handling well. I would imagine that a couple weld beads on the inboard side of the bushings will keep it from migrating inward. If you've modified/replaced your endlinks like was done previously in this thread, the welds or collars might not even be necessary. I was kinda hoping to hear from mikemck on his install to see if he went with the collars or ??. Keep in mind the collars also required a spacer between the bushings and the torsion housing. All of which could be unnecessary with good/functional end-links and properly located/installed bushings :wink: .

Good luck and let us know how it turns out
Karl

DON'T QUIT
User avatar
Greg Rickard
Posts: 153
Joined: Fri Sep 05, 2003 8:23 pm

Post by Greg Rickard »

Karl, thanks for the comments. I found this discussion thread after installing the sway bar per BugPack's instructions for their IRS sway bar kit.

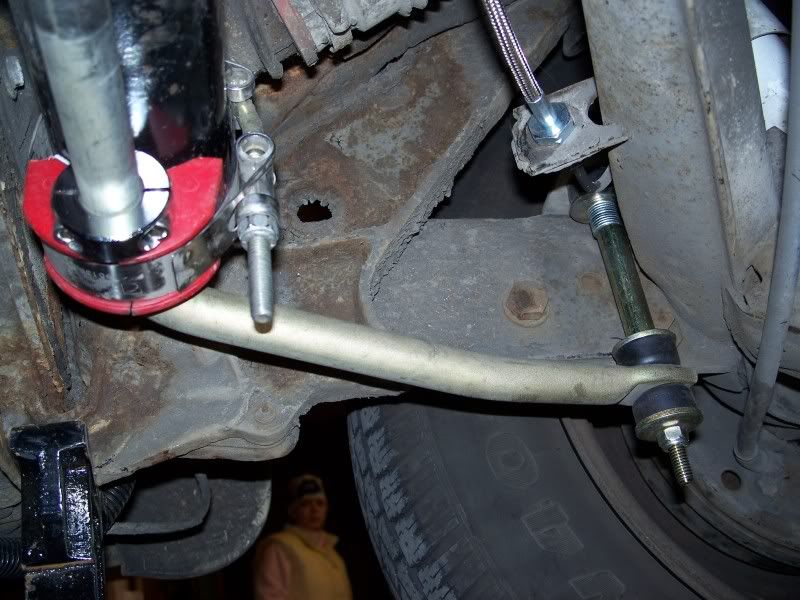
The weekend prior to doing the sway bar installation, I had completed a four wheel alignment of the Ghia. The rear wheels were a PITA because of having to access the torsion arm bolts and the torsion arms being generally uncooperative in adjusting. So, I freaked when reading the sway instructions said that I had to loosen the torsion arm bolts to install the brackets...no, no :shock:! Funny how life sometimes works!

After reading your comments, I went back and made sure the end links were on loose enough to (hopefully) allow some movement as the torsion arms pivot. In the meantime, I will keep an eye on the set-up for creeping of the bushings, etc.

Though, I am an overkill kind of a guy particularly when it comes to suspension matters. I drive an '06 Lotus Exige on the track often and have learned to appreciate a car with a safe, reliable and well dialed in suspension!

I like your modified end link set up and may switch to it anyway...will do some measuring and order the correct length end links...and also may add either a couple of shaft collars against the sway bar bushings or two welds next to the brackets. I'd rather have everything locked down and bulletproof than mickey moused.
User avatar
turbobaja
Posts: 2826
Joined: Fri Sep 14, 2007 4:56 pm

Post by turbobaja »

Right On Greg! Piloting an Exige sounds like a blast, especially on a track. It would be pretty impressive if you could get your Ghia to scoot around the track like the Lotus :shock: . I had a '71 Ghia back in High School (mid 90's) that I dearly miss :cry: . Very fun car. I just wanted to get sideways in the dirt with it back then (first car was a '66 Baja) so I took alot of its handling characteristics for granted. Now I'm trying to build a Baja that'll hadle like a Ghia, I don't know What I'm doing :lol: .

I was really hoping for a "bolt on" package with the rear sway-bar install. This was done on an otherwise almost totally stock '74 Super, and the end-links will contact the under side of the shock towers under compression with the brackets flipped like this. The bracket just sits too high. I would suggest fabricating some kind of bracket that bolts to the inside of the trailing rather than the outside. Even better would be to weld a tab on the trailing arm for the upper link mount. It could be done on the vehicle pretty easily (rather than removeing the trailing arm). And a shorter link, like 3-3.5" would still be plenty to do a good job. If you can get away with just loosening the links, I'm going to be jealous. But more power to ya if it works :wink:.
Karl

DON'T QUIT
User avatar
Greg Rickard
Posts: 153
Joined: Fri Sep 05, 2003 8:23 pm

Post by Greg Rickard »

Yeah...my mind was already pondering if a trick end link bracket might be the ultimate solution :lol: in order to not have any interference issues with the shock tower as you have pointed out. For now, I'm driving the Ghia around with the rear sway bar as originally installed while deciding how to make it bulletproof. Your comments have been very helpful...thanks.

I am very lucky to have an Exige as well as being able to drive it on the track. That is the only place where I can really hammer and stuff it into corners like it was built to do...its performance limits are just too extreme for the street. :twisted:

Baja Bugs are great. I had one when I lived in Phoenix, AZ, in 1982 to 1983...called it the Dirt Diggin' Road Toad. It was chocolate brown, had a mild engine build, roll cage, skid plates, great ground clearance and very knobby tires. I did a lot of off-roading in it here in SoCal and in Arizona.
mikemck
Posts: 97
Joined: Tue May 30, 2006 6:01 pm

Post by mikemck »

Karl,

I haven't installed my sway bar yet.

I am still shopping for the end links. My FLAPS said they wanted $25 each, $50 for a pair. Maybe it is really $25 for a pair.

Since I already have six of the grommets I wouldn't need all the ones that come with new end links. I thought about getting more grommets and then buying cheaper end links with rubber grommets just for the bolts and spacers.

The recent messages have raised new questions about clearance with the relocated angle brackets.

Is it the bolt head or the angle bracket that hits the shock tower?

I did buy collars.

This is for a car I am still building. It is very cold in my Michigan garage right not.
User avatar
turbobaja
Posts: 2826
Joined: Fri Sep 14, 2007 4:56 pm

Post by turbobaja »

Hi Mike. The end links shouldn't be anywhere near $50 for 2. I paid less than $20 for mine (2 in one package). Energy Suspension from local Shucks.

It's the bolt heads that will contact the shock towers. I described earlier how to minimize this by cutting the upper bushing/grommet in half to help with clearance. Mine still contacts the shock tower during nearly full compression. Mostly noticed when entering/exiting steep driveways and p/l enterances, not noticed while driving down the road. If you're still building the car and don't need to drive it soon, I'd spend some time and make something different for the upper mount if you're concerned with interferance. If you could mock up your rear suspension w/o a torsion bar then you can cycle the suspension to find exactly how much clearance you'll need. Shorter bolts/links will be necessary if you make your own upper mount instead of just flipping the one you have. You could even use the grommets that came with the kit, and the collars you bought, and just get some long bolts from the hardware store, with nylock nuts, or double-nut the ends. Then just cut your collars to the right length to make everything work together.
Karl

DON'T QUIT
mikemck
Posts: 97
Joined: Tue May 30, 2006 6:01 pm

Post by mikemck »

I think this end link change all started because the mounts on the torsion tube were rotating and migrating.

If we control the migration with collars is the rotation around the tube all that bad?

If we still want to modify the end links, I am wondering about using a female rod end fastened to one of the spring plate bolts. A 3/8" bolt with 2 of the urethane grommets could fasten the end of the sway bar to the rod end.

Maybe a smaller bolt could be welded head to head to the spring plate bolt and the rod end could fit over this.

I haven't crawled under the car in my very cold garage to see if there is space for this. The round end of the rod end is 1" diameter and 1/2" thick.

On my car the middle, forward, spring plate bolt is closer to the other two than on your car Karl. It is close to lining up with the hole in the angle bracket.
User avatar
turbobaja
Posts: 2826
Joined: Fri Sep 14, 2007 4:56 pm

Post by turbobaja »

I suppose it doesn't hurt anything to have the bushings shifting back and forth on the torsion housing. But they will most likely get noisy sooner with this type of movement.

I'm not sure if I get what you're describing with the rod ends. Some pics might help. And as I said earlier, if you're willing to do some fabricating, the sky's the limit with all this stuff :wink: .
Karl

DON'T QUIT
Post Reply