My ongoing Turbobaja build

With Turbo and Super charging you can create massive horsepower with vw motors.
User avatar
turbobaja
Posts: 2826
Joined: Fri Sep 14, 2007 4:56 pm

Post by turbobaja »

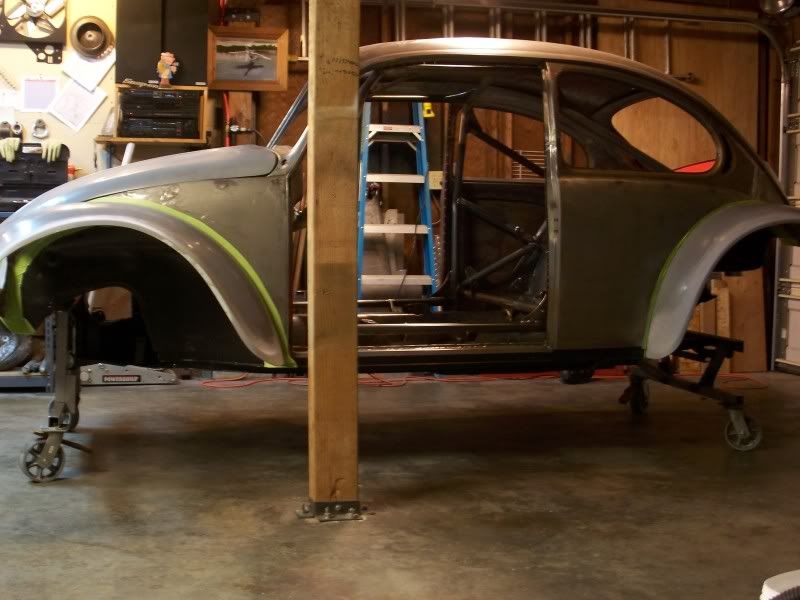
The Baja is correctly oriented with the earth once again :D . I decided to pass on painting a few areas inside the body while upside down and just get this thing right side up again! It was getting hard/confusing to visualize the next step, so I figured it was time to flip it.

I did get the fenders worked over pretty good though. The head and tail light cut-outs got done and the edges of all 4 fenders got a couple extra layers of glass. Also added a couple ribs to stiffen up the rears for fender mounting the lights.

Image

Image


The temps have been dropping lately, so I wanted to leave the fenders mounted up until I could get the garage heated up into the 70's for a few days to ensure a good cure on the fenders. With the fenders still on the body, the flip was a little more tricky. After a couple hours of knot tying and sweating, the body was resting right side up on some jack stands once again :o

Image

Image

Image

Image


I also mounted up the taillights real quick to see how my guess at mounting angles turned out. I mocked up the rear fenders on my work bench with a few cardboard boxes to get an idea of where/how to mount the taillights. I made an aluminum stencil to slide around on the fenders to see where the contours matched best and were the lights would appear to be vertical. The lights are mounted with a rubber gasket to help contour to the fender and clean up the edges a bit.

Image

Image

Image


While I'm in glass mode I'm going to get some work done on the hood and the dash before I move on to painting the interior..........and eventually the body :twisted: .
Karl

DON'T QUIT
User avatar
dave t
Posts: 428
Joined: Sat Nov 25, 2006 5:43 pm

Post by dave t »

:shock: WOW :shock: Looks great :!: Thanks Dave T
User avatar
Unknownracer
Posts: 73
Joined: Wed Oct 20, 2004 7:00 am

Re: My ongoing Turbobaja build

Post by Unknownracer »

That's some really nice fab work!! Looks great!

By the way where did you get that turbo throttle peddle?
miniman82
Posts: 3944
Joined: Sun Apr 27, 2008 3:36 pm

Re: My ongoing Turbobaja build

Post by miniman82 »

User avatar
turbobaja
Posts: 2826
Joined: Fri Sep 14, 2007 4:56 pm

Re: My ongoing Turbobaja build

Post by turbobaja »

Unknownracer wrote:That's some really nice fab work!! Looks great!

By the way where did you get that turbo throttle peddle?
Thanks Unknownracer!

I thought the TURBO pedal was supposed to make the build go faster, but it didn't work that way :x :lol:

I got it from CB like miniman posted (thanks :wink: )
User avatar
Turbo_Manx_Maniac
Posts: 3308
Joined: Wed Oct 22, 2003 1:32 pm

Re: My ongoing Turbobaja build

Post by Turbo_Manx_Maniac »

Just want to throw out there that with the quality of your build, we're really expecting an insane dash layout and interior. :D

Hope you don't mind, but I'm gonna borrow your idea on the fender ribs and glass in a small tube under my front fenders to contain the signal light wires. My tire rubs the top of the fender sometimes and it keeps yanking out the wires.

Keep feeding us pics.


You gonna have the cajones to get this thing dirty & scratched when it's finished? :P
User avatar
turbobaja
Posts: 2826
Joined: Fri Sep 14, 2007 4:56 pm

Re: My ongoing Turbobaja build

Post by turbobaja »

Turbo_Manx_Maniac wrote:Just want to throw out there that with the quality of your build, we're really expecting an insane dash layout and interior. :D

Hope you don't mind, but I'm gonna borrow your idea on the fender ribs and glass in a small tube under my front fenders to contain the signal light wires. My tire rubs the top of the fender sometimes and it keeps yanking out the wires.

Keep feeding us pics.


You gonna have the cajones to get this thing dirty & scratched when it's finished? :P
Thanks TMM! :mrgreen:

The dash is coming up soon in the build process. I think there's 10 or so gauges that have to find a home in the fiberglass dash. Along with I don't know how many switches and indicator lights. I'm not sure if I want to use the center console yet.....kinda crowds my right leg. And still not sure what to do about a glove box or storage compartment of some kind. I'll have to dream something up......

I'm totally glad you've found a way to make use of one of my crazy ideas. Those glass ribs turned out pretty easy. And for the amount of time they took to get done they were well worth the effort. I was originally going to use tubes to form the ribs, but the cardboard worked out easier for me. I hadn't even thought to run my wire harness inside them.....Now ya tell me :roll: .


I'll have to do a nut check when this thing is drivable for sure. I hope I have what it takes to push it hard when the time comes. Once a few scratches and dents start showing up, I'll feel better about off-roading it more agressively. I'm more concerned with keeping my right foot in check ON-road.

And I still have to pick a body color. Been thinking of a metalic silver with just a hint of green. Interior will be rattle can hammertone with POR 15 black cage. Have charcoal headliner to install too. Have to make quarter and door panels, and .......well the list just goes on.
User avatar
HPjunkie
Posts: 334
Joined: Fri Nov 12, 2004 7:14 am

Re: My ongoing Turbobaja build

Post by HPjunkie »

I am still watching this awesome build. Are you planning to show it before drivin?
User avatar
turbobaja
Posts: 2826
Joined: Fri Sep 14, 2007 4:56 pm

Re: My ongoing Turbobaja build

Post by turbobaja »

HPjunkie wrote:I am still watching this awesome build. Are you planning to show it before drivin?
:shock: :lol: Thanks HPjunkie!

If you mean 'am I going to trailer it to a show when it's done before I drive it?'......I hope not! :lol:

I'll take it to the local shows when it's fresh and "new", but I want to DRIVE this thing! I'd like to have a couple dyno sessions with it and maybe a couple 1/4 mile runs before I park it at a show. The last show I took it to was my first and only class win. It was the '03 Northwest Bug-In. I was the only Baja there, but they classed me with a really clean street manx instead of the off-road rails. The show was judged by the contestants and I picked up the wally :mrgreen: . It was a good day. This build started about a month later....

Heres a couple 7-8 year old pics from shows in the past. They're just scanned photos so the quality is iffy. I changed the ride height and tire combos arround to suit my curiosity. The picture in the center where it's lowered is how is sat when I got the win. The bottom one with the Mickey Thompsons and board rack was my favorite. Great snow rig :twisted:

Image
User avatar
turbobaja
Posts: 2826
Joined: Fri Sep 14, 2007 4:56 pm

Re: My ongoing Turbobaja build

Post by turbobaja »

Here's a quick rundown of the last month or so:

Once it was upright again I re-built some dollies I made years ago so I can have the body on wheels in the garage 8) .

Image

Image

Image

I made a form to clamp my hood in so I could add some reinforcements. The quality of the hood was pretty poor, it was lacking beef.

Image

Once it was clamped down I made one large rib to tie the two hood mounts together and keep the shape of the hood.

Image

Then it all got glassed over. The hood feels pretty strong now. No more folding the hood in half when it's sunny :x .

Image

I mounted up the dash and started laying out the gauges. I've got a list of switches and indicators that still need to be stuck on there somewhere too. Console is optional, hopefully.

Image

I can't use the factory glove box any more, and I need the storage space. So I started making one from scratch.

Image

Image

Image

I ended up having to make a pair of hood hinges. The hood was made with the mounting flanges about 1" narrower than they needed to be and the struts were binding up with the stock style hinges. These each step in about .5" to make up for the alignment problem.

Image

Image

Image

Image

I needed a way to latch the hood closed and some kind of a handle to pull it open with. So I took a stock latch and made the rest of the parts.

Image

Image

Image

Image

Image

Now I'm just finishing up the nose area a little. I used cling wrap over the resin soaked glass and squished it into the contours of the reinforcement ribs with foam rubber and some clamps.

Image

Image

Image

Also got a few more parts coated: Both sway bars, spring plates, rear shock mount/cage bar and torsion caps.

Image
shag55
Posts: 1245
Joined: Mon Nov 19, 2007 11:04 am

Re: My ongoing Turbobaja build

Post by shag55 »

This is some great work man! :D
User avatar
panel
Posts: 4253
Joined: Sun Sep 24, 2000 12:01 am

Re: My ongoing Turbobaja build

Post by panel »

I think I'll :cry: if I see that thing in the dirt.
User avatar
ToRy 70
Posts: 1338
Joined: Tue Jun 08, 2004 1:00 pm

Re: My ongoing Turbobaja build

Post by ToRy 70 »

How much experience do you have making this stuff? Do you make it up as you go along, or do trial-and-error, or what? Every single thing you've done on the car looks like it was meant to be that way, functionally and aesthetically. Good job man. 8)
User avatar
turbobaja
Posts: 2826
Joined: Fri Sep 14, 2007 4:56 pm

Re: My ongoing Turbobaja build

Post by turbobaja »

shag55 wrote:This is some great work man! :D
Thanks shag. I've been checking out your project lately. That's gonna be real nice 8) . I like that color too. A buddy of mine has a really mean lookin Spanish Olive '58 rag top, yours kinda reminds me of it. I like that center thrust crank bearing setup too, never seen that done before :shock: . We're gonna need a dyno video of that some day :wink: .
panel wrote:I think I'll :cry: if I see that thing in the dirt.
:lol: ... :| ...... :cry: Your not the only one..

Nah! I'm doing everything I can to make it easy to clean and water tight so I can actually go get this thing dirty........every once in a while at least :roll: . I'm pretty out of touch with any kind of local wheelin' loacations. There's houses just about everywhere we used to go "off-roading" around here. I'll have to look into local ORV parks or something. Getting dirty is usually a pretty good time. I basically learned to drive stick in a '66 Baja in our horse arena years before I got my license. I got pretty familiar with the fence lines and light poles, so I could turn around and stare out the back window to watch the rooster tails of dirt and horse crap as I grabbed 2nd gear. Tons of fun! Something about driving around in the baja always made me want ot find a dirt parking lot or rutted up construction site and go get sideways in it. I do, however, like to keep the inside of the car as clean as possible while doing so :D .
ToRy 70 wrote:How much experience do you have making this stuff? Do you make it up as you go along, or do trial-and-error, or what? Every single thing you've done on the car looks like it was meant to be that way, functionally and aesthetically. Good job man. 8)
Thanks a lot dude 8) ! That's Very kind of you. All this stuff is just made up as I go along for the most part. I kinda had an idea of what I wanted when I was done, but there were gray areas where I knew I'd run into problems and have to make something from scratch I'd never seen before. I would have never guessed how much time I'd spend making parts for this baja. It's like a hobby gone slightly overboard. I don't have any schooling for any of this stuff, short of my highschool auto shop :roll: . I've just always been a very curious person with respect to mechanical things. Making things has always been rewarding for me personally. My dad was a big DIY kinda guy and I always admired him for it. I do most of my trial and error style fab work with cardboard. I've been using it to make stuff since I was a little kid. It gives me a quick/cheap/easy way to make a physical model of a mental image. One thing I've learned to be very helpful is: ALWAYS measure twice and cut once. That one still gets me sometimes :lol: . I don't really "know what I'm doing" half the time, until I've done it.
User avatar
turbobaja
Posts: 2826
Joined: Fri Sep 14, 2007 4:56 pm

Re: My ongoing Turbobaja build

Post by turbobaja »

Got the nose glass work finished up and sanded down a little. Should be good and strong now.

Image

Been working on a tow bar for future flat-towing. I took an old bar and put a new twist on it. The old bar wouldn't mount up to my beam (skid plate & beam supports in the way) so I made some tabs to mount it up to the bumper a little differently. Hopefully my welds hold :shock: .

Image

Image

Image

Image

Image

Image

A couple goodies from Sensor Connection showed up. This display is really compact! I might be able to find a perminant home for it in the dash, instead of just a temporary install to calibrate my Autometer CHT gauge and tune w/EGTs. The controller my buddy uses for his 12K watt powder coat oven is made by the same mfg. All working w/k-type thermocouples for temp sensing. The Sensor Connection guy puts a label over the mfg's label and most likely bumps the price significantly. My buddy paid about half what I paid for this unit, and his is about 4x this size :shock: . I guess it pays to research a little........Having said that, these parts came packaged with loving care and for ~$190 shipped, I got everything you see here, I'm happy :D .

Image
Post Reply