Whilst tinkering with the heater fan fan today (on my 412 1.7 FI engine), trying to seal any leaks that may be reducing airflow into the car, I noticed that the small black box that I now know to be the crankcase breather was hissing.
It sounds like air is either being drawn in or out of the seal around the bottom of it. The cork gasket is very squashed and looks knackered and I'm hoping that I can get a sheet of gasket cork from a local motor factor and cut a new one.
Anyway I had a nose to see what was under the box and found that there are two round holes one slightly larger than the other on this box. In the bottom of the space left by the box was a small plastic bung laying there that looked like it had fallen out of the smaller of the two holes on the box.
Would I be correct in thinking that I need to refit this into the box? and what does/should it do anyway??
Crankcase breather and a small plastic bung???
-
wshawn

- Posts: 209
- Joined: Thu Dec 27, 2007 6:36 am
-
raygreenwood

- Posts: 11907
- Joined: Wed Jan 22, 2003 12:01 am
I'll have to go home and look at one...but basically there is a round plug with a sort of "D" shaped flat edge. This plug goes under the PCV spiggot. It needs to be there so that excessive oil vapor does not end up in the intake. The Flat edge of the plug needs to be in the right place or the gasket will not fit.
It needs to fit tight and usually does. Its worth it to find out why it fell out. Ray
It needs to fit tight and usually does. Its worth it to find out why it fell out. Ray
-
wildthings
- Posts: 1171
- Joined: Thu Jun 03, 2004 12:42 am
There are at least two kinds of breather setups used in the US T4's, and maybe more in Europe. The ones used on fuel injected engines had a PCV valve that can come apart. Not sure if that is what you have or not. The ones used on carburated T4 powered US bus engines were very simple, I don't think they any pieces that can fall apart. Maybe they did when new, and I have just never seen a new one???
-
wshawn
- Posts: 209
- Joined: Thu Dec 27, 2007 6:36 am
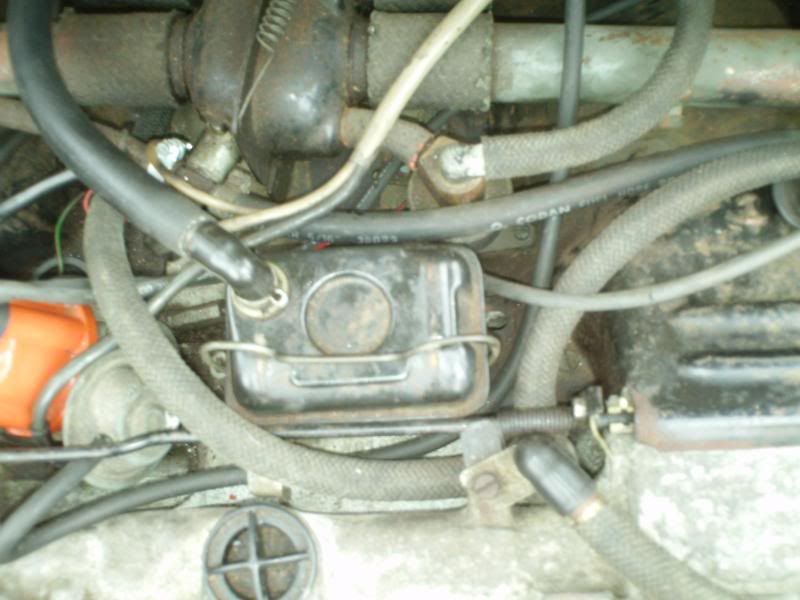
I have now taken some pictures that may show what I have fitted to my 412 a bit better.
Firstly the part in question in situ
The hole left after removing the crankcase breather box, this is where the plastic bung was found.
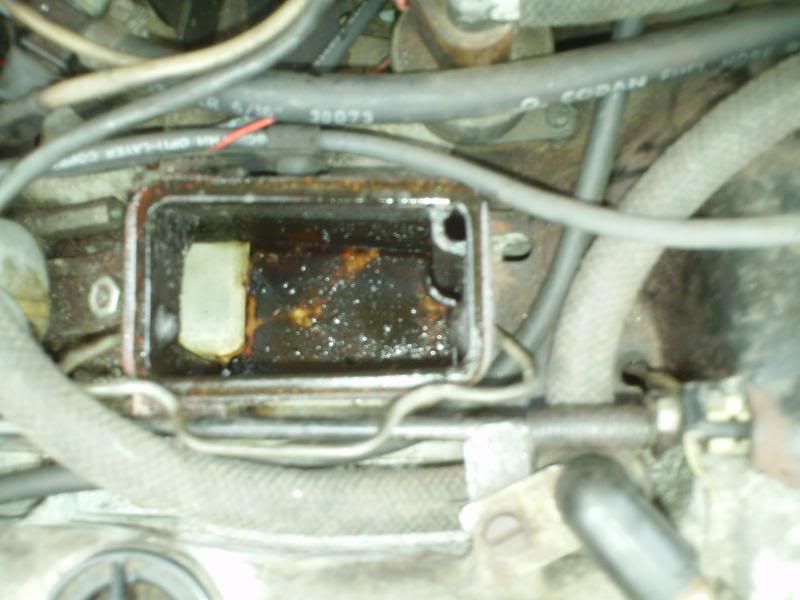
The underneath of the box showing the two holes. I'm assuming the bung goes into the hole that is on the left of the picture? Would this be the PCV spiggot that you mention in your reply Ray?

The bung/plug showing the flat side on it.

Not sure how far to push the bit in and am a bit reluctant to force it and break it. There seems to be two recesses on the side profile of the plug the first recess does not seem to be very tight and the plug falls out the hole. The second recess seems very hard to push the plug far enough in to locate.
I've got a sheet of gasket cork and can use the old one for a template to cut a new one but just need to get this plug to stay in its hole now.
Firstly the part in question in situ
The hole left after removing the crankcase breather box, this is where the plastic bung was found.
The underneath of the box showing the two holes. I'm assuming the bung goes into the hole that is on the left of the picture? Would this be the PCV spiggot that you mention in your reply Ray?
The bung/plug showing the flat side on it.
Not sure how far to push the bit in and am a bit reluctant to force it and break it. There seems to be two recesses on the side profile of the plug the first recess does not seem to be very tight and the plug falls out the hole. The second recess seems very hard to push the plug far enough in to locate.
I've got a sheet of gasket cork and can use the old one for a template to cut a new one but just need to get this plug to stay in its hole now.
-
wshawn
- Posts: 209
- Joined: Thu Dec 27, 2007 6:36 am
Further to this one, whilst I've got the bits around. I have been ploughing through some of the post about changing the PCV for a fixed orifice of 3mm.
Ray mentions somewhere that doing this would get rid of " a fair portion of the "bucking syndrome".....as it causes rapid flexing of the copper plate againts the WOT stop plug...giving untimed enrichments. " ( Found the full post again http://www.shoptalkforums.net/viewtopic ... b66eb0c490 )
I thought my car was running fine but it has always been a bit jerky at the 30mph (ish ) mark. Would this be the sort of symptoms that Ray has described caused by a dodgy PCV or is it totally unrelated?
Therefore if I was to take this opportunity to fix the orifice at 3mm and remove the pcv from the equation what and how would I need to check/adjust to keep the engine running smoothly?
-
raygreenwood
- Posts: 11907
- Joined: Wed Jan 22, 2003 12:01 am
-
wshawn
- Posts: 209
- Joined: Thu Dec 27, 2007 6:36 am
OK thanks for that Ray. I'll try and pursuade it later.
Before I fix the orifice on the PCV would I need any special equipment to adjust anything afterwards?
In other words can you explain to an idiot what I may need to check?
If it is just the idle, I can do that easily enough but I'm not sure about the MPS.
Before I fix the orifice on the PCV would I need any special equipment to adjust anything afterwards?
In other words can you explain to an idiot what I may need to check?
If it is just the idle, I can do that easily enough but I'm not sure about the MPS.
-
raygreenwood
- Posts: 11907
- Joined: Wed Jan 22, 2003 12:01 am
What happens in this situation is that you should get a more stable idle. But...in general most D-jet injected engines that have the PCV valve end up either idling too low...and no manner of turning the idle screw will get it high enough (because they have too much air in the mixalready)...or they idle too high and cannot be brought down becuase there is too much air and fuel combined. What this generally points to is a poorly adjusted MPS...reacting to the intermittent vacuum leak of the PCV.
If your engine is already idling well..and you seem to have some meaure of control of the idle with your idle screw....meaning you might be able to drop 150-200 rpm by screwinfg it all tehway in...or rise about 200-300 rpm by screwing it all the way out....chances are you have pretty good balance on the MPS.
I would make two orifices...a 2mm and a 3mm and possibly a 4mm. Start with your idle screw set dead in the middle...with an equal level of turns available in both directions.Try each orifice.... to see which one stabilizes idle and affords you the WIDEST range of adjustability with the idle screw. For example....a 4mm orifice may make a nice stable idle...but with idle rpm around say 1100. If its working correctly..turning the screw in a couple of turns may bring it down to where you want. keep turning to see if you can bring it down to almost stall. Also turn it all the way out to see if you can bring it up higher than 1100.
My bet is that 3mm will work well. Thats what I use. If you have the drills..it could easily be a fractional size like 3.5mm. I think Piledriver said his uses a 2mm.
You may also find...that you get all of this right...and now you seem to have a bit of a flat spot or some losses in one rpm range or another.
Bear in mind that the MPS reads a controlled vacuum leak...which is what this is....as a signal for enrichment. The problem with tehe PCV is that it was not constant...so you could not just adjust the PCV toward leaner to compensate...because it kicked in anytime it wanted to in any rpm range.
If everything is well balanced you should be able to make a very slight tweek to the MPS to get it back into range...usually leaner.
So...install the orifice...with the dile screw set in the middle. Select the orifice that leaves you as close to proper idle rpm as possible....then do teh fine adjusting with the idle screw on the TB. But.....you do not want to have to take up a huge range of adjustment with the idle screw.
As an example.....with the 3mm orifice...I was left about 1000 rpm for idle. About 1.5 turns in gave me about 900. Great!
But...at this point I noticed it was running just a little rich...but not hideous. Its at this point that we adjust the MPS.
If everything was running well before you started this...meaning no flat spots of the line etc....then I would assume that your outer full load stp was reasonably adjusted as well as the inner stop. So....after you have removed the epoxy covering the plug in the back of the MPS....MARK IT!...with a scribe...to the case of the MPS. In this way you will count exactly how many turns inward that plug is. This VERY important.
Now look inside. See the screw in the center that fits a narrow flat blade screwdriver? Find a screwdriver that fits this. You will notice....that surouning that screw is what appears to be a hexagonal inverted nut...where you could insert an allen wrench....ir the center screw were not there. This surrounding bushing is a seperate adjustment for the inner stop. You need to find a way to securely hold that inverted outer nut in place while you turn the inner screw with the flat blade screwdriver.
Best ways to do this: either go to a hobby store and look for hard pklastic rods of hex material that fits...or round rod that you can file to fit. Then drill a hole through the center for the flat blade screwdriver. Or...if you want to getfancy...get an allen key that fits....and take it to a machine shop or put it on a drill press with cobalt bit...and drill out the center.
I have also used tubular nuts like you use for connecting fence wires..and drilled out the threads in the center. It pays to make a nice tool that you can keep in your box.
Start the engine. Don't rev it too hard without the outer plug or you may see it wanting to stall.
Turning the screw in...mains it lean...out makes it richer. You will be turning the center screw in encrements of about 1/10th or 1/8th turn. It is sensitive.
This is tedious...but rewarding. I mark that outer hex bushing around teh center screw as well to make sure I do not move it.
I make a small adjustment.....screw in the outer plug to its marked position...and drive around a set course. Stop....remove the plug....adjust...replace plug.
Lastly...while doing this....first let your car warm up fully. Then measure the resistance on your CHT. It makes for easier and more foolproof tuning if you then go down to an electroncis shop and spend $5 on a variable resistor that you can plug into the CHT wire instead of the CHT.
You could use a fixed oen as well. But for instance...if when warmed up your CHT reads 125ohms....dial in or plug in 125 ohms. What this does...is it keeps slightly rising head temps from stopping starting and driving from "skewing" your MPS tuning....by changing your mixture baseline. You don't have to do this...but it really makes it much simpler. Happy New Year! Ray