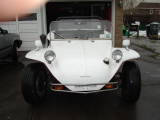
I just put the buggy back on the road after the long winter.
It's delightful.
The bad- It does not like full choke with the turbo (like a stocker) but doesn't like no choke. The best I have been able to do is make a cut-down choke plate so the throttle speed is up on the choke cam but not fully choked. The motor tends to stahl so blip it and go. Once a couple of minutes goes by, it is fine.
The good- this runs like a stock motor just putting around, it doesn't load up, it simply has more power on tap when crusing and is a hoot with full throttle from 3500 to 5500.
The concepts I show here are applicable to other carbs too.
The stock main jet is too small, it needs to go up a few thousandths ( I drill mine -welding tip cleaners and a mic are handy for seeing what you have and what you can step up to- if you don't want to drill jets - that's OK, I have no idea where to get Soles jets from).
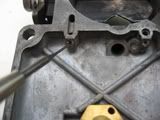
Here is my mod to the E-tube,causing the fuel curve to richen at the top end: soldering up the 2 bottom holes (pay no attention to the smeared solder from prior experiments:
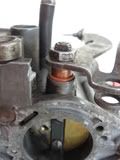
This mod I did to help cover the flat spot off idle, it brings the pump shot in at a quicker rate because I altered the ratio by bending the arm (probably would help N.A.):
I don't know how useful it was to punch the air holes closed a little( inside the carb top), that lead to the brass tubes which act as a hi speed enrichment on the carb but I did that.
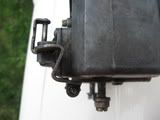
To add seals to the throttle shaft, remove the arms on each side, then you file off the peened-over part of the screws which retain the throttle plate on the shaft (these screws get locktited in later). Select a drill just big enough for boring a shallow pocket in the throttle shaft bore for an "O" ring- use a drill press and watch out for the drill to "Bite in and pull deeper than you want, the rings need to be gas compatible- I used silicone (don't know where I got them - bits of tubing will do.
The rings need to be "Captured" between the arms without binding the throttle shaft. The green stuff you see is epoxy I used to seal little holes after having drilled "Air seal" holes a long time ago, into the carb- Ididn't like them so I went with the "O" rings.
The carb can be turned back to N.A. function by undoing the mixture changes and leaving the seals in.
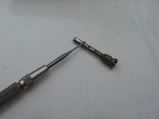
A long time ago I eliminated the 2 anti-dieseling solenoids on the carb. I richened up the idle jet by using a tip cleaner like a little round file in the idle jet, but I discoverd a better way which will work even with the idle solenoid.
Make a tiny groove with a small file on the angeled part of the idle jet tip - this will let more fuel into the carb via the groove. If you make a mistake, you can soldier up the grove and start over. Go slow and test with a warm motor, doing a little at a time. the small mixture adjusting screw on the driver's side is also a mixture tool - start with that one out a couple of turns.
Add another copper sealing washer under the fuel inlet valve to lower the fuel level, so that when, after boosting (and the resulting higher fuel level from the added fuel pressure during boost) your motor doesn't stumble when you brake.
Any questions?


