This is where my thinking is currently on the stand. I am still looking at 1' X 2" X .090 wall assuming I can get it.
Lee
An engine run cart build
-
Ol'fogasaurus
- Posts: 17881
- Joined: Mon Nov 13, 2006 10:17 pm
Re: An engine run cart build
You do not have the required permissions to view the files attached to this post.
-
Ol'fogasaurus
- Posts: 17881
- Joined: Mon Nov 13, 2006 10:17 pm
Re: An engine run cart build
My photobucket accound has stopped working so here is all the update I am able to do.
Lee
Lee
You do not have the required permissions to view the files attached to this post.
-
Ol'fogasaurus
- Posts: 17881
- Joined: Mon Nov 13, 2006 10:17 pm
Re: An engine run cart build
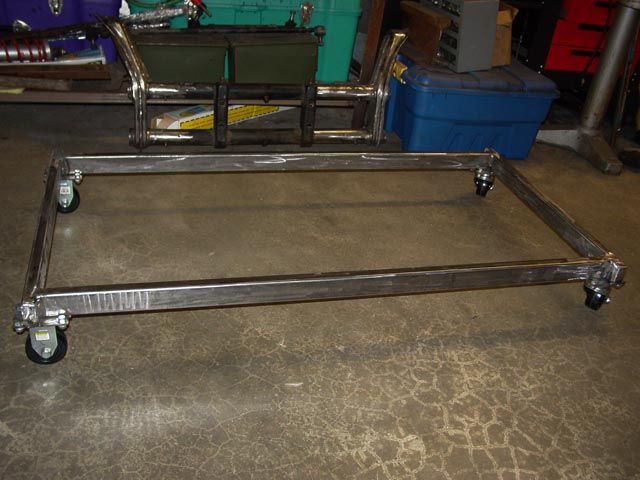
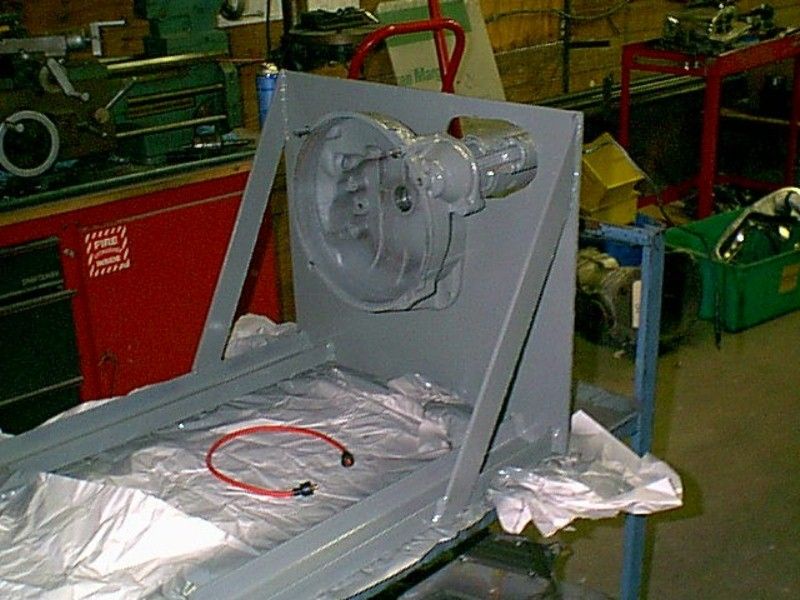
I got the basic frame of my run stand done today. The wheels are on and it is pretty square but there is a tiny wobble from front to rear on one side which I tracked down to one of the swivel casters being a bit looser than the other swivel caster. It is close enough I think I could ignore it or it might just take some thin washers between the foot and the caster mount to level things out. There is also a one or two degree rake to the cart which is from the different height between the fixed caster and the swivel caster, again, something I have to decide whether it is important enough to worry about.
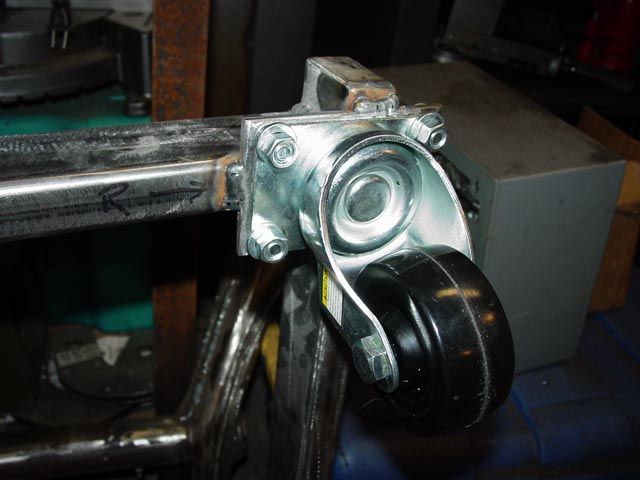
This is how I mounted the foot plates. In the front I welded between the two bolts and then turned the frame over and welded the underside where the foot contacted the frame. I could have done more welding but I think this is enough.
I had some problems with the welding too. It started out OK but then I started having problems finally ending with no wire coming out. I changed wire speed but it got worse. I finally went into the welder and took a turn or two one the pinch roller adjustment and now things are OK.
Now I can start measuring for height of the 002 bell housing and build that part.
Lee
-
Ol'fogasaurus
- Posts: 17881
- Joined: Mon Nov 13, 2006 10:17 pm
Re: An engine run cart build
I got to work on the mounting plate for the bell housing this AM.
I had tried to measure and mark the hole locations but that didn’t work out well so I clamped the bell housing on the center lines I had marked on the blued plate, centered the input shaft hole over the vertical center and used the top and bottom edges of the bell housing and marked the holes.
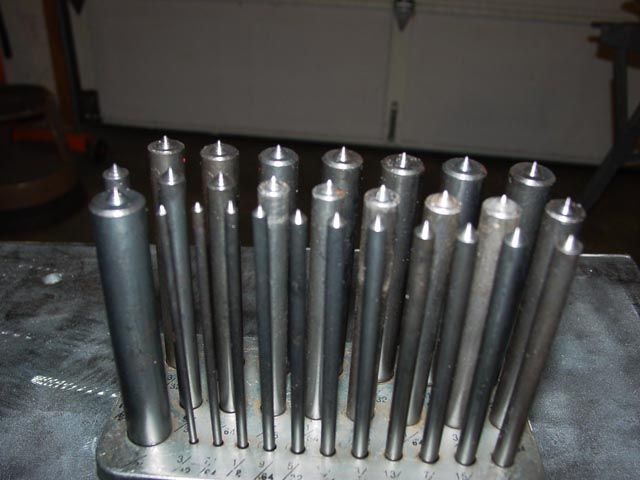
In case someone hasn’t seen them, this is what I used. This happens to be SAE but I found one center punch that was pretty close and carefully marked the holes. I drilled them close and had to slightly elongate one as it was about 1/32nd off center (it pays to have metrics stuff).


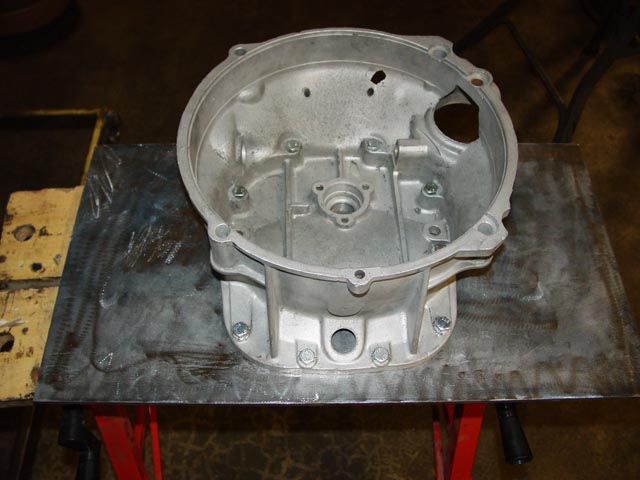
This is what I ended up with. I still have some work to do making room for the starter.
Lee
I had tried to measure and mark the hole locations but that didn’t work out well so I clamped the bell housing on the center lines I had marked on the blued plate, centered the input shaft hole over the vertical center and used the top and bottom edges of the bell housing and marked the holes.
In case someone hasn’t seen them, this is what I used. This happens to be SAE but I found one center punch that was pretty close and carefully marked the holes. I drilled them close and had to slightly elongate one as it was about 1/32nd off center (it pays to have metrics stuff).
This is what I ended up with. I still have some work to do making room for the starter.
Lee
-
turboblue

- Posts: 3969
- Joined: Fri Feb 07, 2003 12:01 am
Re: An engine run cart build
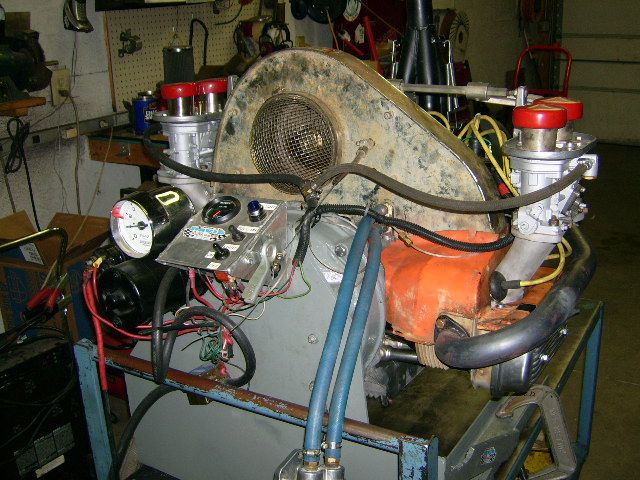
If the plate stays that big you won't have room for an engine with heater boxes.
We kinda shot from the hip and didn't really account for everything.
Mine started out like this:
Had to cut it up and change bracing to make room for exhaust.
We kinda shot from the hip and didn't really account for everything.
Mine started out like this:
Had to cut it up and change bracing to make room for exhaust.

-
Ol'fogasaurus
- Posts: 17881
- Joined: Mon Nov 13, 2006 10:17 pm
Re: An engine run cart build
Looking at old pictures of our buggies, none of which are conclusive, it looks like it is going to be close but if I have to I can do some more relief work on the plate. I think the front of the heads sit pretty close to the division between the engine and the transaxle.
I just went out and checked, the face of the bell housing is 4 3/4th of an inch, plus some change, away from the plate. I looked at the Tri-mil web page and they don't have any information on that exhaust arc. I don't know were I am going to get that info but I am sure it is going to be available somewhere. If I have to, I am sure I can make a spacer assuming it doesn't need to be too thick.
Thanks for bring that up; I wish it had been sooner though; you posted pix and I missed noticing that which I am sure is why you went with thicker stock.
edit: looking at yours a couple more times, I might have to do some changing (I knew this was going too easy). Luckily, I haven't cut the uprights yet which could give me a way out. Shazam!
Lee
-
Ol'fogasaurus
- Posts: 17881
- Joined: Mon Nov 13, 2006 10:17 pm
Re: An engine run cart build
I may have found a way around the exhaust and starter problem but it sure tain’t couth! It might have at the top something like a bent pyramid with a flat top. Not something I am going to be proud of but if it works...  I should know better tomorrow when I am fresh on this.
Lee
Lee
-
turboblue
- Posts: 3969
- Joined: Fri Feb 07, 2003 12:01 am
Re: An engine run cart build
We run in all the engines we build on that stand.Ol'fogasaurus wrote:What are heater boxes!

All of our group run off-road type of exhaust but you do bring up a good point; I hadn't accounted for the exhaust. AW &%$*!!!
Looking at old pictures of our buggies, none of which are conclusive, it looks like it is going to be close but if I have to I can do some more relief work on the plate. I think the front of the heads sit pretty close to the division between the engine and the transaxle.
I just went out and checked, the face of the bell housing is 4 3/4th of an inch, plus some change, away from the plate. I looked at the Tri-mil web page and they don't have any information on that exhaust arc. I don't know were I am going to get that info but I am sure it is going to be available somewhere. If I have to, I am sure I can make a spacer assuming it doesn't need to be too thick.
Thanks for bring that up; I wish it had been sooner though; you posted pix and I missed noticing that which I am sure is why you went with thicker stock.
edit: looking at yours a couple more times, I might have to do some changing (I knew this was going too easy). Luckily, I haven't cut the uprights yet which could give me a way out. Shazam!
Lee
Sometimes we use J tubes on the street engines instead of the heater boxes
The best I can tell a Tri-Mill is 4-1/8" from #3 exhaust flange to outside of bend.
Your casters may not be quite big enough either.
Mine have 4" wheels and I've already replaced one set.
They were urethane/plastic molded onto aluminum.
The red material cracked and broke off the metal.
Looked similar to these.

They take a bit of abuse breaking in engines.
-
Ol'fogasaurus
- Posts: 17881
- Joined: Mon Nov 13, 2006 10:17 pm
Re: An engine run cart build
Thanks Gary, your reply is just in time. On the wheels, even though the wheels I got are rated fairly high weight wise, they are still rated medium duty and I expect to have to change them soon as the weight just keeps on coming (I do like the way they, on the stand, roll so smooth and quiet; no rattles, almost no noise at all). They were the best I could find at the time; that and I don't want to go over 4" in diameter because of the other cart I have wanting to tip over (too narrow of wheel base with the weight sitting so high (you would have to be here to see what I mean).
I had thought I would be OK with the exhaust but didn't realize it was that close. You said 4.125 and I measured (roughly) 4.75 and some change (it actually measured 4.8645) which gives me a net difference of .625 which is 5/8ths. I could very easily build a heat shield that would attach to the corner of the exhaust tube to keep the warming fires off the bell housing mounting plate or, after many hours of deep constipation last night, I have another option which I am seriously thinking about. It is not as neat and pretty as the other way nor as simple but I think it would hold up to a heavier engine as long as I build the motor mount accessory (I plan on a lot of accessories; this could become a full time occupation/passion quite easily).
I have to draw it up which, if I get time tonight or tomorrow, I will post but it is changing the top of the stand to a little more difficult way of doing it (but I may learn something at the same time) but it will allow the starter and exhaust to be un-shrouded all the time which can be good or can be bad. I do like the idea of having the exhaust protected somewhat from accidental contact while the other way will leave it exposed to just about anything.
I am still open to suggestions, comments both good and Herbie.
Lee
-
Ol'fogasaurus
- Posts: 17881
- Joined: Mon Nov 13, 2006 10:17 pm
Re: An engine run cart build
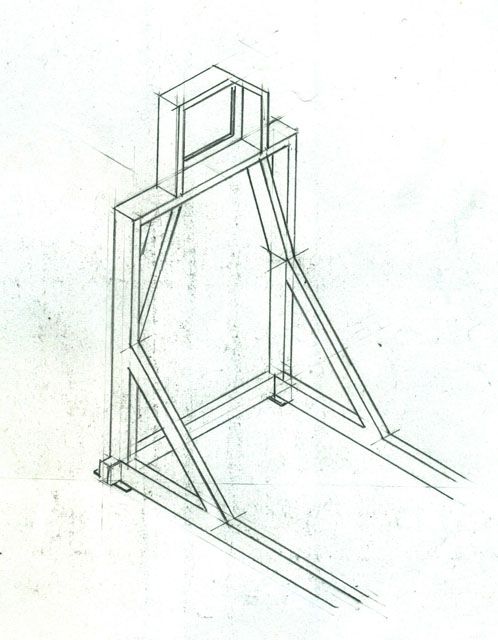
This is option #2 that I have been thinking about. Still not to scale but it will give you an idea of what I am thinking about. It is getting heavy but then I don’t really care. Not a business where I am moving it about in a truck all the time and it is going to be used for an engine storage dolly.
After I got thinking about what turboblue and DaleM pointed out about the starter and exhaust system being a problem I went out and looked at what I have so far. After several more trips in and out of the garage and some sketches I laid down some 1” wide painters tape and after some futzing around I also traced the outline of the bell housing where the starter sits. I found that some cuts at 45° (I have to get the dimensions for both ends) that the starter, even a large one should be OK.
By reducing the height of the uprights the exhaust should clear. I am not sure what the width of the engine is and how far the exhaust would stick out even with an over the top Tri-mil Bobcat would be (wide as I remember) but this way the up-rights would not be in the way.
The vertical dimension of the bell housing plate will remain the full 12” but I need to figure out the width and where the angle cut would start and end. Since the height would not be adjustable as I originally wanted I will still use the 2 ½” X .120 wall stap as a doubler and still go to the bottom of the cart to act as a doubler over the weld.
For the top, I had some 2” wide X .120 wall to use as a doubler off the top piece and a to weld the plate to.
Comments and ideas still welcome.
Lee
-
TimS

- Posts: 5723
- Joined: Fri Apr 23, 2010 10:11 pm
Re: An engine run cart build
Lookin goog, 'Fog. Nevermind the metal work, I just wish I could draw like that.
Don’t ever yield your gift of dream; Your knack for gumption, too. For “It’s the crazy ones that have all the fun," if dreamers yearn to do.
-
Ol'fogasaurus
- Posts: 17881
- Joined: Mon Nov 13, 2006 10:17 pm
Re: An engine run cart build
Thanks for the compliment Tim; after almost 34 years on the drafting table this should come easy but I sure have gotten rusty not to mention old age slowness. Isometric drawing is easy to do and if you didn’t know how to do it, it could be taught very easy. It is equivalent of a sketch with straight lines and some formal help.
Now if it were Axonometric Geometry, that is a different story; it is time consuming and requires some special ellipse templates’ and ellipse protractors and a very weird looking graph paper; it is a mechanical form of Trig and in CAD, is what the computer does when you are working in 3D and want to look at your part rotated/or while rotating the part spherically.
http://www.oldgloryprints.com/Fortresse ... 20Fire.htm
This is a print of a Keith Ferris drawing (he is a Technical Artist) and is Axonometric Geometry taken to the extreme. Each of those airplanes at drawn at different angles of view and if you could get up there to measure the picture and knew the angles that the airplanes were viewed at, you could pretty much reconstruct a Orthographic Drawing (aka three-view) of them to scale. He has a huge mural similar to this at the Smithsonian which covers a full wall.
Lee
-
CentralWAbaja

- Posts: 4287
- Joined: Fri Feb 05, 2010 9:05 pm
Re: An engine run cart build
I was concerned about this very thing on my welding table. One thing I wish I had done different though was to make all four wheels swivel. I was afraid that it was going to be to top heavy and pushing it sideways might result in a tip over. However after using it for a couple years now. I do wish I had gone the other direction as it seems that there is no way that thing is going to tip over, and it really is a bugger to maneuver it around with 2 fixed wheels. I don't know what your footprint is compared to mine? Mine is 28x58 and the wheels are tucked in more that I wanted but seem to be good. In this pic I think that the wheels are only about 24" apart.Ol'fogasaurus wrote: On the wheels, even though the wheels I got are rated fairly high weight wise, they are still rated medium duty and I expect to have to change them soon as the weight just keeps on coming (I do like the way they, on the stand, roll so smooth and quiet; no rattles, almost no noise at all). They were the best I could find at the time; that and I don't want to go over 4" in diameter because of the other cart I have wanting to tip over (too narrow of wheel base with the weight sitting so high (you would have to be here to see what I mean).
Lee

Now there is the chance that its side to side stability comes from having the other two wheels fixed in the other direction....I don't know?
My table is about 1250lbs with close to 950 of that being in the top 6 inches (top and plasma racks) I think mine are 5" or 6" wheels. They are Colson Castors http://www.colsoncaster.com/ that I bought off Ebay. It was the best money I spent as they roll like a dream. I think mine were about 20-25 each. But here is a set of 4" similar ones http://www.ebay.com/itm/4-HEAVY-DUTY-4- ... 3a7bf556e1 That seems like a great price as I think you will have a hard time finding anything that good of quality in local market. About $16 each to the door.
Anyway, just some thoughts based on mine
It is not Mickey Moused.....It's Desert Engineered!
-
Ol'fogasaurus
- Posts: 17881
- Joined: Mon Nov 13, 2006 10:17 pm
Re: An engine run cart build
Thanks for the compliment Tim; after almost 34 years on the drafting table this should come easy but I sure have gotten rusty not to mention old age slowness. Isometric drawing is easy to do and if you didn’t know how to do it, it could be taught very easy. It is equivalent of a sketch with straight lines and some formal help.
Now if it were Axonometric Geometry, that is a different story; it is time consuming and requires some special ellipse templates’ and ellipse protractors and a very weird looking graph paper; it is a mechanical form of Trig and in CAD, is what the computer does when you are working in 3D and want to look at your part rotated/or while rotating the part spherically.
http://www.oldgloryprints.com/Fortresse ... 20Fire.htm
This is a print of a Keith Ferris drawing (he is a Technical Artist) and is Axonometric Geometry taken to the extreme. Each of those airplanes at drawn at different angles of view and if you could get up there to measure the picture and knew the angles that the airplanes were viewed at, you could pretty much reconstruct a Orthographic Drawing (aka three-view) of them to scale. He has a huge mural similar to this at the Smithsonian which covers a full wall.
CWB, thanks for the information on the casters and the source as they are something I think I am going to have to change. Right now my money and thoughts are on the top but I haven't forgotten about the bottom. The top of your tables are about where I want the centerline of the crank shaft to be; ~30". Origionally I thought 36" was about right and 48" was too long but I took a gamble and went with the 48" which I am thinking was a good guess. I might go ahead with the 4 swivel casters also as my new rolling drawers have them and it has been much easier to place it exactully where I want it with than it would be as I have it now.
The position locks on the cart in the background is exactually what I have been planning on doing. Thanks a lot for the pictures of that.
Lee
-
turboblue
- Posts: 3969
- Joined: Fri Feb 07, 2003 12:01 am
Re: An engine run cart build
One day the plan is to build another stand.
Next one will address the issues I had with the 1st one as well as raising it a bit off the cart it is clamped to.
Right now it is difficult to get a pan beneath the engine to change oil.
If we are working on an engine with a deep sump, impossible.
My stand is clamped to the cart as the intention was to make it removable in case I needed the cart for something else.
As of today, it's never been removed............