So I'm going to put this sucker back together. Here is my next question. I've taken off the head and two of the cyclinders. There were shims inbetween the cylinders and the case, the ones that lowered the compression down. Do I need to replace those? Also wear exactly are the gaskets and what gets RTV when I put things back together. I have a copy of that hippy book about how to keep your VW running forever (can't remember what its called exactly) and he mentions some copper gaskets and paper ones. When I took the head off there didn't really seem to be anything in between the head and cylinders. Though I could have missed it. So if it's not too much trouble could someone let me know what I need to buy to safely put this back together assuming non of the push rods are bent or anything like that.
Next thing. I have said a couple times that the brakes are bad. I talked to the guy who built it last night and he was explaining exactly whats wrong. The front brakes are stock and they work perfectly, the problem is that the tiny tires up front don't have enough traction really. They just skid. The rear brakes are from a squareback because they are bigger, but he was never able to get them to work well because they were so much bigger and the system just can't keep up.
Any thoughts on how I could make the squarebacks work or should I convert back to stock in the back or should I go disc?
Thanks again for the input, I will have some more pictures as I dig into this project.
Free.99 Baja Bug Build
-
motorbreath53

- Posts: 2169
- Joined: Wed May 21, 2008 5:57 pm
Re: Free.99 Baja Bug Build
The squareback (or T-III) rear drums are an upgrade. It sounds like the brake bias was never switched. Its a common baja bug trick, to "flip" the wheel cylinders. Front cylinders in the rear drums, and rear cylinders in the front drums. Its a very simple swap. Bolt in even.
Might as well do new cylinders while its appart. Hopefully someone can chime in with what years yeilded the best cylinders. (Its listed in Jeff Hibbards Book.) You should buy that anyway.
Might as well do new cylinders while its appart. Hopefully someone can chime in with what years yeilded the best cylinders. (Its listed in Jeff Hibbards Book.) You should buy that anyway.
Baja5 was right...
-
Devastator
- Posts: 3493
- Joined: Tue Nov 06, 2007 6:51 am
Re: Free.99 Baja Bug Build
Clean the surface that the cylinder sets agains on the case. It is between the cylinder and the case that a gasket goes...if you were running stock cylinders. Since you're not, apply a light bead of silicone on the cylinder's shoulder and slip them back in.
Install the cooling tin underneath the cylinders, (use the modern "cool tin" that is available if you have that old stock stuff). Now come the pushrod tubes, which you stretched about 1/4" and gasketed beforehand. There is a debate about what, if any, sealant to use on the pushrod tube seals. I use aviation high tack applied sparingly. Next you install that copper shim, (no, you can't take it out or the pistons will likely hit the heads). Now, you install the head and torque accordingly.
I highly recommend decking the head to clean up those grooves that the copper shims put in the heads, or you stand a 50% chance of developing a compression leak.
Devastator's Build Thread
Sandrail
2.4 liter, supercharged Chevy Ecotec
"If everything seems under control, you're just not
going fast enough."
Mario Andretti
Sandrail
2.4 liter, supercharged Chevy Ecotec
"If everything seems under control, you're just not
going fast enough."
Mario Andretti
-
dustymojave

- Posts: 2312
- Joined: Mon Dec 01, 2008 9:08 pm
Re: Free.99 Baja Bug Build
MB -- T3 rear drums use wheel cylinders which are not necessarily interchangeable with any ol' front wheel cylinders. MB is right in general tho'. Just make sure the wheel cylinders you put in the front are small and the rears are larger in diameter. Like 19 front and 22s rear. They have to be the right length and the correct offset to the center of the cylinder bore from the backing plate.
I have to disagree with Chris V about the 92 cylinders. I haven't seen "Thin wall" 92 cylinders since the early 70s. I have a set I bought in 1974 and just retired last year. If they are quality cylinders, they will be fine. The 2180 with those cylinders everybody still goes on about how thin their walls are and how they overheat is the winningest engine combo in the history of desert offroad racing. In spite of all the fuss which still goes on after 40+ years. It is still an excellent engine combination. If you had Mahle or old Kolbenschmidt or even Cima brand 92 cylinders, there should be NO issues with them. This engine of yours is old...So the cylinders MUST HAVE worked just FINE until someone oopsed with an 8mm nut down the carb. It would be good to take some of the high spots off the piston and head, but otherwise, I say schlepp it back together and run it!!!
To put the engine back together from where it is shown with the 2 cylinders off, put the spacers back under the cylinders with a smear of red silicon. Put it on the spacers and cylinders before they are put in the case. You will need a piston ring compressor. The simple band type you hold with vise grips works best. 1300 and bigger VW engines do NOT use copper gaskets under the heads, and with the silicon, you don't need the paper ones under the cylinders. Be ready to install and torque the head right after you put the cylinders on so the silicon gets squished out. If you wait, it winds up too thick and you will have a loose head and leakage. Don't put so much silicon in that it gets into the crankcase. That can stop up the oil system and kill the engine. Check the torque sequence in the "How to Keep Your Volkswagen Alive" book before you put the cylinders on. Try to memorize it. It's pretty simple actually. The push rod tubes have to be installed as the head goes on. you can silicon the existing seals unless they are hard. The tubes need to have the bellows at the ends pulled out a little to give it some crush when you torque the head. You just pull them by hand and work them side to side a little. There should also be a small square plate that clips on under the cylinders before the push rod tubes go in.
Richard
Lake LA, Mojave Desert, SoCal
Speed Kills! but then...So does OLD AGE!!
Tech Inspection: SCCA / SCORE / HDRA / ARVRA / A.R.T.S. OffRoad Race Tech - MDR, MORE, Glen Helen BajaCup
Retired Fabricator
'58 Baja with 955K Miles and counting
Lake LA, Mojave Desert, SoCal
Speed Kills! but then...So does OLD AGE!!
Tech Inspection: SCCA / SCORE / HDRA / ARVRA / A.R.T.S. OffRoad Race Tech - MDR, MORE, Glen Helen BajaCup
Retired Fabricator
'58 Baja with 955K Miles and counting
-
560
- Posts: 986
- Joined: Mon Jul 12, 2010 12:08 am
Re: Free.99 Baja Bug Build
I agree with this also...motorbreath53 wrote:...not by me. Clean off the big chunks and have at it. If the motor is lunched, whats the worst that could happen. A single weekend worth of fun is worth the gaskets and RTV required to bolt it back together...This may get me flamed to death...
If there is time I will tell the story about my first (40hp) rebuild in my 1st baja when I was 18...
I am now 44 and still trying to figure it out...
Mike
Jackpot motorsports
-
A.Aeschbury
- Posts: 20
- Joined: Sun May 06, 2012 8:30 am
Re: Free.99 Baja Bug Build
Awesome. Thanks so much. I'm getting really excited about getting this car back together. Now if only I could get some free time from work. We are in the slow process of converting the space that the engine is in to our wood shop (in addition to the normal workload) plus one of my partners is out of town. More money for me, no time to spend it, haha.
I spoke more with the guy who built it last night. He gave me a bunch more details about the life of the car. It turns out it hasn't really been used that much. The "stupid high compression" set up actually never ran. He originally built it without the spacers and the starter couldn't crank it. The spacers seem pretty thick. There are two and they look to be both about .125". He also only daily drove it for about a year, then five years of once a month, then like five times in the next five years, then five years sitting in a garage. Then he sold it and it was daily driven for few months before the nut when into the cylinder. He said probably 15k max on the engine build.
The car also has a piece of angle iron welded along the length of the drivers side floor pan were the heater channel used to be. Last thing. He did a four lug to five lug swap on the wheels, but one stud on each wheel doesn't stick out far enough to put a nut on it. Any thoughts on what that's about? Seems super sketchy.
Oh last last thing. I gotta buy an exhaust. I'm running the dual carbs so I know that limits things a bit. Thoughts?
-
A.Aeschbury
- Posts: 20
- Joined: Sun May 06, 2012 8:30 am
Re: Free.99 Baja Bug Build
Devastator wrote:I highly recommend decking the head to clean up those grooves that the copper shims put in the heads, or you stand a 50% chance of developing a compression leak.
Would this be insane to try?
http://www.youtube.com/watch?v=mc_gaGAf ... re=related
Also from some other forums I have read those copper gasket detents can be pretty deep. If you machine or grind them out in one head but not the other is that going to throw the engine all out of whack as one head would have higher compression?
Also I have access to a parts cleaner and a media blaster. Any of that worth it? I've read about soda blasting to remove hydrocarbons.
-
A.Aeschbury
- Posts: 20
- Joined: Sun May 06, 2012 8:30 am
Re: Free.99 Baja Bug Build
Nevermind about that Youtube video. There are these raised sections on my head that keep the shoulder of the cylinder form laying flat against the underside of the head. They are there on purpose. Would that be to increase the deck height. Either way there were no copper gaskets and there are no grooves from any sort of gasket. I'm going to clean them up and put it back together. Still looking at exhausts though. I'm not even clear what type I can run.
-
Devastator
- Posts: 3493
- Joined: Tue Nov 06, 2007 6:51 am
Re: Free.99 Baja Bug Build
This is assuming you had shims there to begin with. I believe you stated that the shims were made of copper and between the cylinder and cylinder head. This is where they belong if they are made of copper. The shims that go between the case and cylinders are made of steel and have 4 cut-outs to clear the studs.dustymojave wrote:put the spacers back under the cylinders with a smear of red silicon.
dustymojave wrote:1300 and bigger VW engines do NOT use copper gaskets under the heads
I believe that the spacers referred to in the original post are for lowering the compression and not gaskets. There are not any gaskets between the cylinder and cylinder head. There can be, however, copper shims that are used to lower the compression ratio. Copper is used because it is softer than the cast iron cylinder, but harder than the aluminum cylinder head. They work quite well, but tend to leave grooves in the cylinder head because they are harder than the aluminum, (as previously stated).A.Aeschbury wrote:Either way there were no copper gaskets and there are no grooves from any sort of gasket.
Yeah, you'll alter the compression a little, but probably not enough to cause any concern as the grooves are, usually, only about .010 deep. If you were rebuilding and/or blueprinting this engine, then decking both heads would be the only way to go. As I understand it, however, you are just going to "slap it back together" and run it, so a .010 difference in head CC's probably won't affect you very much, if at all. FWIW, I did it to my engine, and it runs just fine.A.Aeschbury wrote:If you machine or grind them out in one head but not the other is that going to throw the engine all out of whack as one head would have higher compression?
Totally!dustymojave wrote:It would be good to take some of the high spots off the piston and head, but otherwise, I say schlepp it back together and run it!!!
Devastator's Build Thread
Sandrail
2.4 liter, supercharged Chevy Ecotec
"If everything seems under control, you're just not
going fast enough."
Mario Andretti
Sandrail
2.4 liter, supercharged Chevy Ecotec
"If everything seems under control, you're just not
going fast enough."
Mario Andretti
-
Devastator
- Posts: 3493
- Joined: Tue Nov 06, 2007 6:51 am
Re: Free.99 Baja Bug Build
LOL! My milling machine doesn't weigh 16, or 10 tons. Hell, my lathe and mill combined don't weight that much.A.Aeschbury wrote:Would this be insane to try?
http://www.youtube.com/watch?v=mc_gaGAf ... re=related
You can try this if you want, although I don't think it would be any better than just putting it back together without surfacing the head at all. I've have had them reseal without surfacing them, (after using copper shims against the head), and I've had them leak, requiring a resurfacing job. Either way, I don't think that the technique shown in that video increases your chances a single bit, especially since you can't get into the correct area with "your wife's glass table" anyway. You'd have to use a disk with sandpaper stuck to the end of it, spinning in a drill.
Edited repeatedly because I can't type for @#%!
Devastator's Build Thread
Sandrail
2.4 liter, supercharged Chevy Ecotec
"If everything seems under control, you're just not
going fast enough."
Mario Andretti
Sandrail
2.4 liter, supercharged Chevy Ecotec
"If everything seems under control, you're just not
going fast enough."
Mario Andretti
-
A.Aeschbury
- Posts: 20
- Joined: Sun May 06, 2012 8:30 am
Re: Free.99 Baja Bug Build
Devastator wrote:LOL! My milling machine doesn't weigh 16, or 10 tons. Hell, my lathe and mill combined don't weight that much.A.Aeschbury wrote:Would this be insane to try?
http://www.youtube.com/watch?v=mc_gaGAf ... re=related
You can try this if you want, although I don't think it would be any better than just putting it back together without surfacing the head at all. I've have had them reseal without surfacing them, (after using copper shims against the head), and I've had them leak, requiring a resurfacing job. Either way, I don't think that the technique shown in that video increases your chances a single bit, especially since you can't get into the correct area with "your wife's glass table" anyway. You'd have to use a disk with sandpaper stuck to the end of it, spinning in a drill.
Edited repeatedly because I can't type for @#%!
The shims are definately under the cylinders to lower the compression. There are no copper gaskets.
My mill only weighs 800 lbs. But its only for wood.
-
Chris V
- Posts: 3410
- Joined: Tue Sep 03, 2002 12:01 am
Re: Free.99 Baja Bug Build
At the very least you should lightly lap the barrels into the heads...valve-grinding compound(s), a junk cylinder, a spare flywheel and a few moments time - just a 'blessing' procedure that should increase your odds.
-
A.Aeschbury
- Posts: 20
- Joined: Sun May 06, 2012 8:30 am
Re: Free.99 Baja Bug Build
So I order a competition exhaust from chirco and some other little things and set to getting the engine all cleaned up and buttoned back together. As I was getting the piston rings lined up to put the ring compressor on and put the cylinders back on I broke the top ring on one piston. It was stuck and I figured that I just needed to pry it off that bottom of the groove to get it to spin into position. Wrong. It was really stuck and broke. I managed to get the majority of the ring out but the section where it was stuck is now truly stuck in the groove. It's currently in the freeze in hopes that I can pop it out tomorrow. It's definately a bummer, I was really hoping to get the engine in the car this weekend.
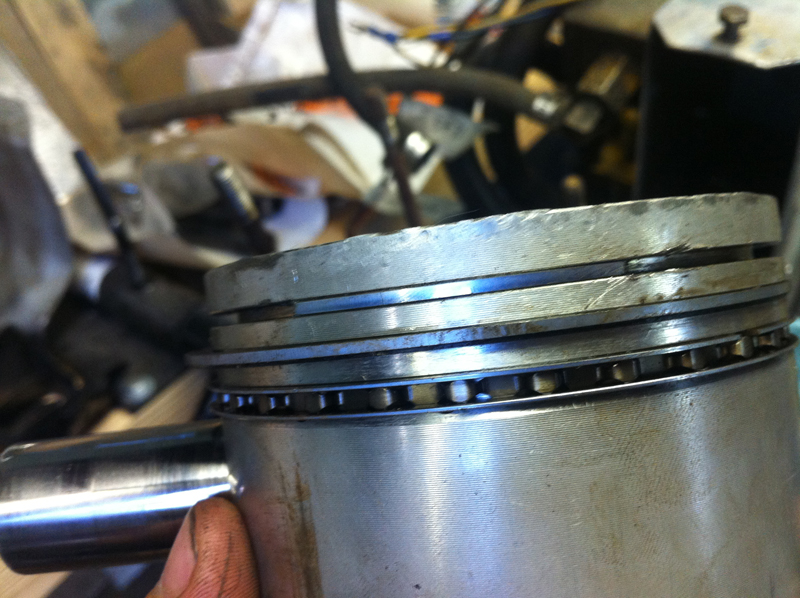
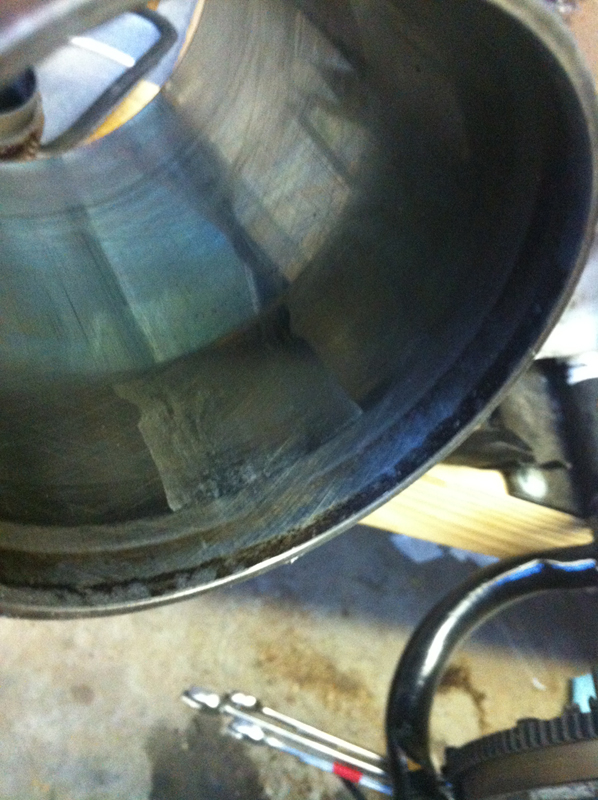
That section of the cylinder wall that has a different texture from the rest of the wall lined up with the stuck portion of the ring. Is this indicative of a bigger problem?
Is it ok if I get a piston ring set but only replace that top broken one? I'm a little worried this build is just getting too bootleg.
Also speaking of getting the engine back in the car. I have purchased a bunch of M10 nuts and a couple grade 8 M10 bolts. I have seen some things about needing one special bolt for the top right mount. If so is this it:
http://www.chircoestore.com/catalog/pro ... ts_id=1037
On a happier note the free.99-ness continues with a torque wrench, 3.5 ton rolling jack, battery charger, ring compressor, and a compression tester free of charge.
Nothing is ever easy