Basic Off-road Ball-Joint Beam rebuild PT 2 starts on p. 13

Offroad VW based vehicles have problems/insights all their own. Not to mention the knowledge gained in VW durability.
Ol'fogasaurus
Posts: 17881
Joined: Mon Nov 13, 2006 10:17 pm

Re: Very Basic Off-road Ball-Joint Beam rebuild

Post by Ol'fogasaurus »

BAJA-IT wrote:I belive I just used some 1/8" flat strap that I had laying around for the doubler.
The post on mine is 7/8"x.120 tube with a 5/8" grade 8 bolt through it. The outer piece comes off with the bolt and makes it easier to get the lower arm on the torsion springs (the hook doesn't hit the post before the springs are in the arm).

BAJA-IT, thanks, I am going to have to build another BJ beam, and a king and link beam before too long and that is what I wanted to know. A tight fit on the through bolt is a must.

I just got in from machining a drill jig (did I mention I was anal about some things. I think Leather mentioned that too when he introduced me several years ago). I'm trying to down load the pictures right now.

Lee
Ol'fogasaurus
Posts: 17881
Joined: Mon Nov 13, 2006 10:17 pm

Re: Very Basic Off-road Ball-Joint Beam rebuild

Post by Ol'fogasaurus »

I am going to rename this string something else as it is sure a big learning curve for me.

In the last installment (pictures)I had just piloted the hole (camera battery went dead) for the post to be installed. When I go drill out the hole for the post, I ran into some problems. One was that I couldn’t find a hole saw for 7/8” without spending $90 + tax for a set of hole saws, none of which are the sizes that I would use. DeWalt was supposed to have a 7/8 but no one carries one. I could get a step-drill but it was too long to go into the tower deep enough so I ended up ordering a 7/8” drill ½ drive. I was warned about being careful with this in my ½ gear drive drill which I was already for so I started the process of going up drill sizes until I was up to drill sizes somewhere between ½” and ¾” (I forget the last size and that was as big of drill as I had. I then started with the 7/8 bit and it went OK (remember, I am leaning against it just in case it hooks and rattles my chain) until just before it went though when it dug in and I went flying, Both pair a glasses when flying (safety and close up) as well as myself. The handle put a blood blister and a beet red bruise on me and this was after being prepared for it. After a couple more sessions I got the last of the edge of the hole deburred and the drill dropped though. That was about all I could take for the day. (Hmmm, maybe this string should be called “an Idiot with a drill and not enough sense to have it done by a younger person”… Naw, true but not politically correct.

I tried to find a hole saw again, one without a arbor but I could not find anyone who has them either. &/8” is just a weird size I guess. I am definitely going to get a step drill for the other side.

I put the post in the hole and it is a very nice fit, not a “honeymoon fit” (class I), but snug. After putting the trailing arms back in I only had 3/8” over the top of the hook so I asked questions about that but I can’t find the post other wise I would link it. I was not too comfortable with that small of a figure sticking out but I was assured that that was OK and go ahead and drill though and use a doubler to support the other side like I had planned.

This is the link to the welding question:
(http://www.shoptalkforums.com/viewtopic ... 8&t=136905

I tried to figure out how to drill the hole and still have the post be vertical not have a messy back of the shock tower. One of the things I mentioned earlier was to build a drill jig and that is what I did today. I did not pretty it up and used old scrap and old tools so it is serviceable but will not go into a museum.

http://www.shoptalkforums.com/viewtopic ... 8&t=136905

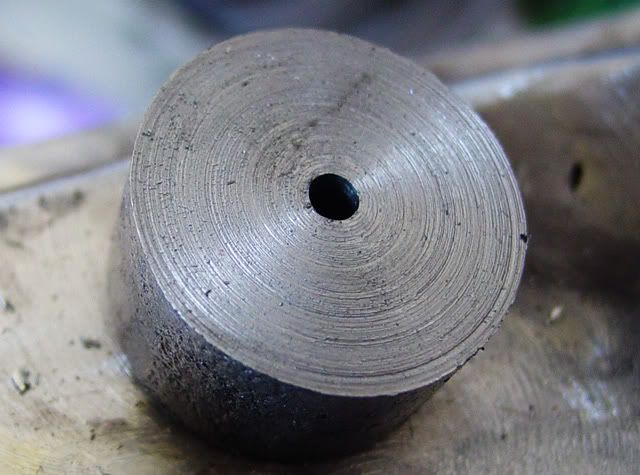
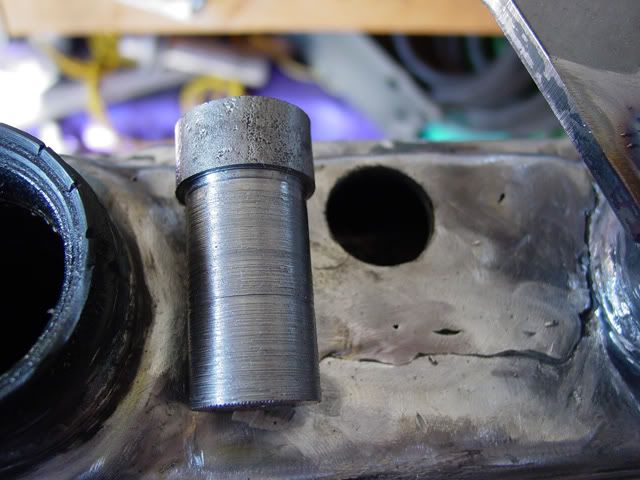
My Late step-son and his friend (he passed young too) had given me a lot of odds and ends of steel and this was 1” think piece of round bar stock that I cut off just over 2” long. I chucked it up in the lathe, checked the run out and trued the end then put an end mill in a holder and set it in the tail stock and touched the center of the piece to make sure I had a flat surface, then put the drill chuck in the tail stock and started to drill though the piece. I got the pilot hole down about an inch then moved up to a 1/8th inch drill bit and chased the hole. I then turned the piece around and duplicated the process from the other side finally joining both holes. I ran the ½” drill completely though to assure that things were OK then started to turn the outside down to 7/8”. I used a dead center inserted into the pilot hole to ensure things stayed straight then turned the shank of the piece down to the distance of the inside of the shock mount and the outside of the other half of the shock mount on the other side where I have a lip.

This is what I ended up with:

Image

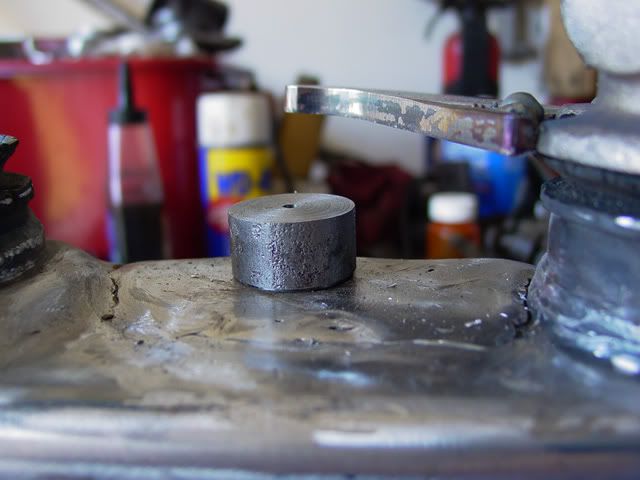
This is the head of the jig sitting in the 7/8” hole. The land on the jig is about .015 higher than the shock mount surface.

Image

Image

This brings me up to date on this.

Lee

Edited to reload the pictures
Last edited by Ol'fogasaurus on Wed Jul 27, 2011 9:32 pm, edited 1 time in total.
User avatar
Lotrat
Posts: 4975
Joined: Sat Mar 29, 2008 11:43 pm

Re: Very Basic Off-road Ball-Joint Beam rebuild

Post by Lotrat »

You deleted the pictures before I got a chance to see um. I guess I'll read all the words and try to figure it out.
Ol'fogasaurus
Posts: 17881
Joined: Mon Nov 13, 2006 10:17 pm

Re: Very Basic Off-road Ball-Joint Beam rebuild

Post by Ol'fogasaurus »

Lorat, they show up in my opening up of this session to look at your post. If they don't open up soon, let me know and I will edit the post again.

Lee

Edited: I reloaded the three pictures. The last picture (the bottom one) had disappeared from Photobucket.
Last edited by Ol'fogasaurus on Thu Jul 28, 2011 8:50 am, edited 1 time in total.
User avatar
Lotrat
Posts: 4975
Joined: Sat Mar 29, 2008 11:43 pm

Re: Very Basic Off-road Ball-Joint Beam rebuild

Post by Lotrat »

They are all there now. Very nice.
Ol'fogasaurus
Posts: 17881
Joined: Mon Nov 13, 2006 10:17 pm

Re: Very Basic Off-road Ball-Joint Beam rebuild

Post by Ol'fogasaurus »

If I get a chance today (the wife is in a destructive mood for the yard and front flower garden), I am going to try to get those voids in the welds filled and smoothed out. Since I spend a lot of time on the Pacific Ocean beach I want to get rid any voids where salt water can sit and "grow". I've seen more than several beams, pans and sand rail chassis' from the area rusted out from salt getting into voids (or the salt in the air). Those small pressure washers are nice to have a round at times assuming you use them for good not evil (work is evil).

Lee
User avatar
bajaherbie
Posts: 9967
Joined: Sat Jul 15, 2006 7:07 pm

Re: Very Basic Off-road Ball-Joint Beam rebuild

Post by bajaherbie »

man up and tell the wife that you have more important things to do.....


:lol:
Of all the paths you take in life, make sure a few of them are dirt.
Ol'fogasaurus
Posts: 17881
Joined: Mon Nov 13, 2006 10:17 pm

Re: Very Basic Off-road Ball-Joint Beam rebuild

Post by Ol'fogasaurus »

I got a chance to use the jig and it did work great. I had left it a bit long as I didn't measure the thickness of the other shock mount and I felt better safe than sorry. I sharpened up a drill and held the jig in place and was though very quickly. Proceeded to go up drill sizes and even tried a step drill but it didn't work that well. You pretty much have to drill though from the outboard side of the shock mount as there isn't enough room to get the big drill in place. I slowed down the RPMs on the big drill when I got to the 3/4 and 7/8 drill sizes: to about ~1 or ~2 revolutions per second and even then, I was still getting bounced around as the flutes dug in.

I put the post in the hole to check perpendicularity and it was so close it is hardly worth mentioning. Now I have to build the doubler for the back side. Then start on the other side.

Lee :D
Ol'fogasaurus
Posts: 17881
Joined: Mon Nov 13, 2006 10:17 pm

Re: Very Basic Off-road Ball-Joint Beam rebuild

Post by Ol'fogasaurus »

I got this from Dale M at his site and I though there was a lot of information that was pertinent to someone doing a beam build like this. Thanks again Dale, I am including it as I felt the information is worth including.

“Some more information here....

http://www.thesamba.com/vw/forum/viewto ... 65#5478165

Dale”


Thanks Dale, there are a lot of ways to do this as I am finding out.

I like the temp use of all-thread to replace the shock absorber freeing up your hands when fitting the hooks in place for fir welding in at full droop and compression (when I first saw the All-thread, I couldn’t figure why as All-thread is about as worthless as certain female pig parts on a boar hog, but then I picked up on the idea and WOW, it is a very good idea). The idea being to go to full Ball-joint travel then back off a bit in both droop and compression; the idea being to get as much travel as possible without putting the ball-joints in jeopardy.

One of the guys did not have a hook on what I think was the upper trailing arm for droop as he was planning on putting a different stop in place for it (I hope it was droop anyway). Droop is something that I am not as concerned with as compression. I figure I might hit full droop once-in-a-while, but who knows what really will happen. It is the compression of the suspension that I would think will be the more violent of the two situations and that the shocks (dampeners), properly chosen, should make the droop situation so much softer when contact is made.

The length of the post that came with the kit does not allow me to put the additional piece though in the back side of the shock like he/they did. It looks like their post is smaller in dia too but that could be just an illusion too as the hooks look as deep as the ones in the kit and also hit off center of the hook like mine do also.

I cut and drilled a piece of .120 flat stock today to use as a doubler/support on the inside surface of the shock tower. After clamping it in place with the post sitting through the two holes in the shock tower and another 1/8 below the soon to be welded in doubler (the offset to be used for welding), I barely will clear the hooks as they currently sit (they are not welded in their final position, only tacked) on the trailing arm boss when the arms are rotated to where they are hitting the post.

I also got some new grease seals for the upper and lower beams to install after final fitting in place, welding then painting of everything on the build. I guess there are inexpensive seals (from what I was told, the inexpensive ones are cheap) and the better seals. The better ones were in the high part of the $20 to $30 range. My lower seals definitely were letting water into the bearing area. One thing that was done was to put the inside piece of metal to support the post at what looks like being over the inside needle bearing area. The heat from welding could do nasty stuff to them.
BAJA-IT
Posts: 2046
Joined: Tue Oct 07, 2008 5:02 pm

Re: Very Basic Off-road Ball-Joint Beam rebuild

Post by BAJA-IT »

When you set the hooks to their final position, don't forget to check the travel with the spindle turned to the right and left.
BRAT Motorsports #936
Bolt Center: Salt Lake City, Ut
ACE: Air Cooled Engineering, now Black Line Racing
Ol'fogasaurus
Posts: 17881
Joined: Mon Nov 13, 2006 10:17 pm

Re: Very Basic Off-road Ball-Joint Beam rebuild

Post by Ol'fogasaurus »

Good idea! I hadn't thought about that one at all; spindle mounts and no backing plates but that clearance should be checked out anyway; thanks again!

Being we are 400 mi from the buggy, it is difficult to do some things; you try to get it all thought out and bam, someone comes up with a great something else to worry about :lol: . It might be coming home at the end of the month or soon after for some major refinishing (I'm still thinking about putting a rack & pinion steering in it) and maybe sinking the fuel tank into the rear seat deck instead of sitting on top of it; we'll see. Luckily the black buggy pan will turn parallel to the floor for storage.

Lee
User avatar
fusername
Posts: 6806
Joined: Sun Jan 28, 2007 11:26 am

Re: Very Basic Off-road Ball-Joint Beam rebuild

Post by fusername »

do you mean perpendicular? or are you gutsy enough to use it for storage/as a table
give a man a watch and he'll allways know what time it is. give him two and he can never be sure again.

Things are rarely just crazy enough to work, but they're frequently just crazy enough to fail hilariously.
Ol'fogasaurus
Posts: 17881
Joined: Mon Nov 13, 2006 10:17 pm

Re: Very Basic Off-road Ball-Joint Beam rebuild

Post by Ol'fogasaurus »

fusername wrote:do you mean perpendicular? or are you gutsy enough to use it for storage/as a table
:lol: :twisted: yes and yes!
BAJA-IT
Posts: 2046
Joined: Tue Oct 07, 2008 5:02 pm

Re: Very Basic Off-road Ball-Joint Beam rebuild

Post by BAJA-IT »

BAJA-IT wrote:I believe I just used some 1/8" flat strap that I had laying around for the doubler.
The post on mine is 7/8"x.120 tube with a 5/8" grade 8 bolt through it. The outer piece comes off with the bolt and makes it easier to get the lower arm on the torsion springs (the hook doesn't hit the post before the springs are in the arm).
A correction to this post, I was at my dad's last night and checked the post size and it is 1", not 7/8".
BRAT Motorsports #936
Bolt Center: Salt Lake City, Ut
ACE: Air Cooled Engineering, now Black Line Racing
Ol'fogasaurus
Posts: 17881
Joined: Mon Nov 13, 2006 10:17 pm

Re: Very Basic Off-road Ball-Joint Beam rebuild

Post by Ol'fogasaurus »

Hmmmm, I was just debating the need for still adding the adjusters (I was going to use them for trimming the suspension for height and ride) so this may end up being another reason to have them, installing the arms. :lol: I hadn't thought that that would be a factor in the equation, silly me. :roll: :wink: Do you put the arms in the beam as an assembly or one at a time then put the spindle in last? I was planning on installing them one at a time.

This beam build is bringing out a lot of things that one needs to know before they run into them during the build. Thanks BAJA-IT and the rest of you.

Lee
Post Reply