Timing Marks

Here's the place to start. Introduce yourself and your ride.
User avatar
david58
Moderator
Posts: 14096
Joined: Sun Oct 23, 2005 6:14 pm

Timing Marks

Post by david58 »

Timing Marks
Glenn wrote:This should help.

Image
keifernet wrote:Yep... dimple is TDC...

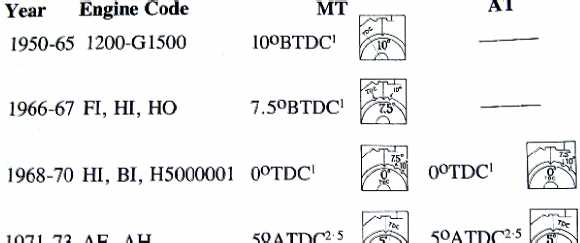
I have never seen a pulley with all the marks on it like in Glenns pic though... most of the time you either see the notch to the left of the dimple which is 5 ATDC ( orginally a DVDA distrubutor) or a single notch to the right which is 7.5 BTDC ( SVDA) VW did produce at least 5 pullies with different notches in them that I know of... maybe more.

Image
glutamodo wrote:
keifernet wrote:Yep... dimple is TDC...
I have never seen a pulley with all the marks on it like in Glenns pic though...
I have, but not from the factory. That image is actually derived from a picture I put together of a pulley I made those marks on myself. ATK/Vege rebuilt motors come with all those marks on them, but the notches aren't as nice as the ones I made. No I made those marks just to illustrate the common timing mark locations in relation to one another.

If you've ever seen the John Muir "Idiot Book" it has a good chart that shows the timing marks as well, I scanned a snippet of that chart before:

Image
jamesdagg wrote:Print, cut out and draw marks on your pulley where needed.
Image
wcfvw69 wrote:
lewis71bug wrote:This is the pulley (stock) on my engine:

Image

It has the three 'v' notches on the rear of the pulley, but no dimple that I can find (that dark spot on the front of the pulley is just a dark spot, not a dimple). Which of the 'v' notches is TDC, or is mine supposed to have dimple between the first and second 'v'?

Wayne
It's the V on the far left. It goes 0,7.5 and 10 degrees or left to right o, 7.5 and 10.
The picture of the pulley with the dimple that Glenn posted is not original VW.
Hot, humid air is less dense than cooler, drier air. This can allow a golf ball to fly through the air with greater ease, as there won't be as much resistance on the ball.
User avatar
Piledriver
Moderator
Posts: 22520
Joined: Sat Feb 16, 2002 12:01 am

Post by Piledriver »

Very informative thread, but people must realize that for many reasons, setting static timing (or at idle) is ONLY good to get you RUNNING.

ALWAYS set the MAX timing, vac advance and retard DISconnected to very close to 28 degrees on a T4, and ~30 on a T1, unless you actually know different.

Let the idle timing fall where it may (EDIT:or fix it by internal adjustment to the distributor)

The vacuum retard port on the vac can, if not used should be left OPEN. The carb side should be plugged.

These are not old Chevies, VWs (usually) have pretty decent combustion chambers, and don't need a ton of advance.
(Folks running ~6mm deck, or Semi-hemi heads probably NEED ~40+ degrees to run ~OK, no one else)

Jake Raby has made the comment that 2 degrees of timing can mean 50 degrees in CHT... anyone who has played with this has seen ~the same. The engine WILL tell you what it needs.

If you don't KNOW where TDC is and can't beg/borrow/rent/steal a timing light, you should seriously consider parking it until you can, as you risk damaging the engine otherwise.
Last edited by Piledriver on Sat Oct 18, 2008 10:56 am, edited 1 time in total.
Addendum to Newtons first law:
zero vehicles on jackstands, square gets a fresh 090 and 1911, cabby gets a blower.
EZ3.6 Vanagon after that.(mounted, needs everything finished) then Creamsicle.
Bugfuel
Posts: 3011
Joined: Fri Apr 20, 2001 1:01 am

Post by Bugfuel »

Piledriver wrote:If you don't KNOW where TDC is and can't beg/borrow/rent/steal a timing light, you should seriously consider parking it until you can, as you risk damaging the engine otherwise.


How to find true, accurate TDC:

Take an old sparkplug, and cut the side electrode off. Then punch the porceline center out. Then tap the inside for an M10 thread, (or whichever thread size you feel comfortable working with) and use a long bolt and nut to make an adjustable "positive stop" piston stopper. Round off the bolt tip. Screw the bolt through the spark plug body far enough that the tip goes deep inside the combustion chamber, enough to hit the piston before the piston reaches tdc. Lock the bolt in place with the jam nut. Screw the whole deal into the spark plug hole when the piston is at BOTTOM dead center, then start turning the engine by hand VERY SLOWLY. Allow the piston to come to a full stop against the bolt tip, and scribe mark on the pulley at the case seam. Not turn the engine the opposite way, until the piston comes in contact with the bolt tip again, and scribe another mark on the pulley, at the case seam. Remove the piston stopper, and measure exactly half way between your markings on the pulley, there's your accurate TDC. Done exactly like I described, gives you no loose parts, no flex anywhere, no room for 'tolerance' or error. It's a dead accurate way to measure TDC, as long as you don't touch the stopper tool once you have started the procedure, and you used the jam nut to make the whole tool rigid and remove all slack.
The only inaccuracy comes from your ability to scribe two sharp lines on the pulley at exactly the case seam, and then finding the halfway point between them.


Use extremely light force/pressure when turning the engine over, you don't want to damage your piston. I would remove all sparkplugs before doing any of this.


Jan
rsb
Posts: 242
Joined: Fri Nov 07, 2003 6:03 am

Post by rsb »

Is there any way to screw up the indexing of the TDC dimple with TDC when you put a motor back together?
User avatar
Piledriver
Moderator
Posts: 22520
Joined: Sat Feb 16, 2002 12:01 am

Post by Piledriver »

rsb wrote:Is there any way to screw up the indexing of the TDC dimple with TDC when you put a motor back together?
Not unless you leave the key out...

Note the factory marks are not always perfectly accurate, nor are many of the the aftermarket degreed wheels.

It's all somewhat relative anyway, the motor has the final decision as to what total timing it wants, just be careful to not "feel the kick" when you advance it some, the kick is usually from more INITIAL timing, down low, sometimes taking the slop out of the springs as well to slow advance down some.
(If you start at ~20 BTDC, you don't have to be in a hurry to get to 28...)

There is usually an easy way to limit the total advance, has been described many times, but probably not appropriate for THIS forum... Just make sure to limit the total until you get comfortable with working on your car, and let the idle fall where it may.

The upper end---total timing must be limited, the "sweet spot" balancing head temps/power/knock must be found, or damage will likely eventually ensue, ~guaranteed.
Addendum to Newtons first law:
zero vehicles on jackstands, square gets a fresh 090 and 1911, cabby gets a blower.
EZ3.6 Vanagon after that.(mounted, needs everything finished) then Creamsicle.
aussiebug
Posts: 1520
Joined: Wed Mar 07, 2001 12:01 am

Post by aussiebug »

I have to partly disagree with Piledriver.

For the mechanical 009, the max advance is way more important because they vary (cheap build) and since they run UNDER-ADVANCED for much of the engine's rpm/load conditions it's important to set them at max advance (30-32 degrees for a bug) and let the idle fall where it may (which will usually be in the range of 5 to 10BTDC and should ideally be about 7.5BTDC).

But for general use with a single vacuum distributor (I'm not talking about guys with all the instruments under the sun setting up a race car here), the correct way is to set up a single vacuum distributor is to set the idle as per the VW specs for that engine/distributor (usually 0, 7.5 or 10BTDC), and let the vacuum and (where fitted) the mechanical advance determine the max advance, which will be up to about 42 degrees.

For the dual vacuum distributor, the correct method is to set the timing with a timing light at idle with all the vacuum tubes connected and set it at 5ATDC (that's AFTER TDC) and then let the distributor determine the max advance, which once again will be up to about 42 degrees.
Regards
Rob
Rob and Dave's aircooled VW pages
Repairs and Maintenance for the home mechanic
www.vw-resource.com
Post Reply