Race Test: The CB Dry Sump System

Do you like to go fast? Well get out of that stocker and build a hipo motor for your VW. Come here to talk with others who like to drive fast.
User avatar
FJCamper
Moderator
Posts: 2901
Joined: Wed Nov 14, 2007 2:19 pm

Race Test: The CB Dry Sump System

Post by FJCamper »

Image

Racing the CB Performance Dry Sump System

I've worked on many dry-sumped racers, but this was my first ground-up install. To rehash, here's the link to the install:

http://www.shoptalkforums.com/viewtopic ... 5&t=141653

This post is mainly about actually racing the system, answering the questions most guys might have.

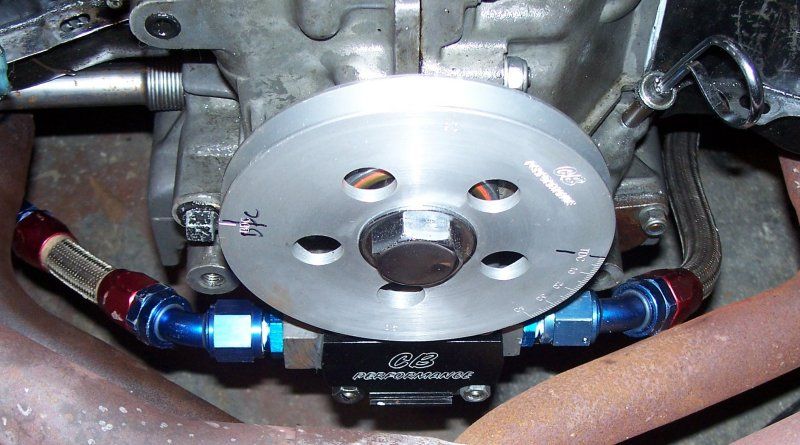
We chose the CB pump because of its simplicity. It slips right into the Type 1 engine case. We were not looking for extra scavenging from extra stages to the pump. That usually means an external belt-driven pump or at least a much longer pump. Now extra scavenging connectors are good, allowing you to scavenge the valve covers, for instance, but we just wanted the basics.

NO CASE OR PUMP PLUGS!
A big point about installation not made headline bold in the very, very basic CB info is you do not plug the case or pump body as in a full-flow pump system. In fact, if you've plugged your case oil-out port, unplug it or your entire dry sump experience will not last but a few minutes once you start the engine.

OIL LINE SIZES & TYPES
We used 10-AN lines (half-inch internal diameter), but the fact is the common aluminum oil filter adapters we use are threaded for NPT (5/8" OD, 3/8" ID), so the oil filter adapter becomes the bottleneck. I use FRAM HP-1 filters because the cases are strong.

The longer the oil lines, the larger ID they should be. To keep our lines short, we installed the oil tank right beside the driver. Steel braided lines are best, but 1/2" ID rubber oil line does work. Actually, the rubber lines have more flex to them and will curve through tighter spaces.

Image
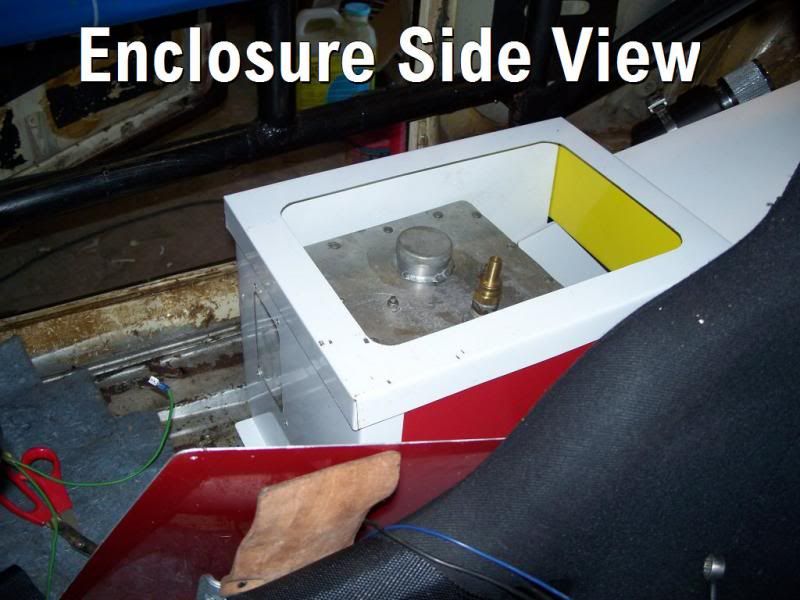
Above: Our enclosure during fabrication. That's the (brass) tank vent itself you see. We had remarkably little vapor escaping from it.

OIL TANK ENCLOSURE OR FIREWALLING; How not to parboil drivers
For safety, we built a sheet metal oil tank enclosure, to include coverage for the oil lines that pass through the body. Our enclosure completely firewalls the oil tank, has a removable top to service the tank, and sports a Lexan window that lets us see the oil tank sight glass, a clear tube that indicates how much oil is in the tank.

ANTI-DRAINBACK MOUNTING
Oil, like water, seeks its own level. A very critical aspect of oil tank location is the height of the oil level in the tank vs. the oil level in the engine. An oil tank mounted higher than the engine can drain back and fill the engine with oil. The common oil tank location in a Bug is in the back seat area, and that is always higher than the engine.

Some people place a manual valve on the return oil line on the engine. I have a hard enough time remembering
I need to have to remove the plastic velocity stack caps on my carbs before starting the engine, so I mounted our oil tank flat on the cabin floor, and was prepared to cut a hole there so I could sink it down deeper if needbe. It happened that the OIL OUT line from the tank to the engine is exactly the same plane as the engine oil pickup tube, and we suffered no drainback at all.

You could accomplish this same leveling with a round, tall, oil tank in the nose of a Ghia or a Bug, low in the spare tire area. But not too low -- just level with the engine oil pickup. You want oil in that line, engine off, to keep the pump gears submerged.

SELECTING AN OIL TANK; Luck of the draw
Ours was used, came off E-Bay, and was cheap-cheap. It is also square and low, very different from most tall, round tanks.

Oil tanks have an internal OIL IN nozzle that sprays the oil sideways in a swirl that passes down through the baffles, to help separate air from the oil, a defoaming or deareating process. That swirl is why most dry sump tanks are round, and tall. That we have a short square oil tank would seem to defeat the swirl, and I'm sure it decreases the deaerating efficiency. The question is, would it decrease the efficiency enough to cause us trouble? Short answer, apparently not.

Image
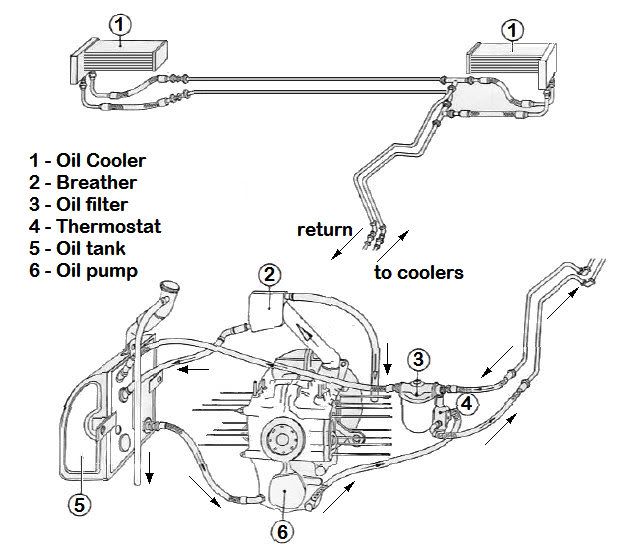
Above: CB's install guide

OUR LAYOUT
Our OIL OUT line from the CB pump goes to the filter adapter, from the adapter to the oil cooler, and from the cooler to the dry sump tank itself, the top fitting.

The CB pump OIL IN line is directly from the bottom side of our tank back to the pump body.

That's it. No trick oil thermostat bypasses, just the basics.

Image
Above; Porsche used a by-pass oil thermostat to more quickly warm the dry sump tank in the Type 547 (4-cam) Spyders.

From way back in 1954. The original 1500cc 547 engine was equipped with a 6 qt. tank.


OIL PRESSURE & SENSOR PLACEMENT; Playing it safe
I left them stock, meaning pressure readings from the normal case port, and temperature (for us) from the case
pulley-end pressure relief valve location.

FIRST TIME STARTUP; You pays your money and you takes your chance ...
Our tank holds three gallons. I poured ten quarts of Valvoline Racing 10w30 into the tank, and two quarts into the
engine to prime the pump. The HP-1 filter had already been pre-filled, which took about 3/4 quart.

Oil pressure was almost instant on startup, pegging our 80 PSI VDO gauge. The oil was at ambient temperature,
about 45° F. Half an hour of idling later, the pressure had dropped to 60 PSI, and the tank (unshrouded at the time) was barely warm to the touch.

It goes without saying that the first two minutes of running were pure anxiety, gauge readings or not. But it worked.

DIPSTICK & SIGHT GLASS CHECKS
Curiosity forced me to check the dipstick oil level with the engine running. No oil was on the stick. The oil tank's
sight glass showed the tank at half full.

Image
Above: NASCAR engines use high capacity oil tanks, and oil heaters are a necessity. Here, RetroRacing's Barret Camper at Talladega.

AT THE RACE; We need an oil heater!
14-hour enduro at CMP, Carolina Motosports Parkway.

The oil system was working. Presumably, the oil pressure relief valve was functioning normally, and we finally began to see some oil temperature in the Friday practice sessions, which was not all-out sustained throttle racing. Ten to fifteen track minutes in 70° F. ambient South Carolina sunshine (after a near freezing night) was showing us 120° and then 140° F.

VW and Porsche racers survive off oil coolers. But we needed an oil heater! Such equipment exists, and is common on the large 3 and 5 gallon oil tanks. Oil heaters are electric, 120v (for US) devices, and come in blanket types and probe or dipstick types.

Remember, we do have an oil cooler in the system, with a fan on a switch. There is air flow over the cooler from an external scoop, but we weren't using the fan. I considered stuffing a rag in the scoop, but the ambient daytime temp was rising into the pleasant mid-70's.

AT SPEED; 180° F. & beyond
Once the green flag dropped, and we were ripping off the laps, we saw our oil temps soon raise to 180° F. We decided to turn on the oil cooler fan at that temp, as without it, one of the drivers reported a temporarily flashing oil warning light. We have a big red one, intended by the manufacture to be a trailer running light. And that warning signal comes directly from the very basic stock VW oil pressure sensor.

We also added one more quart to the system and never had another light flicker. That means we were running on about three gallons + of oil in the system overall, not just the tank. That seemed to be the sweet spot.

And we stayed at 180° to 200° F.

PRESSURE READINGS
Once at 180°, the pressure readings dropped to 40 and then 20 PSI at hot idle, but on the track, we saw a very welcome approximate 10 PSI per 1000 RPM.

We did get some excitement from erratic pressure readings but traced them back to the barrel nut on the VDO sensor wire connector loosening.

CRANKCASE SCAVENGING; Oil, great ... pressure, fair Dipstick checks with the engine off never showed more than a touch of oil. Not one quart low, or somesuch. Just a touch, as if you'd stuck the dipstick in an eighth-inch of oil.

But crankcase pressure scavenging was another story. The engine needed more. I had prepared it with only the stock alternator stand vent to a breather box, no vented valve covers, no vent off the mechanical fuel pump location, and I should have.

CB cites good crankcase pressure scavenging as a feature of dry sump systems, and in general, that is so.

But the CB pump scavenges through the engine's one and only oil pickup, and that is not enough. Worse, 4AgeDub from South Africa had warned me of this, since he uses the CB pump as well.

CONCLUSIONS
The CB dry sump pump works, and for such a basic design, works very well.

Oil starvation in the corners is over and oil temps are lowered. I'd like to think we get the small power boost dry
sump systems claim due to decreased crankcase windage, ("oil drag") but I have no way of proving that.

Building a dry sump engine means you no longer need a deep sump or windage pushrod tubes. But, you have the
added complexity of the oil tank. Plus an oil heater!

For hard racing, a dry sump is a necessity. For street, just bragging rights.

FJC
Last edited by FJCamper on Mon May 30, 2016 1:56 pm, edited 2 times in total.
andy198712
Posts: 2433
Joined: Wed Apr 13, 2011 1:01 pm

Re: Race Test: The CB Dry Sump System

Post by andy198712 »

I come into the "just bragging" for street use as I don't want a deepsump.... Would get ripped off down my lane lol

Thanks for the right up!
I was thinking under the rear seat on my bug, opposite the battery...? (For my tank)
User avatar
FJCamper
Moderator
Posts: 2901
Joined: Wed Nov 14, 2007 2:19 pm

Re: Race Test: The CB Dry Sump System

Post by FJCamper »

Hi Andy198712,

Just getting rid of the deep sump alone might be worth it.

My "bragging rights" reference means sporting serious race car tech on a street car.

I've been working on what might make a dry sump "street kit" for Bugs and Ghias. It will mean a special oil tank.

FJC
User avatar
Marc
Moderator
Posts: 23741
Joined: Thu May 23, 2002 12:01 am

Re: Race Test: The CB Dry Sump System

Post by Marc »

The original Claude's Buggies (as they were known back then) drysump pump was made in Brazil by Schadek, and what I most often used on circletrack engines back in the day. It is quite compact compared to the multi-stage type, but still requires a special pulley that's even smaller than a "normal" power pulley so the fan speed is reduced significantly. It is possible to fit a 5¾" pulley if the case side is trimmed away on a lathe and a flat cast-iron cover, ground thin at the top, is used. It's still necessary to loosen the pulley and slip it back for belt changes, but it can be done. Obviously with room that tight you're going to have to forego running a full breastplate so there'll be custom tinwork needed to seal up the air holes in a full-bodied car.
If you needed to restore normal fan speed you could also run the smaller 912 12v generator pulley.
These days there are cog-belt pulley systems available with smaller top pulleys. With the stock ratio, if you're expecting to exceed ~5000 crankshaft RPM with a cogged belt (zero slippage) I'd strongly recommend a welded fan. With a V-belt and 5 to 5¾" crank pulley (and a standard 12V gen pulley) I never had any stock unwelded fan fail, even under sustained use at 7200-7300 crankshaft RPM - including the antique 36-HP fans I'd run on cold nights...but that compares to ~6000 RPM using the stock ratio. You could be one missed shift away from scattering a non-welded fan, with potential damage as severe as ruining your case.
Another issue is exhaust system clearance - some merged-collector headers need to be extended by ½" or so, not a problem in a race car but for a full-bodied Beetle things could get tight. I recall one Chinese-made 1-5/8" merged system where I got away with just making a ¼" dimple in one tube to clear the CB pump.
These pumps relied upon a tiny woodruff key to drive the pressure-side gear, and eventually it does work loose - I'm skeptical about using one on a daily-driver car, but since most street applications would be on a weekend warrior it should outlast the engine.
It takes a special tissue-thin gasket between the scavenge and pressure housings, with openings for transfer ports. We used to make our own out of the 6mm cover gaskets left over from rebuild gasket sets, easy enough to do with some sharp cuticle scissors.
The oil passages through the pump are small and take several twists and turns so there's some pressure lost internally which you can't do too much about beyond radiusing and smoothing them a little. If you can heliarc, the inlet & outlet restrictions can be lessened by lopping off the stock "ears" and grafting on AN-10 bungs that point the way you need them to so no extra fittings are needed.
I found these pumps adequate for racing purposes, but on a hot engine at idle the pressure would be near-zero. If you're cornering hard enough to starve a wet-sump system but infrequently, and a bigger sump's not an option, you may want to consider an accumulator setup instead.
As for tank placement, location isn't critical for most other than the height issue Frank discussed. Wherever the tank, I still chose to run an isolation valve on the return line (a big, low-restriction ball valve with a lever handle that made it obvious when the valve was shut). Made things much less messy when removing the engine for maintenance. If you do mount the tank high, it's vital to shut that valve when the engine's going to be off for more than a day or two or you risk filling the crankcase and "hydraulic'ing" it.
On one mid-engine car we located the tank on the right side of the transaxle and found it to be starving the pump under hard left-hand cornering (that car generated more g-force than any rear-engine). Had to alter the chassis and relocate it to the left side to eliminate the problem - but for road-racing or street use it would've been fine on the right.
As Frank pointed out the ideal tank is cylindrical. With the incoming oil bung positioned tangentially so the oil swirls along the side of the tank, both dearation and cooling are improved over a "square" tank. I never ran more than 8 quarts, and probably could've gotten away with 6.
Before I made the jump to drysump, I'd been going to larger and larger vent lines to control crankcase pressure, so I had all the stuff for ¾" hoses from each valve cover and from the pedestal - but I'd imagine ½" lines would be adequate with the drysump system.
Fram HP-1 filters do have strong cans but they aren't the best filter in the world. I've run `em, but prefer the stock filters made for early Diesel waterpumpers. They're more efficient filters and even less likely to blow out at the seal (those Rabbits made 150+ psi when revved cold).
I don't know if the current CBPerformance pump is the same deal (more likely they've outsourced them to China) - just wanted to share my experience with the Schadek.
User avatar
FJCamper
Moderator
Posts: 2901
Joined: Wed Nov 14, 2007 2:19 pm

Re: Race Test: The CB Dry Sump System

Post by FJCamper »

Hi Marc,

You have some valuable experience with the "CB" dry sump system. My crew and myself were just winging it at CMP.

A detail worth noting here is the crank pulley we got from CB is the same diameter as a power pulley, something I didn't expect but was glad to get. Take a look at my earlier install post with the pulleys compared together. The difference is the CB pulley is thinner than a standard power pulley and takes a more narrow belt.

http://www.shoptalkforums.com/viewtopic ... 5&t=141653

FJC
User avatar
Marc
Moderator
Posts: 23741
Joined: Thu May 23, 2002 12:01 am

Re: Race Test: The CB Dry Sump System

Post by Marc »

Yes, I commented there too:
Marc wrote:A stock pulley uses a 9.5x905 (generator) or 11.3x912 (alternator) belt. A pulley which takes a...865 is not going to be stock diameter. All CB has done is use a pulley the same diameter as a normal "power-pulley", made thinner on the case side with a bolt-in sand seal (yecccch!) which stands further away from the case. Shims are included to push the gen/alt pulley outward to restore belt alignment.
By making the top of the cover as narrow as possible (IMO that looks like they've pushed it a bit far, it'll be interesting to see if leakage develops there - aluminum's not as stiff as cast iron), and jacking the pulley position rearward they've accomplished the feat. More than one way to skin a cat. Personally I've never liked sand seals, especially bolt-ins...time will tell.
andy198712
Posts: 2433
Joined: Wed Apr 13, 2011 1:01 pm

Re: Race Test: The CB Dry Sump System

Post by andy198712 »

FJCamper wrote:Hi Andy198712,

Just getting rid of the deep sump alone might be worth it.

My "bragging rights" reference means sporting serious race car tech on a street car.

I've been working on what might make a dry sump "street kit" for Bugs and Ghias. It will mean a special oil tank.

FJC
i think your right!

i've got a bugpack pump with 60mm/30mm gears.... will probably just run stock oil pickup i think like you have as it seems to run pretty well and KISS!
madmike
Posts: 3146
Joined: Mon Jul 24, 2006 3:11 pm

Re: Race Test: The CB Dry Sump System

Post by madmike »

I picked up a 'Nice' Tank at the Buggy Builders Show a few weeks ago for $50 8)(fittings were worth that :wink: ) i was told it came out of a Lola Indy car and the hole was for the input shaft on the trans,so it fits down inside the bellhousing :lol: Just a really cool piece,I'm going dry sump on the Dragster someday :mrgreen:
You do not have the required permissions to view the files attached to this post.
Post Reply