
Parts Needed
-EDIS 4 module, connector, and about 4-6 inches of the connector wiring from a junkyard Ford or can be bought new (found on Escorts and other 4 cylinder Fords, Mazdas, etc.--the module is pictured below and more information below)
-EDIS coilpack, capacitor that comes with it, connector and a few inches of the wiring (more notes on coilpacks below)
-Plug wires (this depends on where you will mount the coilpack, note that V6 EDIS wires are a bit longer than 4 cylinder cars)
-VR sensor, connector and a few inches of wiring, and bracket (there are several choices for the type of sensor depending upon where you will mount the sensor as well as the bracket you will either have to fabricate yourself or get an aftermarket one here, or here,or here
-36-1 trigger wheel (again, several choices here either using one off a Ford and mounting to your crank pulley by a machine shop or mounting it yourself, or aftermarket unit here or here.)

Getting started
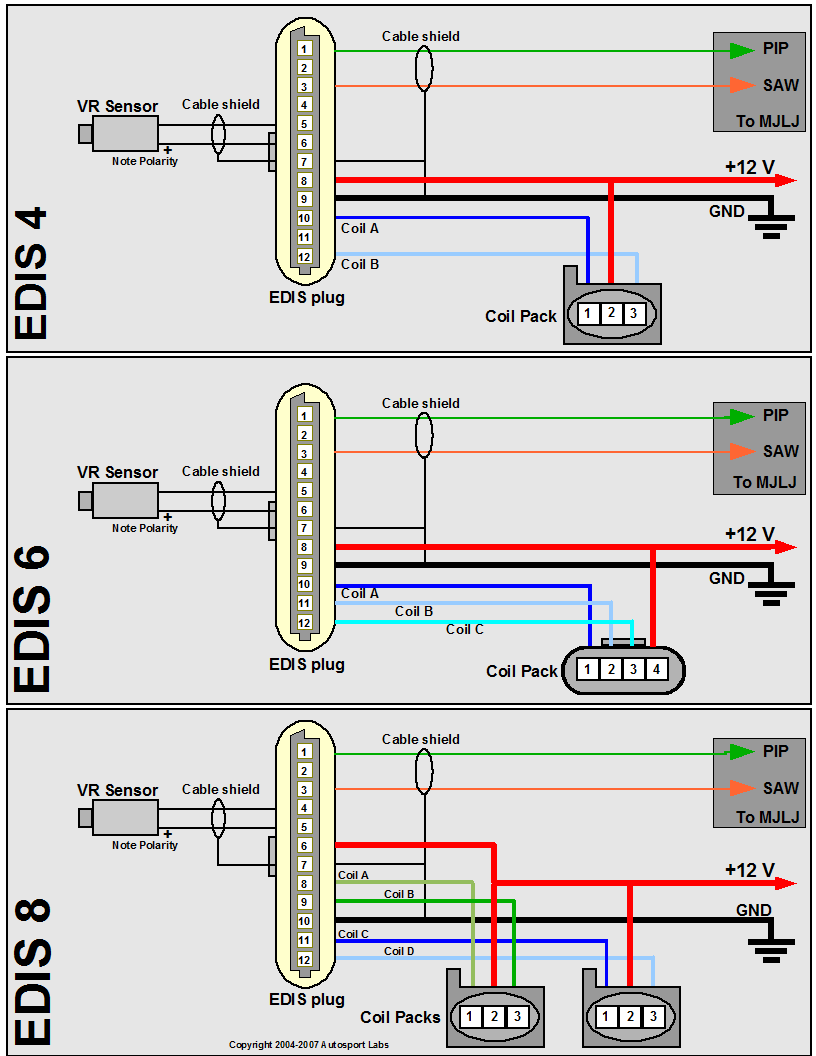
Consider where you will mount everything and how. The EDIS module and coilpack can be mounted in the engine compartment area, but it is not advisable to put the megajolt (MJ) unit in the engine area because of the chances of getting it wet or being contaminated with oil vapors the engine gives off--unless you have the unit fully enclosed. Make sure to enclose your wires on your install, but especially the SAW, PIP, and VR sensor wires need to be shielded and grounded to the number 7 wire on the EDIS module to minimize noise picked up in the system. You can mount the coilpack in the same location as where the stock coil was and the Ford 4-cylinder plug wires will just reach (see attached photo below), but note the plug ends may be different depending upon which route you go, more below. You can also mount the coilpack on firewall, but may need to get longer wires.
Overview and Install
A good example of the methodology here. This is very similar to mounting on a VW. Note the firing order for a Ford is 1-3-4-2 and VW is 1-4-3-2, be sure to install your spark plug wires for cylinders 3 and 4 reversed on the coilpack. Also note, if you plan on hard wiring all of the connections, at least have the 10 and 12 wires to the EDIS module and coilpack with quick connections so they can be interchanged if need be. Ford has the 10 and 12 wires reversed to the coilpack vs. what Megajolt/Megasquirt shows how to hook them up, but this is easy to check which way is correct for your coilpack you have mounted. Start up the car in limp-home mode (just the module, coilpack, and VR sensor powered up) and if you hear backfiring in the intake just switch the two 10 and 12 wires and it should start up fine. Other installs here and here, and here, Megajolt specific wiring hookup and general setup here.
Distributor plug hole notes
If you plan on pulling the old distributor out and setting with a plug you will also need to pull the drive gear and shims. Do not leave the gear or shims in place and just plug the hole, you will chew the gear up and it will wind up in the sump. If you are running a stock mechanical fuel pump with the pushrod, you will also need to remove this and go with an electric fuel pump as the pushrod is lubricated by the distributor drive gear. More on how to remove the drive gear and shims here. There a few different types of plugs on the market, one is a straightforward machined plug, another accepts the newer style flat-back coilpacks and plug for a mounting point to put the coilpack where the distributor was, or additionally you could just cut an old distributor and use that as a plug.
Spark plug ends
VWs originally (along with a lot of other older cars) were equipped with a threaded spark plug end that accepts a spark plug wire with a small clip (you can hear the clip running over the threads as you install/remove the plug end). Most spark plug manufacturers, as well as car manufacturers have moved away from this plug end and gone with a cap that fits over the threading (on many newer type plugs this cap is not even removeable any longer). Be aware of this when you're doing the EDIS swap that unless you have a set of four of these caps to fit over your stock plug ends, you will have to buy a new set of plugs as they do not sell these caps separately.
VR Sensor and Trigger Wheel Mounting
You will need some adjustability with your mounting bracket to get the VR sensor the correct distance. Check your trigger wheel for runout, you can eyeball it and see if it is off center by looking at the edge of the teeth as the engine rotates and see if they get closer or further away with each rotation of the crank. Ideally you will want the VR sensor 0.75mm away from the trigger wheel, you will know pretty quick if you are getting a signal when you plug into the MJ unit--if there are no RPMs displayed then try moving the VR sensor a little closer. Also note the polarity of the VR sensor below when you are running the wires to the module. You may need to leave some adjustability of the sensor to be moved left or right to be centered over the teeth as well. Where you mount the VR sensor and bracket with reference to TDC of cylinders 1 or 3 doesn't matter as long as the reference of 90 degrees after the missing tooth is followed. Usually the best place to mount the sensor on an upright type 1 is the inside area of the v-belt (generator/alternator stand area) for ease of mounting points to use and keeping the sensor and bracket out of harm's way if the belt should break. Examples of VR sensor installs/mockups above in the 'Overview and Install' section links.

Coilpack options and mounting
If you use the original Ford type coilpack there should be some space in the area behind the coils (don't mount them flush). You can use the original bracket the coilpack came with or spacers on the shafts of the mounting bolts to put some distance behind the coilpack. MSD ignition makes an aftermarket replacement version of the Ford style coilpack you can find from most automotive stores or hot rod parts places such as Summit Racing. There is also a newer type of coilpack sold that does have a flat bottom and accepts straight spark plug wire ends instead of the clip on style that come with the Ford coilpacks. This flat bottom style pack also works with Miller's distributor hole plug (described above) to mount in the same location as where the stock distributor normally sits on a VW engine.
