1600 crank puzzle.
-
wglide
- Posts: 20
- Joined: Sun Feb 05, 2012 4:57 pm
1600 crank puzzle.
i've run into a quandry with my 1600 beetle engine build. i bought rebuild kit that replaces just about everything in the case. new crank, cam, lifters, ect. . being new to all this, i also bought a book titled how to rebuild aircooled vw's. now this is where the fun starts. i put together the crank assembly and lowered it into the case. book says timing marks should straddle case parting line and dist. pointing to mark on body wich is same point for #1 on dist cap, which is what i did. pics in book show crank lowered into case with #1 rod all out (tdc) and #2 rod all in. mine has no rods all out or all in. upon scouring pics on the net i discovered that there are cranks made with woodruff slot in different locations. my crank has the slots opposite #1 journal, so when i line up the timing mark the #1 journal (along with the rest) is sitting at halfway point of stroke. does anyone have suggestions about this problem? i appreciate any suggestions or advice, thanks. 
-
Marc
- Moderator
- Posts: 23741
- Joined: Thu May 23, 2002 12:01 am
Re: 1600 crank puzzle.
Not true. Woodruff key is always opposite #1 & #2 rod throws, timing mark on crank gear is always 180° from woodruff key - so you must rotate crank 90° from #1 TDC for the timing marks to "straddle the case parting line", where you want it to be when aligning the cam gear timing mark between them.wglide wrote:...book says timing marks should straddle case parting line and dist. pointing to mark on body wich is same point for #1 on dist cap...
At that position, the distributor rotor won't quite be lined up with the mark on the distributor housing rim, that should happen when the woodruff key is at 9:00 and both camshaft lobes at the front (flywheel end) of the engine are pointed in the direction of #3 cylinder...this is 0° at #1 ready-to-fire.
Note that all distributors do not require the same position of the drive gear, so you should be using the same distributor that you intend to run when making this check. Also, never rotate the crankshaft with the drive gear installed and no distributor in place to hold it down - it can climb up and chew the brass gear before you recognize the problem.
-
wglide
- Posts: 20
- Joined: Sun Feb 05, 2012 4:57 pm
Re: 1600 crank puzzle.
going by that, would the steps be to: line up dist. rotor with mark, lower crank with #1 at tdc, then turn crank backwards to line up gear marks before installing cam? if not , could you tell me the proper steps to install craink and then cam. by following instuctions and illustrations in this book will have it always out of time.
-
wglide
- Posts: 20
- Joined: Sun Feb 05, 2012 4:57 pm
Re: 1600 crank puzzle.
by the way, the book i got is titled " how to rebuild your volkswagen air cooled engine " by tom wilson. it was what stopped me dead in my tracks right now because what it showed and what i saw on my own engine didnt make sense.
-
Marc
- Moderator
- Posts: 23741
- Joined: Thu May 23, 2002 12:01 am
Re: 1600 crank puzzle.
That should work. Confirm that the cam is at #1 ready-to-fire (not #3) when the distributor rotor is pointed at the notch. Both flywheel-end cam lobes should be pointed towards the left side of the engine when #1 is at the top of its compression stroke.wglide wrote:Going by that, would the steps be to: line up dist. rotor with mark, lower crank with #1 at tdc, then turn crank backwards to line up gear marks before installing cam?...
Personally I prefer to install the distributor drive pinion only after the bottom end is all together and the crankshaft endplay set, but some like to do it as they lay the crank.
I just now looked at the Tom Wilson book at Amazon.com and it does indeed give incorrect instructions on this subject on page 122. Since I don't do it his way I've never read it closely before, but it's definitely wrong - there's no way that the crank timing marks can be aligned with the case parting line when the rods are at TDC/BDC, the crank must be rotated 90° from there. Funny that the book's been in print for 25 years now and this is the first time I've heard of this error.
-
Dale M.

- Posts: 1673
- Joined: Mon Oct 05, 2009 8:09 am
Re: 1600 crank puzzle.
This is absolute correct setup of crank and cam for proper timing with #1 TDC...
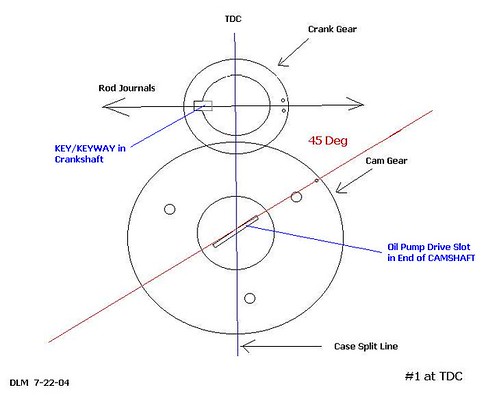
What TOM Wilson is alluding to on page 122 is when assembling (aligning) crank gear to cam gear the dot on cam gear has to be between the two dots on crank gear and THEN CRANK IS ROTATED 90° to bring #1 TDC..... HE forgot to mention the rotate crank 90° part to achieve TDC......
Here is proper cam/crank gear timing is ALL flat four (VW) engine builds...

(Yes I know pic is not all that great but it does show relationship - case center line is through center of shafts and cam dot and keyway of crank gear)
This is what TW is referring to but does not make it clear.... About laying in crank and cam with "marks" on parting line....
For every single revolution of cam gear the dot should match up with the two dots on crank gear (every forth revolution of crank)...
I think if you are going to drop distributor drive in first and then crank, distributor rotor has to point to about #2 so when you drop crank, with timing marks (cam & crank) on case center line and then rotate it (90°) to TDC, dist & drive come around to #1 on distributor cap as crank moves to #1 TDC... Also IF you are going to use this method (put drive in first), put distributor in place and clamp it down and leave it in there (installed in case) during rest of assembly, this will keep distributor drive gear from trying to ride up crank gear and jamming assembly....
Dale
What TOM Wilson is alluding to on page 122 is when assembling (aligning) crank gear to cam gear the dot on cam gear has to be between the two dots on crank gear and THEN CRANK IS ROTATED 90° to bring #1 TDC..... HE forgot to mention the rotate crank 90° part to achieve TDC......
Here is proper cam/crank gear timing is ALL flat four (VW) engine builds...
(Yes I know pic is not all that great but it does show relationship - case center line is through center of shafts and cam dot and keyway of crank gear)
This is what TW is referring to but does not make it clear.... About laying in crank and cam with "marks" on parting line....
For every single revolution of cam gear the dot should match up with the two dots on crank gear (every forth revolution of crank)...
I think if you are going to drop distributor drive in first and then crank, distributor rotor has to point to about #2 so when you drop crank, with timing marks (cam & crank) on case center line and then rotate it (90°) to TDC, dist & drive come around to #1 on distributor cap as crank moves to #1 TDC... Also IF you are going to use this method (put drive in first), put distributor in place and clamp it down and leave it in there (installed in case) during rest of assembly, this will keep distributor drive gear from trying to ride up crank gear and jamming assembly....
Dale
"Fear The Government That Wants To Take Your Guns" - Thomas Jefferson
1970 "Kellison Sand Piper Roadster"
1970 "Kellison Sand Piper Roadster"
-
wglide
- Posts: 20
- Joined: Sun Feb 05, 2012 4:57 pm
Re: 1600 crank puzzle.
Thanks for the tips. they made more sense. I redid and was exactly as you guys described, but unfortunately ran into another problem with crank binding up when putting case together. took back apart several times and double checked bearings were lined up, ect. this project is on hold till ..... i dunno. just too aggrevated after spending $1500 on all these parts and going nowhere.
-
Dale M.
- Posts: 1673
- Joined: Mon Oct 05, 2009 8:09 am
Re: 1600 crank puzzle.
Check bearings...IF you have damaged one by not having it on the alignment pin correctly while torquing case it will cause a bind (look for pin impression near actual alignment hole).. If bearing is damaged replace it, if you do not engine will have very short life maybe 15 minutes....wglide wrote:Thanks for the tips. they made more sense. I redid and was exactly as you guys described, but unfortunately ran into another problem with crank binding up when putting case together. took back apart several times and double checked bearings were lined up, ect. this project is on hold till ..... i dunno. just too aggrevated after spending $1500 on all these parts and going nowhere.
I usually hand fit bearing to case first (before assembling crank) and scribe or use black felt marker along case line once I know bearing is seated.... When installing assembled crank, I know where bearing are located (in relationship to pins) and once they have "dropped" into correct position...
Dale
"Fear The Government That Wants To Take Your Guns" - Thomas Jefferson
1970 "Kellison Sand Piper Roadster"
1970 "Kellison Sand Piper Roadster"
-
wglide
- Posts: 20
- Joined: Sun Feb 05, 2012 4:57 pm
Re: 1600 crank puzzle.
did that. bearings are lined up on pins. thats not it.
-
FJCamper

- Moderator
- Posts: 2901
- Joined: Wed Nov 14, 2007 2:19 pm
Re: 1600 crank puzzle.
Hi Wglide,
When the crank rotation is binding on assembly, it often is the case bearing saddles or the bearing sizes are not the size you think. I've seen it where just one bearing is the wrong size!
Drop in the crank without the thrust bearing. Torque the case. If it binds, the thrust bearing is the culprit.
If it still binds, replace the thrust bearing and remove the split center mains. Torque it. If it still binds, it's the #3 bearing behind the cam gear or the #4 bearing behind the oil slinger.
FJC
-
Turbo_Manx_Maniac

- Posts: 3308
- Joined: Wed Oct 22, 2003 1:32 pm
Re: 1600 crank puzzle.
Many times a crank will not rotate 360° without the flywheel pulling the crank. Push on the crank snout (pulley end) and see if it rotates freely.
I accidentally Googled my Twitter. (And I liked it)
-
wglide
- Posts: 20
- Joined: Sun Feb 05, 2012 4:57 pm
Re: 1600 crank puzzle.
As i stated earlier, i had it back apart at least a half a dozen times. i double checked everything. pins lined up, all bearings marked as standard stock. had already tried pushing on crank lenthwise both directions. no movement. no movement lenthwise and no rotating freely. if bearings are wrong size then they are stamped wrong. crank can be turned by putting bolts in dowel holes and using a lever. turns smoothly, but very stiff. makes no sound when turned with lever. i'm wondering about assembly lube at this point.
-
Marc
- Moderator
- Posts: 23741
- Joined: Thu May 23, 2002 12:01 am
Re: 1600 crank puzzle.
Nothing special is needed, but personally I prefer Marvel Mystery Oil, it's so light that it doesn't create any drag but it's got enough film strength to provide protection until you've cranked for oil pressure - if things are right you can twirl the crank with your fingertips using MMO.
Have you had it together without the cam and distributor pinion?
Crank should move freely longitudinally.
Visual inspection of the bearing shells should reveal where the problem is, any shiny spots indicate drag.
Have you had it together without the cam and distributor pinion?
Crank should move freely longitudinally.
Visual inspection of the bearing shells should reveal where the problem is, any shiny spots indicate drag.
-
Turbo_Manx_Maniac
- Posts: 3308
- Joined: Wed Oct 22, 2003 1:32 pm
Re: 1600 crank puzzle.
You can color all the bearing surfaces with a black magic marker, assemble engine, spin, take apart and easily see what's making contact. Marker is easy to get off when you're done.
Agree with everything Marc posted.
Agree with everything Marc posted.
I accidentally Googled my Twitter. (And I liked it)
-
560
- Posts: 986
- Joined: Mon Jul 12, 2010 12:08 am