The rear spring hinge on the left side of my car is toast (just the part that attaches to the lift springs) and I'm afraid that the spring will come off. So it's time to upgrade to the modern lift cylinders.
Who has done it and what cylinders did you use?? Did you graft ones from a car in the wrecking yard?? Inquiring minds want to know. . .
Thanks!!
Rear hatch lift cylinders??
-
aircooledtechguy

- Posts: 1709
- Joined: Sun Oct 28, 2001 1:01 am
-
Ol'fogasaurus
- Posts: 17756
- Joined: Mon Nov 13, 2006 10:17 pm
Re: Rear hatch lift cylinders??
Nate, this is long winded so be prepared.
About 18 years ago I started a buggy project with a body similar to a Berry Mini T +4 with the idea of making an engine cover that looked like a steamer trunk that the cars from the 20’ and 30’s had.

This is a first iteration of the engine cover and it has black construction paper covering it so I could get a look as to how it looked (ignore the object above the car as this was scanned and re-photographed for something else). Since I had a V6 in the car and it turned out that I couldn’t put the radiator in front of the engine I had to change the framing to accommodate the radiator in the rear.
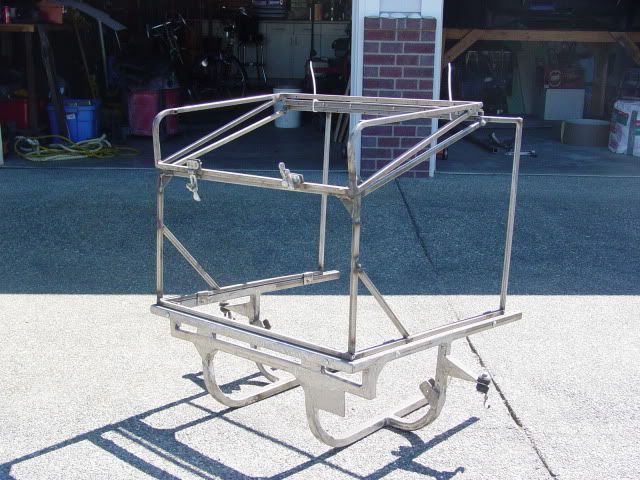
This is what the frame looks like now (I am not going to use it as the length looks way too awkward hanging out behind). I now wish I had taken more pictures as it worked great. Although it doesn’t look like it, the opening top is heavier than one would think and that was bare ½” tube.
Here is how I went about deciding how to do it: I had already built the frame and heat bent the curved pieces so that was easy. It has a CRES continuous piano hinge and that was in place and mounted so it was a matter if lifting the hatch to a point before going over and having the weight taking the hatch over backwards. I tied/proped it in place and started measuring the fully extended length of the strut. I then closed the lid and took measurement there. These measurements were not final measurements so I took them at the worst case spots I could find (you will find that it is easier than it seems while reading).
My oldest step son has a friend who owns a NAPA store and he has done right by me so I went down and asked him if he could get strut kits which they could. I looked at what they had for length, compression and since I had not taken a weight for the hatch I wrote down the limits for them.
I went back with the measurements’ of several different struts and started to try to work them in to both open and closed positions. It took a lot of compromise to get to a final length w/weight but I ordered the strut. It came with two ball mounting parts which had a threaded end and nut so the making of the tabs was pretty straight forward; remember, you have to consider the potential of them being in the way of hands, knoggin’s and other things you are trying to jam in so you have to consider that in your design. I tacked the mounts in place, attached the strut and, with some adjustment, it worked as well or even better than I thought. I used one strut but you might want to consider two struts just for safety. My motor home uses them on all the outside storage lockers but I have had one fail but luckily I was not under it when it did.
In my case I found some CRES (SS) latches from the marine industry (I used to sail so I was aware of these latches) and they were mounted and look and work fine.
Mounting struts is not has hard as you would think but just takes some additional thought as you go along. Don’t get in a hurry which can be a fatal thing to do. Be aware that they are going to get in the way so plan on that and make their presence the least objectionable without weakening the design you come up with.
Again, my problem was not the same as your problem but to get there they are very similar.
Lee
About 18 years ago I started a buggy project with a body similar to a Berry Mini T +4 with the idea of making an engine cover that looked like a steamer trunk that the cars from the 20’ and 30’s had.
This is a first iteration of the engine cover and it has black construction paper covering it so I could get a look as to how it looked (ignore the object above the car as this was scanned and re-photographed for something else). Since I had a V6 in the car and it turned out that I couldn’t put the radiator in front of the engine I had to change the framing to accommodate the radiator in the rear.
This is what the frame looks like now (I am not going to use it as the length looks way too awkward hanging out behind). I now wish I had taken more pictures as it worked great. Although it doesn’t look like it, the opening top is heavier than one would think and that was bare ½” tube.
Here is how I went about deciding how to do it: I had already built the frame and heat bent the curved pieces so that was easy. It has a CRES continuous piano hinge and that was in place and mounted so it was a matter if lifting the hatch to a point before going over and having the weight taking the hatch over backwards. I tied/proped it in place and started measuring the fully extended length of the strut. I then closed the lid and took measurement there. These measurements were not final measurements so I took them at the worst case spots I could find (you will find that it is easier than it seems while reading).
My oldest step son has a friend who owns a NAPA store and he has done right by me so I went down and asked him if he could get strut kits which they could. I looked at what they had for length, compression and since I had not taken a weight for the hatch I wrote down the limits for them.
I went back with the measurements’ of several different struts and started to try to work them in to both open and closed positions. It took a lot of compromise to get to a final length w/weight but I ordered the strut. It came with two ball mounting parts which had a threaded end and nut so the making of the tabs was pretty straight forward; remember, you have to consider the potential of them being in the way of hands, knoggin’s and other things you are trying to jam in so you have to consider that in your design. I tacked the mounts in place, attached the strut and, with some adjustment, it worked as well or even better than I thought. I used one strut but you might want to consider two struts just for safety. My motor home uses them on all the outside storage lockers but I have had one fail but luckily I was not under it when it did.
In my case I found some CRES (SS) latches from the marine industry (I used to sail so I was aware of these latches) and they were mounted and look and work fine.
Mounting struts is not has hard as you would think but just takes some additional thought as you go along. Don’t get in a hurry which can be a fatal thing to do. Be aware that they are going to get in the way so plan on that and make their presence the least objectionable without weakening the design you come up with.
Again, my problem was not the same as your problem but to get there they are very similar.
Lee
-
Piledriver

- Moderator
- Posts: 22520
- Joined: Sat Feb 16, 2002 12:01 am
Re: Rear hatch lift cylinders??
subscribe...
...Although the factory setup works extremely well/very compact in this case, I'd be more inclined to repair.
...Although the factory setup works extremely well/very compact in this case, I'd be more inclined to repair.
Addendum to Newtons first law:
zero vehicles on jackstands, square gets a fresh 090 and 1911, cabby gets a blower.
EZ3.6 Vanagon after that.(mounted, needs everything finished) then Creamsicle.
zero vehicles on jackstands, square gets a fresh 090 and 1911, cabby gets a blower.
EZ3.6 Vanagon after that.(mounted, needs everything finished) then Creamsicle.
-
Ol'fogasaurus
- Posts: 17756
- Joined: Mon Nov 13, 2006 10:17 pm
Re: Rear hatch lift cylinders??
Me too!
Lee
Lee
-
aircooledtechguy
- Posts: 1709
- Joined: Sun Oct 28, 2001 1:01 am
Re: Rear hatch lift cylinders??
Thanks for the advise on setting up and choosing lift cylinders, Lee. I like long winded!! 
The piece that is damaged is a riveted hinge pin that seized and now has ruined the piece that it's connected to as well as split the original piece. It's down-right dangerous and to fix it properly. I would need to disassemble the entire hinge, build the piece up with weld and re-drill. Then attempt to re-rig the lift springs Then replace the rivet with a bolt/nut. Those springs can be very dangerous to work with and I just don't feel like dealing with the frustration of fighting them.
I also need to do the same thing to the "frunk" since before I owned the car the frunk flew open and that spring got,. . .sprung too. (sigh)
I'm going to have to look at these more closely tomorrow and take some measurements.
The piece that is damaged is a riveted hinge pin that seized and now has ruined the piece that it's connected to as well as split the original piece. It's down-right dangerous and to fix it properly. I would need to disassemble the entire hinge, build the piece up with weld and re-drill. Then attempt to re-rig the lift springs
I also need to do the same thing to the "frunk" since before I owned the car the frunk flew open and that spring got,. . .sprung too.
I'm going to have to look at these more closely tomorrow and take some measurements.
-
Angelo Amato

- Posts: 137
- Joined: Sat Feb 24, 2001 12:01 am
Re: Rear hatch lift cylinders??
i've done the front hood on mine, positioning was trial and error during the build up.
originally used aftermarket bug ones (crap) didn't last long and started leaking !
found Porsche 911 hood one similar so running them now.
works AOK
never got around to do the rear !
Angelo
originally used aftermarket bug ones (crap) didn't last long and started leaking !
found Porsche 911 hood one similar so running them now.
works AOK
never got around to do the rear !
Angelo
-
vdubin

- Posts: 99
- Joined: Wed May 01, 2002 1:01 am
Re: Rear hatch lift cylinders??
I've thought about this myself. I believe that you will have to put te cylinder on the j hinge at the roof instead of on the door itself. Unless you don't mind it being seen.