How do I start a build thread?
Dev
Devastator's upgrade
-
Ol'fogasaurus
- Posts: 17756
- Joined: Mon Nov 13, 2006 10:17 pm
Re: Devastator's upgrade
You just did. Now you can add to it.
Lee
Lee
-
Ol'fogasaurus
- Posts: 17756
- Joined: Mon Nov 13, 2006 10:17 pm
Re: Devastator's upgrade
There is a tutorial on how to add pictures that Leatherneck did at the top of the Off-road fourm page. I forgot to welcome you to the "dirt piled" was some of us call it.
What kind of rig are you working on? There is just about anything you could think of used off-roading, VW base mostly, that you can think of here. A lot of people with a load of useful, and not so useful, information here.
Welcome again. Lee
What kind of rig are you working on? There is just about anything you could think of used off-roading, VW base mostly, that you can think of here. A lot of people with a load of useful, and not so useful, information here.
Welcome again. Lee
-
Devastator
- Posts: 3493
- Joined: Tue Nov 06, 2007 6:51 am
Re: Devastator's upgrade
Thanks Lee.
My project is a rebuild of my Chenowth frame sandrail. I bought the bare frame back in 1989, installed an engine, trans, etc., and drove it like I was mad at it for years. Several transaxles and engine upgrades later, I'm currently running the following:
2276 turbocharged VW engine, with a Megasquirt 2 direct injection system that burns E85. This has been bolted to a Transform Sand Pro, type 1, IRS trans. My last trip out to the dunes last February, resulted in breaking all the teeth off of my pinion gear...again. Now I'm going to upgrade to a Sand Pro Plus, 6 rib 091 trans, with a 002 bellhousing added, purchased from Don's Bus Barn in Peoria, Az. I'm upgrading the CV's to 930's, and long travel shocks all around. In order to achieve this, I'll be cutting off the "old school", front end that I currently have, and upgrading to A-arms.
I've been treadily employed as a machinist for the last 23 years, and a CNC programmer for the last 14 of them. Since I have more time, tools, and CNC's available, then money, I've decided to make as much of the components as possible.
Well, that's enough words for now, on with the pictures.
Dev
Last edited by Devastator on Sun Oct 30, 2011 8:07 pm, edited 2 times in total.
-
Devastator
- Posts: 3493
- Joined: Tue Nov 06, 2007 6:51 am
Re: Devastator's upgrade
Pics
You do not have the required permissions to view the files attached to this post.
-
Devastator
- Posts: 3493
- Joined: Tue Nov 06, 2007 6:51 am
Re: Devastator's upgrade
More pics.
You do not have the required permissions to view the files attached to this post.
-
Devastator
- Posts: 3493
- Joined: Tue Nov 06, 2007 6:51 am
Re: Devastator's upgrade
Well, all the old trans mounts, straps, and other supporting brackets have been removed and new ones have been fabricated and welded in. I cut my rear trans, bus to bug adapter plate, extended and rewelded it so I could get a 10 degree forward tilt to the trans. Everything fits great, but I stripped the nosecone bolt threads out. I'll helicoil them tomorrow night.
More pics:
More pics:
You do not have the required permissions to view the files attached to this post.
-
Devastator
- Posts: 3493
- Joined: Tue Nov 06, 2007 6:51 am
Re: Devastator's upgrade
This is the third freakin' time I've tried to upload this pic!
Finally!
Well, I have the trans in place now, with all the needed helicoils, straps, mounts, and additional supports welded in, installed, and complete...minus paint.
Today I welded up the spring plate to torsion housing adapter plates up, as well as the pivot bushing and it's corresponding plate. I also leveled up the frame, found and marked the centerline, and built the trailing arm end plate support fixture. I'll take some pics of the other parts soon, but here's one of the fixture and the bushing, (installed).
Man I'm tired.
More to follow.
You do not have the required permissions to view the files attached to this post.
Devastator's Build Thread
Sandrail
2.4 liter, supercharged Chevy Ecotec
"If everything seems under control, you're just not
going fast enough."
Mario Andretti
Sandrail
2.4 liter, supercharged Chevy Ecotec
"If everything seems under control, you're just not
going fast enough."
Mario Andretti
-
kyle_pc_75

- Posts: 1804
- Joined: Wed Jun 24, 2009 6:20 pm
Re: Devastator's upgrade
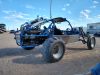
All these pics of cool parts, shiny ass metal, etc....we need a pic of the actual project!
Kyle
Kyle
-
Devastator
- Posts: 3493
- Joined: Tue Nov 06, 2007 6:51 am
Re: Devastator's upgrade
Would you like pics of it before starting the upgrade or as it sits on the jack stands?kyle_pc_75 wrote:we need a pic of the actual project!
Devastator's Build Thread
Sandrail
2.4 liter, supercharged Chevy Ecotec
"If everything seems under control, you're just not
going fast enough."
Mario Andretti
Sandrail
2.4 liter, supercharged Chevy Ecotec
"If everything seems under control, you're just not
going fast enough."
Mario Andretti
-
Lotrat

- Posts: 4975
- Joined: Sat Mar 29, 2008 11:43 pm
Re: Devastator's upgrade
Yes.Devastator wrote:Would you like pics of it before starting the upgrade or as it sits on the jack stands?kyle_pc_75 wrote:we need a pic of the actual project!
-
Hedrock

- Moderator
- Posts: 3251
- Joined: Sun Mar 04, 2007 7:49 pm
Re: Devastator's upgrade
Most definitelyLotrat wrote:Yes.Devastator wrote:Would you like pics of it before starting the upgrade or as it sits on the jack stands?kyle_pc_75 wrote:we need a pic of the actual project!
Collecting parts again... No I'm not going to say why!
-
Ol'fogasaurus
- Posts: 17756
- Joined: Mon Nov 13, 2006 10:17 pm
Re: Devastator's upgrade
Without any intentions of being a smart A$$, yes; it is good to have a starting point of reference then adding all the information and pictures of the “shiny stuff” will be that much more interesting and informative.
The last posts; where you talked about the technical things, such as leveling out your rail, finding the center as a starting point for some detail build; in my opinion is good. There are a lot of lurkers out there that either are afraid to post and look like beginners (we were all there at one time) or just don’t know where to start and are looking (and more than willing) to learn; all the technical help like something so simple as leveling out your project is most likely going to be of interest to them and maybe stop them from making a false start and wasting a lot of time and money. I try to write to them as much as writing something to a person who is documenting a build (such as this).
I also think that; why a decision was made to do or use something is also important (my background as an instructor/mentor here). An example, you mentioned stripping out the threads on the nose cone and now; so casually/matter of factly talking about having to install Helicoil(s), while a lot of us may consider this as a no-brainer decision some would be lost. Someone who didn’t know may decide to drill out and thread and install a larger bolt (not a good example and over simplified, but I think you get the point) or just replace it or even worse; get discouraged and sell, give it away, or even worse, push it out side and let it rot. If you had something else where you had the option of either Helicoil or threaded inserts, the reasoning for using one over the other might be worth the discussion (in my opinion). The “why” you did the changes to the transaxle mount to get a 10 degree down mount may appeal to some of them. From the work you have shown us, you seem to know what you are doing.
Doc has created a great, friendly web site and Leather and the other mods and all the contributors have made “the dirt pile” a great place to learn and share information. When someone comes along with as much experience and build information as you and several others have we can’t let it go untapped, I don’t want to put too much of a burden on you but this is a chance to document the building of the next iteration of a rail. There are lot of good solid builds are also going on here, Bajas, buggies, rails, of which; a couple of them are also over the top.
Gotta admit, what I have been seeing so far is pretty impressive! It is looking like you have done your homework and have a plan. Again, thanks for sharing and again; welcome to the forum.
Lee
-
Devastator
- Posts: 3493
- Joined: Tue Nov 06, 2007 6:51 am
Re: Devastator's upgrade
Point well stated and taken gentlemen. Thank you. 
I'll look for some, pre upgrade pics as soon as I can get my older laptop, at home, up and running. I'll also try to take some more pics of the "big picture" when I can. I'm using my snazzi new phone for the pics because my digital camera is sketchy at best.
I started this thread with some info on me and the reasons for my upgrade, so I'll skip that in this post. I've been planning this upgrade ever since some dude in the dunes blew past me in the rough stuff and I couldn't keep up. That, and the fact that one of the younger guys in our group called my sand rail "old school", even though I have an MS2 digital fuel injection system installed and have mounted a, small, touchscreen, laptop for datalogging and tuning. Busting all the teeth off of the ring gear, again, was the last straw. But, the planning had been done, in my mind, for years.
I decided to go with a 10 degree forward tilt on this transaxle for a couple of reasons. First, when I first bought this frame, (at the tender age of 21), I didn't realize that it needed support bars between the transaxle horns and the cross bar directly above it, so, I left them out. 3 months later, I had a busted nose cone because the trans had dropped, under a heavy jump my brother did, and bent the horns downwards. I cut the ends off of the horns, sleeved the ID of the tubing with 1/8 wall pipe, and welded it all back together. I assumed they were straight, but was wrong. My engine had rested slightly below the rear engine cage ever since. Before I removed the broken transaxle, I checked the angle it was resting at by placing an angle finder, (angleometer), against the bellhousing, and writing down the number. At this point, the back of the frame was on jack stands, but not level. It didn't really matter to me what angle the frame was at, since I just wanted 15 degrees in the opposite direction, (10 for the new tilt angle, and 5 to compensate for the bent bars). I had read, (on this forum), about the advantages of tilting the trans 10 degrees, (nose down), and decided it sounded like a good idea to me. The bus to bug adapter mounting kit I bought with the 091 trans did not fit my sandrail. Even if it did, the tilt angle would still have been with a 5 degree "sag". So, I cut the mount, at an angle, for strength purposes, and so that I could salvage the original mounting hole positions for the transaxle, as well as the holes that locate the trans mount to the horns, since this is where my rear engine cage also attaches. From there, I welded a supporting "cross member" under the trans front bearing carrier. I've always added this cross member to my builds because it makes installing the trans easier by giving it something to rest on, and because I don't like the strap over the bearing carrier to force the trans down without anything underneath it. With the cross member in place, the front strap clamps the trans down instead. Bolted the front, adapter, mount to the trans, and added the needed gussets etc. to hold it to the torsion housing, and the new crossmember.
With the front mount and cross member in place, I tilted the trans at 15 degrees, (explained earlier), and cut some steel plates to take up the gap I had created in the rear trans mount. Gusset the sides for strength, (and to hide some unattractive welding I did), and paint it. Remove the rear mount again to drill, (on a conventional mill), the holes that the rear engine cage bolts up to and reinstall. This is when I stripped out the aged threads in the nosecone, prompting the installation of the helicoils. Helicoils, (named for the helical coil used), are a commonly used thread repair system that replace stripped threads with a, formed, wire coil that creates a new, stronger, thread to bolt to. The helicoils are stronger because they are made of stainless steel or carbon steel. Also, they spread out the load form screwing the bolt into them across their entire length which prevents stretching the threads as you would if bolting into aluminum or other soft material. I used a 3/8-16 helicoil kit for my repair, since it was close enough to the original 10mm. bolt size, and I had one at work that I could use, whereas I didn't have one for the M10 threads. I recommend them to anyone repairing a stripped thread or installing a soft material part that is going to have the bolts removed and replaced frequently. I also used them on my steel shock mounts years ago and the are still intact and functioning fine, but about to get cut off so that the new shocks will fit.
OK, my fingers are tired now, so I'll add more later.
Feel free to ask any questions you may have and thanks for tuning in.
Dev
Last edited by Devastator on Tue Aug 10, 2010 7:12 am, edited 1 time in total.
Devastator's Build Thread
Sandrail
2.4 liter, supercharged Chevy Ecotec
"If everything seems under control, you're just not
going fast enough."
Mario Andretti
Sandrail
2.4 liter, supercharged Chevy Ecotec
"If everything seems under control, you're just not
going fast enough."
Mario Andretti
-
Leatherneck

- Moderator
- Posts: 17104
- Joined: Sat Jul 01, 2006 6:47 pm
Re: Devastator's upgrade
Well DUHHH, of course we do! Devastator good to have you hear, sound like you will fit in just right.Hedrock wrote:Most definitelyLotrat wrote:Yes.Devastator wrote:Would you like pics of it before starting the upgrade or as it sits on the jack stands?kyle_pc_75 wrote:we need a pic of the actual project!