You often need to look at your pulley markings when fiddling with these engines, and most of the work revolves around doing something while the piston is at Top Dead Center.
Usually the factory stock steel pulleys are marked accurately, but they lack the finesse of a degree pulley, which allows you to see crank angles printed (or etched) right on the pulley. Unfortunately, many aftermarket degree pulleys are marked incorrectly, the TDC mark and subsequently all other degree marks are off.
What you need to do, is find the absolute TDC of the #1 piston, and mark that on your pulley.
The best method in my opinion is teh "dead stop" method. No special tools or gauges are needed, and the result is accurate.
You see, one problem is that the piston stays virtually motionless while the crank turns over the TDC position. The crank keeps turning, but the piston doesn't move until the crank starts pulling it back down. This brief moment of piston wait, or "dwell", or "death", can last for several degrees of crank rotation.
The solution is to find the middle (in crank degrees) of the piston "dead" spot. Here's how:
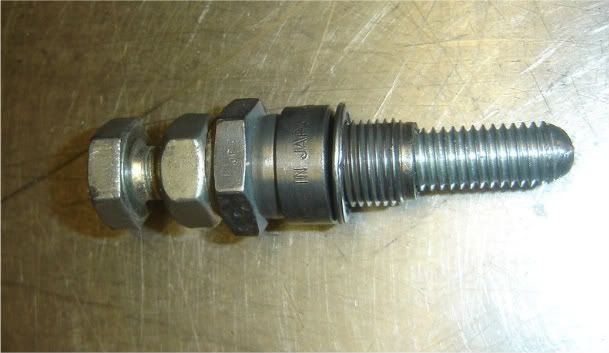
You need to fabricate a simple piston travel stopper. Take an old spark plug, and knock the porceline center out. (bench vise, hammer, steel punch or something similar). Cut out the side electrode too. Then drill and tap the remaining metal part of the plug for a suitable bolt size, I use a metric M10 size.
Now find a long bolt that you can turn in and through the plug. You will need to have maybe an inch of bolt tip exposed on the other side, and enough threaded part of the bolt visible on the bolt head side for a jam nut.
This may take some trial and error, but next you need to "guess" how much of the bolt tip you want to protrude into the combustion chamber. Adjust the bolt accordingly, and lock it in place with the jam nut. I would also file the bolt tip round, because it will come into contact with the piston in the next step.
Now, screw your home made dead stop "sparkplug" in, while the piston is at or near BOTTOM dead center. Nice and snug, almost as tight as a regular sparkplug.
Now SLOWLY start turning the engine clockwise, until you feel the piston hitting your dead stop.. if the engine can turn a full turn without stopping, screw in your bolt a little deeper and lock it in place again.
Anyway. You have now managed to make the piston come to a complete stop against the bolt coming through the spark plug. Mark this position on the pulley. One sharp, thin mark right right on the outer edge.
Do NOT move your dead stop "spark plug" at this point.
Slowly turn the engine over the opposite direction, until the piston again meets the dead stop bolt. Mark this position on the pulley again.
Your True TDC is precisely half way between these two markings. Measure with a flexible tape measure along the outer lip of the pulley, or count the degree marks if you have a degree pulley to find that half way spot, and file a notch or otherwise mark your True TDC on the pulley, and rely on that in all your future adjustment procedures.
How to find true TDC
-
Bugfuel
- Posts: 3011
- Joined: Fri Apr 20, 2001 1:01 am
I thought I had a pic sopme3where but now I can't find it. I'll snap a pic tomorrow at work if I remember. Prepping for Sebring weekend at the shopdavid58 wrote:Can you post a pic of your homemade stop?
Edit: These guys made something very similar:
http://www.scooterhelp.com/tips/timing/ ... tools.html
They used a smaller bolt than what I did, and secured it in place with a jam nut in the combustion chamber side. Apparently th ebolt head was small enough to fit inside the plug, but not all the way through. This would not require tapping new threads inside the plug.
-
david58

- Moderator
- Posts: 14101
- Joined: Sun Oct 23, 2005 6:14 pm
Merling wrote:I have a stock 1600 dual port with a single notch pully. From the sticky, this means 5 degrees After top dead center. I have an 009 and need to know how far from the 5 ATDC notch i need to measure to find 30 degrees (or 28 or 32). I printed that degrees image from the sticky, but it didn't print out big enough for my pully.
Jeckler wrote:Lay it on a bigger piece of paper and extend the lines out from center. Problem solved.
Or, do the math. Best to do this in millimeters. Diameter of the pulley x3.14 to get the circumference. Divide by 360 to find distance per degree. Multiply by 25 to find total distance (5+25=30).
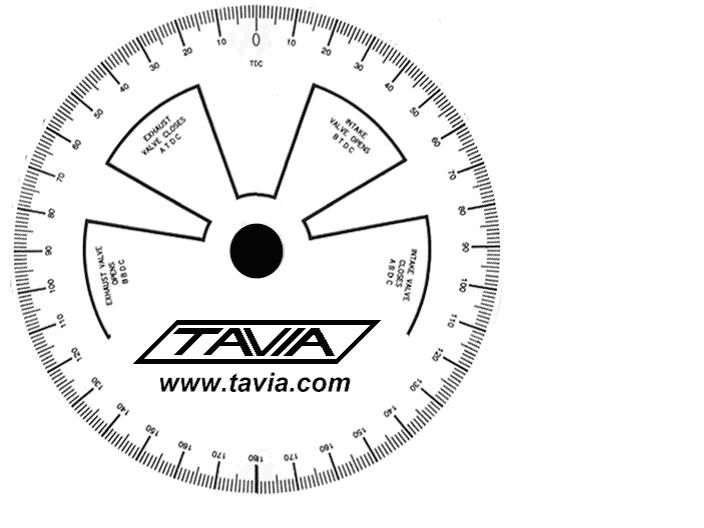
Here is where you can print one out.
http://www.machinerycleanery.com/DWUniversal.htm[/quote]
Copy and Paste this link
beetle.motorious.org/wiki/Engine_and_clutch_(stock)/Crankshaft_pulleys
-
Lew

- Posts: 529
- Joined: Tue Feb 24, 2009 6:42 am
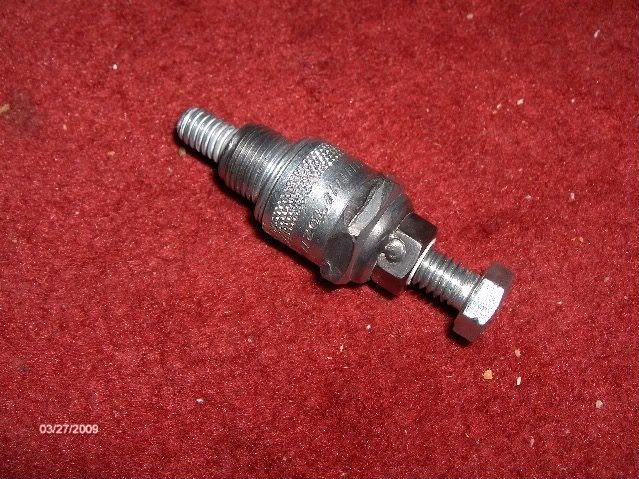
You might try this as I did....I had the bolt and nut, which the bolt was small enough to pass through the plug once the porcelian was removed and that's not easily done....Since I did not have a tap, but had a wire feed welder, I decided to tack weld the nut on top of the plug. It worked!
Nice little device to have.
Nice little device to have.
It's still in the Restoration Booth!
You can take a peek!
VW Help
VW Technial
Track Gas Mileage
The Class I Teach
You can take a peek!
VW Help
VW Technial
Track Gas Mileage
The Class I Teach


-
Lew
- Posts: 529
- Joined: Tue Feb 24, 2009 6:42 am
Porcelian Removal!
As said it's not very easy.....be patience. All I did was to break the porcelian with a hammer first....Then I locked it down real tight in my big vise.....I cut off the electrode that extended up through the porcelian. Next I used a small nail set punch and began driving it down through the porcelian breaking out small pieces.....Once you began to crack it loose from the plug, the hard work is done, most will just drop out.....I cut off the prong on the bottom of the plug last and pressed the bottom of the plug up against my bench grinder being careful not to mess up the threads....Just a touch to clean up......I also used a drill about the same size of the opening to run in and out a few times just to make sure it was cleaned out....The nut is nothing special.....When you use this device go in with it just like you would a regular plug. Snug it down. Good Luck! HTH! 
It's still in the Restoration Booth!
You can take a peek!
VW Help
VW Technial
Track Gas Mileage
The Class I Teach
You can take a peek!
VW Help
VW Technial
Track Gas Mileage
The Class I Teach
-
Glenn

- Posts: 5108
- Joined: Fri Mar 09, 2001 12:01 am
Nothing like making something simple seem so hard.
Finding TDC is easy, user remove the left side valve cover and rotate the engine until the TDC mark is inline with the case seam. then rock the crank back and forth while observing the rockers on #3. If both are moving then you are on overlap on #3 and at TDC on #1. If both are not moving, rotate the engine 360 degrees and you'll be at TDC on #1.
No special tools needed.

-
Bugfuel
- Posts: 3011
- Joined: Fri Apr 20, 2001 1:01 am
You don't get close enough with this method. TDC is one exact point in rotation, one degree here or there makes a difference. You leave room for several crank degrees of error. Only a positive stop will show you true tdc. Even measuring when the piston stops moving, isn't accurate enough. During a TDC pass, the piston stops for a duration of several degrees.Glenn wrote:Nothing like making something simple seem so hard.
Finding TDC is easy, user remove the left side valve cover and rotate the engine until the TDC mark is inline with the case seam. then rock the crank back and forth while observing the rockers on #3. If both are moving then you are on overlap on #3 and at TDC on #1. If both are not moving, rotate the engine 360 degrees and you'll be at TDC on #1.
No special tools needed.
I would not trust a TDC mark on the pulley. It may be enough for a quick tuneup on a stock engine, but I am talking about building engines to an acceptable accuracy, minimizing all chances for error.
There are countless aftermarket pulleys out there with incorrect TDC marks by the way.