Ol' Foggy garage seat with tool chest

General tips/tricks/tools that could be utilized on any platform.
Ol'fogasaurus
Posts: 17758
Joined: Mon Nov 13, 2006 10:17 pm

Re: garage sitting creaper with tool box built in

Post by Ol'fogasaurus »

I have one of those trolly/carts but it is seldom use. If there was a car lift I am sure it would be used more. Laying on the floor or sitting on a short stool makes it awkward to keep getting up to get things out of the cart.

I also have an adjustable height stool which I use a lot but the storage area is just too small.

My barber chair is of no use at all while working on something but its great to sit in while planning (or storing things (:oops: ) something :P . I need to make a slide-a-way table for some day,

My stepdaughter was throwing away a perfectly good office chair (oogly but comfortable) so I have been using that at times too. (My garage is getting too crowded.. I wonder why?)
Ol'fogasaurus
Posts: 17758
Joined: Mon Nov 13, 2006 10:17 pm

Re: garage sitting creaper with tool box built in

Post by Ol'fogasaurus »

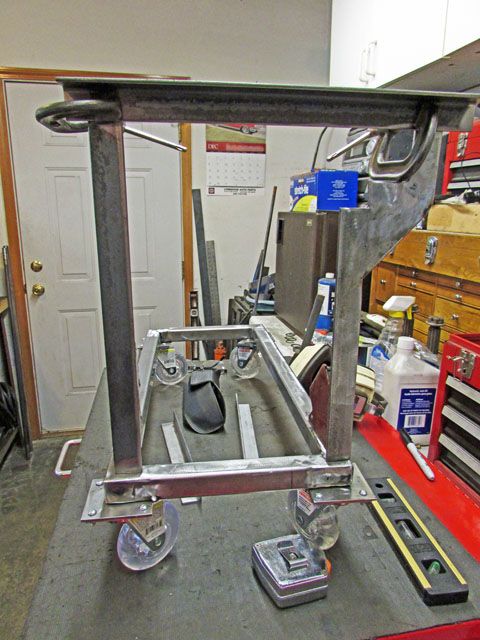
Got some relief from allergies for a couple of hours late in the afternoon yesterday so I got to do some fitting of the rear uprights for the box. The problem here is the lid of the box - when open does make things complicated. By removing the lid like the commercial boxes have, the build becomes a piece of cake. With the lid opening there has to be some detail (off-set of the seat support to accommodate the open lid) work done to support the seat mount.

Before I go much farther in design decisions (I am now back to my original design) I have to weld the base of the trolley together, drill then mount the caster pads to get a solid base for tacking the uprights and seat mount together for a fit check.

Options:

Since the box's lid pivots like it does the build gets complicated allowing for that. I could remove the lid and leave the top open for use (and to collect dust) which would make the build easier for sure. Other than the hinge the back of the box lacks strength but a doubler or only removing the pivot part of the hinge would solve that. Another good/bad problem is the slider that is attached to the lid that keeps the drawers closed when moving the box around. Removing that allows the drawers to slide around as they do not have locks or detents themselves; this is the good/bad part of the equation. The drawer hinges do allow the empty drawers to dance around a bit also but that has never been a real problem, just an observation.

By removing the lid the seat would be ~1 1/2 to 2 1/2 inches lower (depending on the handle; keep or remove) or one could still leave it at the same height and just have the top open which brings up the next question: do I pivot the seat pad or make it a lift off seat pad:

Pivoting: Pivot is added to tilt forward which is OK but is a bit awkward. Pivot to the rear is probably more normal hence comfortable.

Lift off seat: How do you keep the seat pad from sliding around. Either locating angle brackets/blocks on the bottom of the seat or posts going into holes on the rim of the seat frame. Removing the seat pad just puts another object on the floor to trip over if your distracted by what you are doing :roll: (like I get).

Since haven't seem them in person there are several reasons to think if it the commercial units may not be that bad, cheap but the work is already done. I'm not sure about seat height and structural capabilities over the life of the units which may be a problem. Seat height possibly being low could be a problem if you are long legged or somewhat tall. Looking at their pictures they look to be built of a lighter material that I am using (scraps I have laying around mostly) hence a weight savings but... strength if you are a "chubby".... My unit is certainly going to be heavier but maybe that will help in cornering :lol: . The wheels on the commercial look to be of a smaller diameter than I am using which, if your floor has seams like mine does or a lot of cracks, the small wheel diameter can get stuck in them - they also help dictate seat height.
Ol'fogasaurus
Posts: 17758
Joined: Mon Nov 13, 2006 10:17 pm

Re: garage sitting creaper with tool box built in

Post by Ol'fogasaurus »

Was able to get some garage time w/no allergies.

The top of the handle sits at 18"s. The hard part comes next.
IMG_0810.JPG
You do not have the required permissions to view the files attached to this post.
Ol'fogasaurus
Posts: 17758
Joined: Mon Nov 13, 2006 10:17 pm

Re: garage sitting creaper with tool box built in

Post by Ol'fogasaurus »

IMG_0812.JPG
In the last few days I have tried something I have never really done before. The angle stock I am using is 1" X 1" X 1/8" angle iron and I needed to put an off-set in it to allow for the lid of the tool box too open. These are the two mirrored pieces I came up with ( should have taken pictures but I didn't. I can do it again if anyone needs to see how I did it).
IMG_0812.JPG
This will give you an idea of what I am planning: the flanges are to connect to the shortened upright I will try to spot weld them in place to hold things still while I finish weld the tabs. The angle will cover the tabs and allow for a full weld and added strength. The top of the piece has not been trimmed to length yet.
You do not have the required permissions to view the files attached to this post.
Ol'fogasaurus
Posts: 17758
Joined: Mon Nov 13, 2006 10:17 pm

Re: garage sitting creaper with tool box built in

Post by Ol'fogasaurus »

:roll: (Silly me) In the bottom pix I made a mistake. Allergies were starting in again so, as I was getting a bit rummy, had quit for the day when I set up the pix. The bent piece I made was to sit 1" higher on the vertical piece of angle with a corner fill to be added later for protection from the sharp corners and for strength. This was to protect the lid of the box if it was open and it got bumped to the side accidentally when open.

The picture wasn't how my plan is/was but I could leave it this way as it as it would be easier just not look as "professional :roll: :lol: in my book and not have the additional protection for the lid.
Ol'fogasaurus
Posts: 17758
Joined: Mon Nov 13, 2006 10:17 pm

Have you ever

Post by Ol'fogasaurus »

I finally got a chance to get back on the tool box stool and noticed that the lower frame had warped. After I finished welding the base together (and I am NOT the best of welders) I noticed that the frame had warped so one corner was about .02 off a flat surface. I had other damage done during the winter to fix and was working on that and yard work to do so when I looked at it again maybe a week later... the warp was more. I figured that I could shim up the caster on that corner with washers so I put the caster pads on and let is sit for a few more days. When I went out it had warped (lifted) to maybe an 1/8th of an inch or more (never measured it) in the one corner. After constipating it a lot I decided today to cut the welds at the two opposite corners and lay it back down then weld it.

When I did this I laid it back down (before welding) and I did get a perfect laydown so then welded the opposite corner from where the problem was; checked it and it had stayed flat. I then welded the top of the corner that wanted to warp and checked it and it had started to warp again. I cut it loose then tacked the inside corner of the join of the two pieces of .095 X 1" square tube, laid it on what I was using at a flat surface and it was OK. I then tacked the outside of the tube then checked it and it was warping again. I cut it loose then tried it again and again... it warped. I laid a straight edge on all of the tubes and it and the other pieces were straight and true. Shining a flashlight behind them and a straight edge does not let any light through.

This was left over scrap from the body mount tunnel stiffener I made for my black buggy and I seem to remember that I did have problems with one of the tubes during that job. I am wondering if the mix of the materials to make the steel has a flaw in it as one end is OK but the other end wants to do something when heat is applied at the one end only.

I did not clamp things down this time as I was welding (several reasons) but the first welding was done that way and the warping just took longer to appear. I did have the wheel pads still welded on one side (I had cut the other weld loose) to hold alignment and being straight so I'm not sure what I am doing wrong. The pad was still sitting up tight to the join. Back up to the steel yard I guess.
Ol'fogasaurus
Posts: 17758
Joined: Mon Nov 13, 2006 10:17 pm

Re: garage sitting creaper with tool box built in

Post by Ol'fogasaurus »

I got some time in the garage today and decided to work on the tool box.

In the last installment of this tale of terror the base has warped again after several tries to fix the problem. The last attempt I made some rough cuts along the seam and tried to weld them up but it warped again. I made one last cut on the warping end and had to leave it. The other day I tried to weld the relief cut and, still using the last gas, power and speed setting I got some weird stuff.

The first try got me nothing: no spark only the wire coming out. I reset everything and this time I got a mass of soot and almost a weld. Check things over again, including moving the ground closer to the weld and after cleaning all the soot away I got a funny kind of weld more like a solder job. The wire melted but none of the noise. I moved about ½” away and got a decent weld then moved back to the other end and got to finish that.

Today I cleaned up the welds and laid the base on the flat/level bench and it was flat!!! Woo-hooo but when I turned it over to check the pads they were off again. After spending about an hour with a flap wheel on my 4 ½” grinder it sat pretty good.

Image
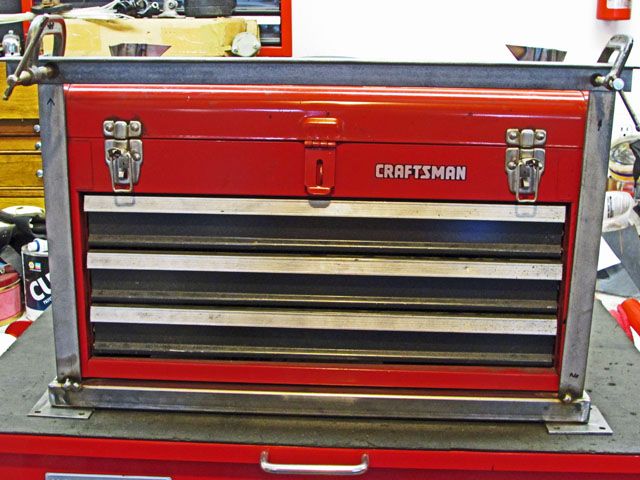
This shows the 13” tall front upright beam sitting about where it will be and the rear upright beam that has been modified for the open lid in place along with the top piece where the seat cushion will sit clamped roughly in place.

Image

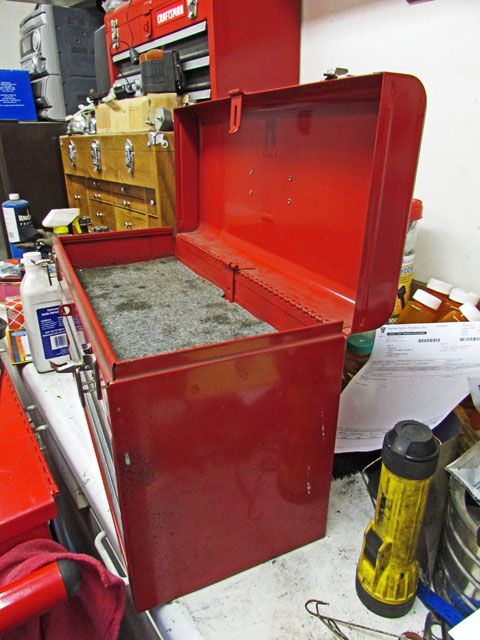
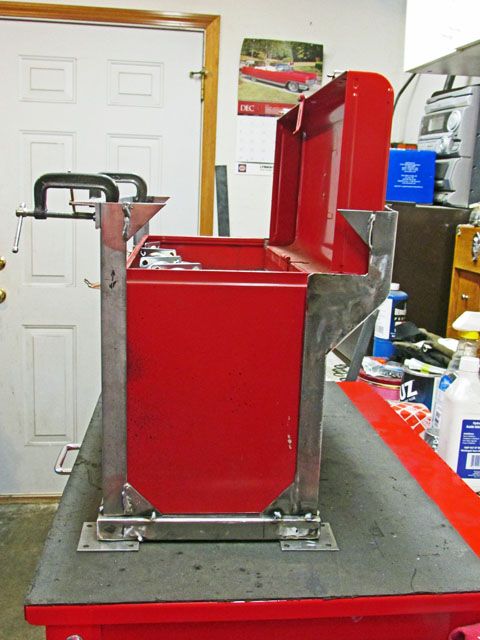
This shows the tool box with the lid open which is the reason for the odd upright back beam.

Off to the steel salvage place to get 3’ of angle iron and some flat stock for braces to start finishing the job.

It’s been a fun but frustrating job

Update: I forgot to mention that during the next try at wekding the seam after getting all the soot I got what looked like a candle flame which created the weld that loomed like a solder job. I'm still trying to figure that one out.
Ol'fogasaurus
Posts: 17758
Joined: Mon Nov 13, 2006 10:17 pm

Re: garage sitting creaper with tool box built in

Post by Ol'fogasaurus »

Image

Got a chance to work in the garage today so, instead of the buggy I went for the rolling tool chest/seat to work on. It started out to be a comedy of errors. I started with the right rear upright as that is the worse one to work with mainly because the top weight is not over the base. I tried magnets to hold it in place, my hand and several other ways but it kept wanting to fight me. I even took it off to clean up the area and grabbed the other rear upright and got it in place then &*^_(%*!!! Once I got the rear one in place then the other three got progressively easier to place and tack in place.

This shows the 4 uprights with the tool box inset to check fit. Tight but that is the way I wanted it. The angle across the top is the start of the mount for the seat.

Image

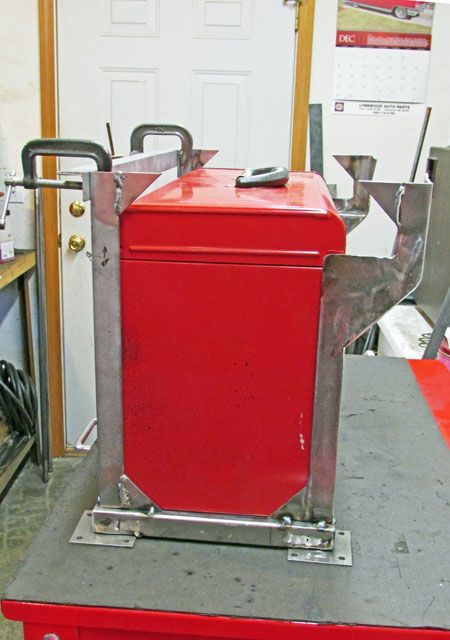
A side view of the framing.

Image

This shows why the offset as the lid is now open. It works, it is tight and it should be done before too long assuming I can get garage time.

Lee
User avatar
Dale M.
Posts: 1673
Joined: Mon Oct 05, 2009 8:09 am

Re: garage sitting creaper with tool box built in

Post by Dale M. »

Might want to consider removing drawer locks so you can open them without having to stand up and open lid to get access to tools in drawers...

Dale
"Fear The Government That Wants To Take Your Guns" - Thomas Jefferson
1970 "Kellison Sand Piper Roadster"
Ol'fogasaurus
Posts: 17758
Joined: Mon Nov 13, 2006 10:17 pm

Re: garage sitting creaper with tool box built in

Post by Ol'fogasaurus »

Yes I am and no I am not! :roll: Good question Dale one that I have spent more than a little time on debating with myself as just what to do.

Right now, the latch for the padlock is to removed. I knew that from the start and fighting with it when installing the box in the framework for a fit check and to take the pix I posted it did rear it's ugly side (it flopped around and got in the way when trying to get past the upper seat mount rail that was clamped in place) and become a pain in the rear (you have to remember, this is a very old box so things are not stiff like they were when new). With the frame sitting on the work table, higher than it would be on the floor it was an awkward and heavy lift of the tool box to place in the framework which brings forth the ageless debate between "man and inanimate objects": e.g., can man win or will it be the inanimate object that wins? :D

It is the "internal latch", the one in the back of the box, that is attached to the lid so that when you open the lid the "locking rod" lifts and drawers are then free to slide in or out. When the lid is closed when the drawers are fully closed they are locked shut, that is where the debate comes into play. This older style of box does not have the feature that the drawers don't have a detent device that requires some pulling to exit the feature that keeps them closed but not locked in place... that is the problem!

When the drawers are empty they slide in and out very easily and can and will fly out during jostling or tipping... even slightly; that is the quandary! That being said (part of the argument I am having with myself) is that the tool box will largely stay in the framework so lifting it around and sliding it in and out; that is not a problem... maybe! Also, what about moving the seat around with the drawers empty of full and bumping into things; will they slide out?

I could leave the "rod" in place which allows the drawers to be closed but not locked in place but do I want that "unlocked feature" other than when I am working. I do not expect the box to be loaded all the time; only when working on a project; then they could be locked shut. When not being used the tools are kept in the larger tool box and only loaded into this box as I work on a specific task. That way I could keep the locking device when the drawers are not in use. The same for the storage area under the lid.

I think I am going to wait on removing the rear locking device until the seat is done and I get a chance to work with it to see just what it will do in real use. To remove it I just have to grind the edge of the pivot pin and drive the pin out to remove the "locking Rod" (the quotation marks is that the rod is really a flat piece with an unknown shape in the closed off part of the box).

Thanks for bringing the question up Dale.

Lee
User avatar
SCOTTRODS
Posts: 626
Joined: Sun Nov 07, 2010 7:15 am

Re: garage sitting creaper with tool box built in

Post by SCOTTRODS »

Lee... I have a thought for you and an observation... One of your reasons for leaving the lid in place, was to allow you to use the box outside the creeper if I remember right (This is the observation part)... If you remove the Pad lock latch, you cannot pick up the box normally, as the lid will come open and everything goes off-kilter. Thus making the lid completely unnecessary... as likely the box will not be lifted out of the creeper as originally conceived. In a case where the box needs to be removed at any given time, you need some sort of latch to hold the lid in place to lift the remaining box. Does this make sense? or have I missed something completely (which I know is entirely possible)?

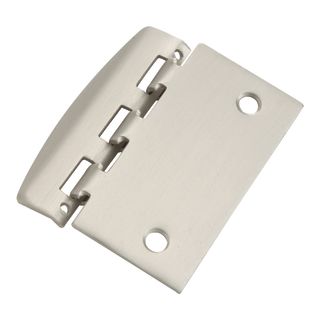
The Idea part, is to give you a latching mechanism for your drawers to stay shut whilst jostling the creeper around the shop/garage. Basically a simple wing that folds back and covers one end of the drawers will keep them from opening unless access is required. Using a door stop/latch concept is my idea on that... you could easily build your own I think. They look like this... home depot and all those guys usually carry them in door hardware area... you can either buy some or check it out to make your own specific length one/s.

Image

Or... If you can spare the room in a drawer, buy some of the magnetic door closer/openers and mount them under the back of each drawer (or inside if needed, so they grab the back of the tool box when shut, and require a minor push or pull to disengage... lots of options of drawer control without going expensive, for sure. The drawer latching situation is something that's been making me itch for a while, so I finally saved up and bought a Snap-On tools Service cart, so I could get away from the friction type detents on my current MAC cart... I move my box around a lot and the drawers either do not close completely or some open even under slight movement, so I opted for a box with positive latching that is EASY to open and a quality build totally.

If you decide not to ever remove the tool box, I'd probably remove the lid and get rid of the hinge issue and permanently mount the box under the seat... I bet once it's in there it will never move and the storage under the seat will be moot, but the drawers will be very useful. The whole thing looks excessively top heavy already to me... I would also have expanded the base to help keep it form tipping over easily. (I like those wheels though)
I have found them completely missing more than once. - PILEDRIVER

Some pics of My Powder Coating work
http://s244.photobucket.com/albums/gg6/terrellster/
My Facebook Page for Powder Coating
http://www.facebook.com/profile.php?id=100001788886297
Ol'fogasaurus
Posts: 17758
Joined: Mon Nov 13, 2006 10:17 pm

Re: garage sitting creaper with tool box built in

Post by Ol'fogasaurus »

SCOTTRODS wrote: "... One of your reasons for leaving the lid in place, was to allow you to use the box outside the creeper if I remember right (This is the observation part)... If you remove the Pad lock latch, you cannot pick up the box normally, as the lid will come open and everything goes off-kilter. Thus making the lid completely unnecessary... as likely the box will not be lifted out of the creeper as originally conceived."

Thanks for the idea Scott. If you look at the top picture again, there are two over center lunch box types of latches at each end besides the padlock latch. I use the lunch box latches all the time just-in-case I grab the box at full run w/o paying attention to other things :roll: . I don't think the padlock part has ever been used and that is true on both of the boxes of this type I have. It usually is just an irritation that has to be dealt with every time I use the boxes. I don't lock my tool boxes up which has been not a good idea at times even the plastic ones. Only my roll-a-way is unlocked and that is because the top if full of too much stuff!

I don't think the "creeper" would be used outside, mostly because the driveway (we live near the crest of a very steep hill) is slanted for drainage. The parking area had to have a good slant to it plus a path for water drainage, in the parking area in front of the garage, to follow to get water to into the drainage system (city construction requirements'). Remember it rains a lot in Western WA plus we live in what is referred to as the "Convergence Zone" which means even more rain as the "eye" of the storms re-converge here after going around the very tall Mt. Olympus. Also, since we have the motorhome not only the cement in front of the garage but the side parking strip for the MH and my car trailer are slanted quite heavily and go into a drainage system) since the slant to the parking pad is two directional and both are steep it could cause me to take an unplanned trip North (the hill face faces North) if the creeper got loose with me on it :lol: .

Your ideas are good and I am not dismissing them until it is done and I know more about what I have. I also thought about a drop through tube in the front to keep the doors shut... but not yet. If someone decides to build something like this they are worth looking into.

Thanks for the input and it is still here if I need it.
User avatar
SCOTTRODS
Posts: 626
Joined: Sun Nov 07, 2010 7:15 am

Re: garage sitting creaper with tool box built in

Post by SCOTTRODS »

I'm Sorry, Lee... I was just not looking at the picture and going off of your explanation... I should have paid more attention to that part when looking at the pics... My focus was on the frame and it's top heavy appearance more than anything, but thought I'd throw in something about the latch... I have several of the old Grey Craftsman boxes... I should have had a better grasp before posting. I also have a Larger sized Top Box with I think 9 drawers, that would make a very good Creeper seat as well... It's front to rear dimensions are much larger than that you show and I have actually seen one just like mine used as the rolling stool cart creeper that you're building... All they did with theirs was screw a seat onto the lid from inside the lid on theirs... effective, but I hate destroying good tool box lid... I would have removed it and made a replacement lid with seat... I know... goofy, but that's kind of how I think.
I have found them completely missing more than once. - PILEDRIVER

Some pics of My Powder Coating work
http://s244.photobucket.com/albums/gg6/terrellster/
My Facebook Page for Powder Coating
http://www.facebook.com/profile.php?id=100001788886297
Ol'fogasaurus
Posts: 17758
Joined: Mon Nov 13, 2006 10:17 pm

Re: garage sitting creaper with tool box built in

Post by Ol'fogasaurus »

Thanks Scott.

I seem to remember seeing an old 9 (or so) thin drawer Craftsman (or other make) tool box with wheels on it and I think it could be sat on... to be honest, I think I saw it a long time ago but I had forgotten about it until you just mentioned it. It wasn't very tall as I remember so it could have been for sitting on. I grew up next to a cemetery and on the other side of it and almost directly across from us was a machinist who lent me tools when I needed them (micrometers' for example) and it could have been there or anywhere in the neighborhood as it was a very old part of town even then.. I don't remember how I got hooked up with him but I did get some advice on several different things (he had a cute daughter too but that never materialized). This would have been sometime in the mid-50s.

The height vs. (not the length distance but) the width distance between the casters has bothered me a bit too be sure. The extra room needed for the opening lid does give me more fanny room which should be nice unless it affects the balance. It does look top heavy but a smart person would load to bottom first or at least I would hope so. If I find a problem with this setup I am building I will post it. I also suspect that it is going to be quite a bit heavier than the commercially available ones shown at the top of the string.

Since I wasn't completely sure about the height problem I made the front vertical angle iron 13" high which just clears the handle. Using a horizontal piece of angle iron and a level the height give enough distance above the handle that it won't interfere with the seat. I made the rear uprights so they were a bit higher than the fronts figuring I could trim them down a bit when everything was tacked in place. I measured it several times the last couple of days and found I was very close on figuring out the heights of the rear uprights after the allowance for the open lid measures out to be... the thickness of a leg of the angle iron. Go figure! This gives me several options to fit the seat height.

I think I may have figured out why I was having so much trouble welding. I have a new bottle of gas and it looks like the shut off handle it touchy. The instructions for the welder says to crack the gas handle/knob but don't turn it too far. After trying to weld but finding the gas shut off I think I need, with this bottle, to go a bit more than cracking the valve open. I should find out tomorrow as I have been too busy with other things (like goofing off plus some important things) to get into the garage other than to be measuring things and contemplate what options I now have.

https://www.harborfreight.com/magnetic- ... 69319.html

https://www.harborfreight.com/18-in-mag ... 61199.html

I was going to make wings at each end of the cart until I found some of this stuff. I think it will be an option for a sometime later upgrade if this stuff doesn't work well.
User avatar
SCOTTRODS
Posts: 626
Joined: Sun Nov 07, 2010 7:15 am

Re: garage sitting creaper with tool box built in

Post by SCOTTRODS »

I use the Magnet bars from HF on a few things... They're really strong and hold anything I can stick to it. The Tray thingy... Not impressed with the ones they have at my local store... I took one and hung it on one of their boxes and it just doesn't feel like it will stay with ANY kind of tools on it... They give the Magnet bars away on our Freebie list in the ads here too... so I have had and even given away several of them as gifts.

I see the clearances and all on your frame and it looks to be fairly well done... I have another idea (I'm looking for pics to show what I mean) for lowering the center of gravity on the cart. Ah... Here goes (Hopefully the pic comes in)... At least something like these... not exact though...
Image
I have found them completely missing more than once. - PILEDRIVER

Some pics of My Powder Coating work
http://s244.photobucket.com/albums/gg6/terrellster/
My Facebook Page for Powder Coating
http://www.facebook.com/profile.php?id=100001788886297
Post Reply