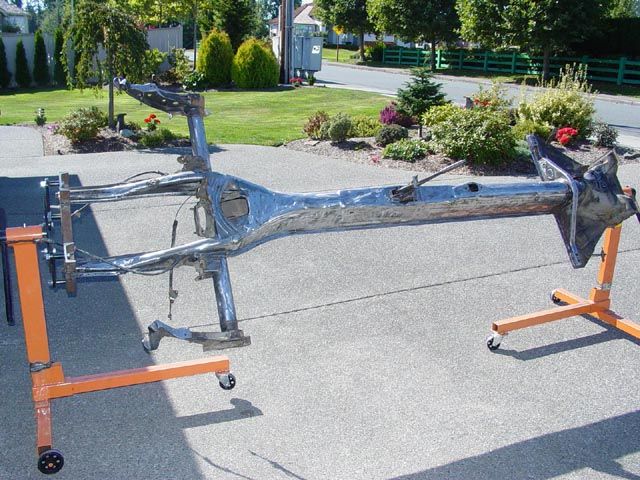
Home made rotisserie

General tips/tricks/tools that could be utilized on any platform.
Ol'fogasaurus
Posts: 17758
Joined: Mon Nov 13, 2006 10:17 pm

Home made rotisserie

Post by Ol'fogasaurus »

I just did a search to see if I ever did document my rotisserie but it looks like I didn't at lest in the tool area. I have also have a couple of things I would change on mine which I would like to document.

Image

First, I built this thing either in the mid to late 90's or early 2000s so it has been around a lot as well as a lot of photos taken and posted here.

I used two HF 750# engine stands, on sale, to do my build with. Since the main post is angled back to allow the cantilevered weight to straighten out the main post and since I am not going to put that much weight on it, cantilevered on one stand that I so I had to accommodate for that.
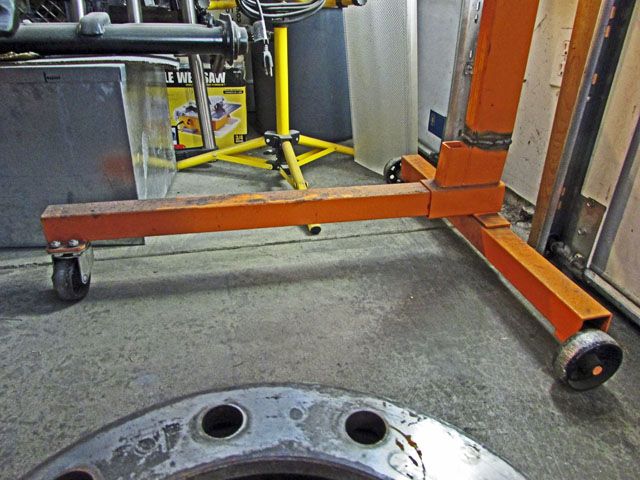
Image

This was taken today and it shows the location of the notch I took out of the front of the rectangular tube to straighten out the main post; I marked the notch then using a cut off tool I took out the three sides of the tube. Actually I made the same cut to both stands the put the assembled stands back to back and aligned the main posts to be straight up I also had got a piece of tube that is the same outside diameter as the inside diameter of the pivot piece then leveling them out by clamping the tube to both pivots and rechecking the main posts for being vertical I tacked then welded them back together. As far as making the basic stands that was about it.

One thing I got lucky on: While I think I did, I don't remember if I measured the mid-point of the pan vs. the lower leg of the stand and if I could rotate the rotisserie all the way around which I can do... a type I anyway. I doubt it would handle a rail w/cage, as far as a type III goes I am not sure about in any way and if you are thinking about a bus... are you kidding! :wink:

Corrections I would make to the basic stand.:

On seeing the adapted stand on the show two things that I thought about were done. The front wheel on the stand was moved probably half way back or more towards the other wheels and the front legs on both parts were trimmed back. I couldn't remember just how close they were so I went out and was going to measure the gap but it is so far away it shouldn't be a problem. One thing the single wheel moved back does is allow for tighter turns when rotating the pan to work on the left side after working on the right side if you have a tight work area (I have to go outside to swing things around). The long wheel base of each stand does make it a bit longer of a circle you have to pivot around. The commercial rotisserie had a square tube that joins the two stands; it fit inside of the front legs and needs to be bolted/locked in place.
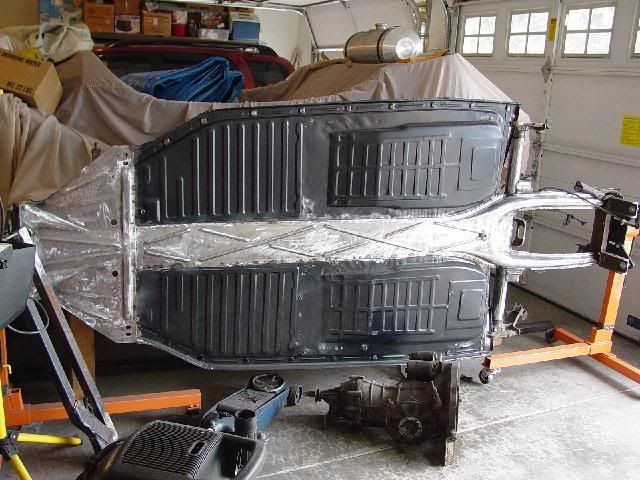
Image

Normally I would say to weld two nuts per stand to allow bolts to jam down on the square tub to lock it in place. Thinking about it, I think I would put the bolts on the under side as the pan does come pretty close to the legs. The other option is to raise the main post which is harder to do but makes more sense.... maybe!

There are two basic weaknesses I have found as together and unmodified, they both together can accommodate a shorter wheel base pan but really need the stiffness of the joining tube. Mine does need it also especially when moving it around to face the other direction.

Recently I was watching one of those auto rebuild shows and during a short piece I saw the guy rotating the car on the stand and noticed two things. One was that he was using a pipe in a tube to turn the car (see below) and the other was accommodations' to chassis/body length adaption.

The next part deals with the rotating part of the engine stands:

I used the stock arms of the engine stand and the bolts that attach the front beam to lock the frame head to the engine stand. In the rear I made an H-shaped mount using scrap and attached the stand to the pickle forks using the stock bolts. I used the arms on both stands to level out the pan and also to clear the legs of the now a rotisserie.

Changes to the rotating part of the now rotisserie:

One thing I was not aware of at the time was the 4° to 6° lay back of the frame head to accommodate the front beam caster so when I move things the front wheel comes up (see the top picture) but there is enough slop in the engine stand rotating devices to accommodate this... except you need a hammer to re-align the holes for locking the position of the heads (more on that later).

I am not sure if the rear transaxle/pickle forks have some angle added or not to account for deflection when the engine and transaxle are mounted but now I think there is an fix that can be made thanks to the one quick view of a purchased rotisserie that I already have alluded to.

http://www.mooreparts.com/8428-AC430036-24%2A/

These are EMPI and there is 24 of them in the package but this is the idea; I am sure you can get them elsewhere also. You will need at least 8 of them, maybe more depending on how you attack this change.

On the front I would use a shortened front beam that will fit the year of pan you are using. After trimming off the ends (a bent axle would be nice if it weren't been too far inboard) then weld a threaded bolt to accommodate the engine mount pieces on the now rotisserie. On one or the other clams on the front you will probably need to make a spacer to accommodate the caster of the frame head.

I the rear I would use a tube longer than the spread of the transaxle mounts and tab it then bolt it to the mount. I would then use these clamps and make similar mounts (intentionally vague as there should be several ways to do this) to accommodate and angle in the transaxle mount... if any.

On my rotisserie there are four holes in the pivot of the head which are sloppy but allow you to sit the pan horizontal tunnel up or down, vertical left or right and ...
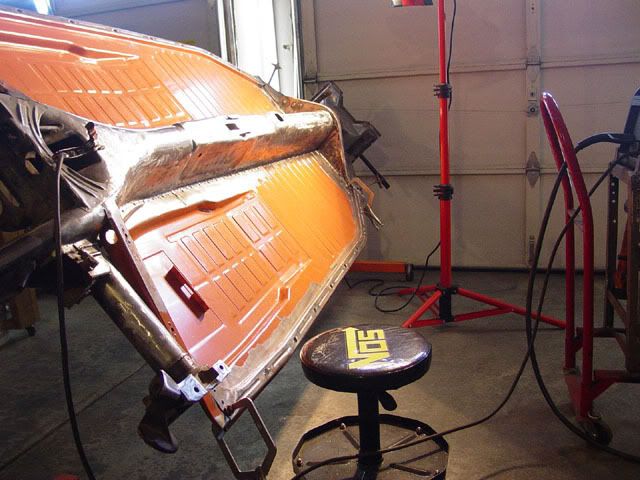
Image

Image

... at ~45° tipped left or right. By closing off the holes with weld/making a new tube and putting a jam bolt or two on the pivot you can do closer intervals of change. Not completely sure if that is a good idea or not assuming you are one that climbs all over everything. This will give an idea of the hight off the floor and an advantage to pan rotation.

The pan is high enough to work on without having to lean too far over assuming you are ~6' or under. Tilting it also allows for some fanny support at times as shown in one picture.

Other than rotating it around horizontally in a close shop it is easy to move around and rotate. I did a lot of work on the pan with it standing vertical (on edge) too which made it easy and storing the pan on edge is a lot nicer than it setting on jack stand horizontal to the floor. It is hard to mount the beam when on the rotisserie which is too wide to be rotated if and when mounted on the rotisserie. The rear trailing arms can be done on the rotisserie but not rotated to anything much more than 45 degrees as the trailing arms will hit the front leg of the stand.

One additional thing about using the tubes is the handles on the motor stand are short of leverage as they are short and mounted inboard. I usually gab or also grab the pan itself to help rotate. The same handles could be used as levers in the ends of the tubes making things a lot easier to rotate.

I am welcome to any other ideas, corrections or what ever.

Lee
User avatar
ProctorSilex
Posts: 228
Joined: Sun Jul 17, 2011 6:09 pm

Re: Home made rotisserie

Post by ProctorSilex »

I saw this back when you posted it, but did not think to thank you for the idea. I had not thought of using two engine stands and I did not know that they were angled (that would drive a person nuts figuring that out the hard way!).
My friend and I started building one out of 2x4 thick wall tubing a while back. It was hard finding tubes that would telescope for the rotation bit (the tubes I found were not very tight together and I might search again when I return to the project). I was designing mine for whole body restoration which included a spine connecting the ends to take strain off the body. I also got rather large wheels (particularly for our suboptimal working conditions). "Simple" projects like this get really complicated really fast. My drills bits wore out (I designed it to be disassembled for storage). My welder could not get hot enough such that the welds need to be redone with a hotter welder (have one now). The dang thing is not straight on one end. Et cetera.
This method would have been pretty helpful back when I was cleaning up a chassis.
For the anal, I add that one could use a bit of tubing to connect the stands then use a laser or a bit of string to align the mount tubes.
Ol'fogasaurus
Posts: 17758
Joined: Mon Nov 13, 2006 10:17 pm

Re: Home made rotisserie

Post by Ol'fogasaurus »

Thanks ProctorSilex I hoped it might be some use to someone. So simple and so cheap to make plus it stored fairly compact.

One of the things I have considered is running a close fitting tube inside of the foot then using nuts welded onto each foot lock the feet together to work on shortened VW pans. The angle of the mounting surface for the front beam is something like 4 to 6 degrees and I am not sure what the unloaded angle of the trans mount is but using tubes and adding clamps to the rotisserie faces might help keep the three wheels on both stands on the ground when rotating the pan... as I currently have it. It still works good but there is some miss-match.

I think a shortened VW pan will work on the stand but it would be close. I am not home right now to measure the gap but when I do I will try to measure things out.

Lee
User avatar
dunegoon
Posts: 253
Joined: Fri Jul 27, 2001 12:01 am

Re: Home made rotisserie

Post by dunegoon »

A very nice post indeed! It occurred to me that I might find some larger wheels for the back of the engine stands in order to accomplish the angle correction. It would not require cutting and welding that way and it would be easily reversible. Or, remove the front wheels after it's in place.

Laziness is the mother of invention....
Ol'fogasaurus
Posts: 17758
Joined: Mon Nov 13, 2006 10:17 pm

Re: Home made rotisserie

Post by Ol'fogasaurus »

Hmmmm: very interesting; that is something I never thought of. So easy and it should work if you can get the right sized wheels... or make some. Hmmmmm!
Ol'fogasaurus
Posts: 17758
Joined: Mon Nov 13, 2006 10:17 pm

Re: Home made rotisserie

Post by Ol'fogasaurus »

Doongoon; at first glance your idea looked good but after a long drive (in Bend OR now) and not being able to sleep I got some time to think about what the big wheels in the rear change would bring.

If you look at a real rotisserie the two main posts are connected together at the bottom which my two engines stands have yet to have happen (it will be removable from both and there will be clamping bolts on each lower leg). I am not sure if the third wheel on one or both stands will still be used or...

Also, if you remember the vertical posts on an engine stands leans back so when the engine is mounted on the stand the main post will bend forward due to the cantalevered weight on it. When I built the stand I notched each post as low as I could (I think there was a collar or something which stopped me from going lower), backed the two stands together then clamped the two together with a tube going through the tube where the rotating mount would sit. I checked to make sure both posts were vertical and if, when turned around, the two posts would align together and would be horizontally aligned. I then welded each of the notches in the posts into that alignment.

The engine mount heads were used "as is" by adjusting them to fit to the beam nount bolts in the frame head (this is where the problem starts) and I made a simple (and heavy) adapter to the pickleforks and the arms of the engine mount head (this is the other area that causes the problem as they don't sit level until the weight of the engine and transaxle are mounted and they deflect). When the pan was mounted and in place I did some final adjustments to ensure that the pan sat centered inbetween the two stands and also sat level. The setting of the pan on the stands was doable by one person and a cherry picker (engine hoist) and the engine mount heads attached to the pan (this was done about 20+ years ago :oops: ).

The engine mount heads fit just lose enough in the tubes on the stands that the locking pins when the pan is tunnel up and tunnel down align correctly and when you rotate the pan to 45 degrees of pan face up or down the algning holes fit easily. With the pan sitting on edge there is a bit of aligning so the lockingn pins drop into place. Some of that I think is due to slight errors in the hole locations in the two mont heads.

When you rotate the engine one or the other of the rotisserie legs wants to lift but by taking some of the weight off that leg or smacking the vertical leg with a rubber hammer the leg will setting back into its proper setting.

That all being said: if you put larger tires on it would through all the alignment off an make things worse when rotating the pan on the stands. If you did all the orgional alignments of the two stands with larger wheels on first then you would end up with the same problems... no gain.

Where I think the fix would be is in the mount heads and how they are attached to the pan. One way woulc be the use of an old beam: cut the ends off and make adapters (probably threaded fasteners and faced (?) shims or washers used as shims) that clamp to the beam with U-bolts. I think a tube in the rear with U-bolts might work also but I haven't tried it as right now it is something easily put up with/tolerated. If I built a stand which would allow the body to be attached then I would have to solve that problem. It is probably easy to do this to farmed cars ( don't know what they do as I only looked at some video of one and there were a lot of secrets they didn't show), this was a easy solution to what I thought was a simple problem.

Thanks for the imput though as it got me thinking the problem over again. Mabe I will work on a solution... but probably not... at least for now.

Maybe I will see you on the dunes. We ride in the southern dune area; between Horsfall and Spinreel. We are in Bend right now for a few days but will be down on the dunes in a bout a month.

Lee
User avatar
andk5591
Posts: 26
Joined: Sun Mar 11, 2007 1:01 pm

Re: Home made rotisserie

Post by andk5591 »

This was really nice - I needed something similar for pan rehabs and already had a pair of body dollies that I had built a few years ago. I simply added a couple vertical 2x6s, made end boards to bolt to the pan and used a couple 2x4s to tie the 2 pieces together. I also needed to be able to use this for shortened pans, so if I flip the dollies around and space the 2x4s a couple inches different, it works for either.
12345407_494202444092431_3742810097171494_n.jpg
You do not have the required permissions to view the files attached to this post.
Ol'fogasaurus
Posts: 17758
Joined: Mon Nov 13, 2006 10:17 pm

Re: Home made rotisserie

Post by Ol'fogasaurus »

Very cool! Good to see other ways to accomodate the same thing.

I am going to shorten the forward legs and run a piece in-between the two legs that would allow me to shorten the distance between the two ends then have some jam nuts, two on each leg to lock things in place and keep the alignment.

I also think that I need to make a soft alignment on the front end or the rear end to accomodate the angle in the rear transxle mounts because of no weight is on them so they sit flat. Not much angle to accomodate though.

Lee
User avatar
GS guy
Posts: 909
Joined: Wed Nov 06, 2002 12:01 am

Re: Home made rotisserie

Post by GS guy »

Bring-back Monday? Popping this old thread back to the top. I'm getting ready to put together a rotisserie similar to yours Lee. I've got a "sacrificial" 20+ YO HF 3-legger engine stand I built a 1641on many moons ago, then more recently served duty resealing a Suby engine. I now need something to support and rotate my Deserter buggy chassis for prepping and painting, to also serve same duty on the fiberglass body once chassis is done. I liked reading about how you modified the inexpensive engine stands for similar work, I hope to mimic your efforts. I picked up a new stand (1Klb version) last fall, but now have 2nd thoughts about hacking it up - think I'll keep stock for future engine duty. Looking at getting another 3-leg stand for the rotisserie, they're cheap enough.
Couple questions: I want to be able to "wheel" the stand in and out of my garage/shed to do all the really dirty grinding/sanding work outside, hope to keep the inside cleaner for painting. How did you manage to steer your stand when in use? Seems the fixed supporting wheels wouldn't allow easy turning/direction changes? Also, what about locking the wheels while you're working to keep the whole thing from shifting?
Debating whether I want to fit swivel casters in place of the fixed stand wheels, weighing pros and cons in my head.
I'll probably get a section of strut channel to connect the center legs together, make the whole thing more stable.
Any other suggestions?
Thanks,
Jeff
Ol'fogasaurus
Posts: 17758
Joined: Mon Nov 13, 2006 10:17 pm

Re: Home made rotisserie

Post by Ol'fogasaurus »

Couple questions: I want to be able to "wheel" the stand in and out of my garage/shed to do all the really dirty grinding/sanding work outside, hope to keep the inside cleaner for painting. How did you manage to steer your stand when in use? Seems the fixed supporting wheels wouldn't allow easy turning/direction changes? Also, what about locking the wheels while you're working to keep the whole thing from shifting?
Debating whether I want to fit swivel casters in place of the fixed stand wheels, weighing pros and cons in my head.
I'll probably get a section of strut channel to connect the center legs together, make the whole thing more stable.
Any other suggestions?


1) On concrete with the metal wheels they slide reasonably well with a slight helping lift on the cross-bar in the hub. The same for turning. I work one end at a time 'cause where you want to go in one felled swoop things will change and probably be too far in the one direction (see Murphy's Law URL below)
Black buggy build 001 (2).jpg
If I move it outside to asphalt then the lift to steer it requires slightly more lift (check your truss on this :wink: ). As far as putting casters on it... I don't know to be honest. Casters can swivel very easily; in my case my garage has seams in the concrete floor and casters have a tendency to snag and stick in them; the same for the seam join when going outside to asphalt.
DSC00647 (2) copy.jpg
This is about as light as I ever got the load but it was still relatively heavy/awkward then.

Unless you are on uneven or not level flooring I doubt that the brakes are necessary as there is a fair amount of weight involved. One thing though, if you put brakes on it then Murphy's law (https://www.bing.com/search?q=https%3A% ... b131b10d94) will take hold; e.g., the brake(s) with the brake pedals in question will always be where it is the hardest to get to.

There are a couple of disadvantages to what I built.

1) With the torsion bars in place with the endcaps in place the pan will not rotate 360°. With them off then the 360° works but with one caveat.

2) The caveat is that the frame head I connect to has a ~6° angle set to it. With the pan adjusted to 0° when horizontal it will rotate 90° right or left but when you try to go for a complete turn over then there is a problem: one of the two stands will lift until you lift the stand up so the slop in the head allow things to sit flat.
001.JPG
The other argument is that the rear trans mount may or may not have an angle to it also. This is a BJ pan (I am not sure if the K&L pans are the same) and where the dimple is for the CV joint there is a bend: then question then being is there deflection there caused by bounce or jounce and did the engineers account for it which could also be some of the same problem.

Looking at the body and frame rotisseries I seen on the "build shows" on TV the seem to have tubes involved that they can use to clamp to in order to even out things during rotation. I have thought about it but never got serious about it enough to go after it. Doing a search on a similar question I had I stumbled onto this very same question on the Samba once;the argument given was to "go over to STF and ask the Ol'forasaurus about it" :lol: .

If you have more questions hit me as I probably have forgotten a lot so my mind may need to be jiggled a bit.

I also have seen a variation where the legs were sit facing outside of the pan but that is something to trip over. It also lengthens the wheel base making things harder to manipulate like you want. With the pan bolted to the stands the whole unit becomes pretty dang ridged.

Another thing is that if you are working on a shortened pan then the legs will not allow it so one or both of the ends of the center legs will need to be cut then a fill tube added and locked n-place by a couple of jam bolts on each leg. this is to keep the rest of the rotisserie vertical in alignment.

Off to get some bolts but back in a while.

Lee
You do not have the required permissions to view the files attached to this post.
Ol'fogasaurus
Posts: 17758
Joined: Mon Nov 13, 2006 10:17 pm

Re: Home made rotisserie

Post by Ol'fogasaurus »

Just got back from getting the bolts when I walked into the garage I noticed this:
IMG_1506 copy.jpg
I don't think the swivel wheel does much but then I don't think it fights me when I lift up on the stand and pull it side ways. Kind of funny that you can look at things a lot and not see/forget something :roll: .

Lee
You do not have the required permissions to view the files attached to this post.
User avatar
GS guy
Posts: 909
Joined: Wed Nov 06, 2002 12:01 am

Re: Home made rotisserie

Post by GS guy »

Thanks Lee! I kind'a figured that center leg swivel wheel didn't do a whole lot, but I'm sure it's easier to roll around when not in use! My chassis is 85" WB, though it extends a bit beyond that with the tubing. I won't have to deal with the angled frame head/rear forks as my chassis is all custom/tube, but I will have to make up custom rotisserie mounts for it. My front and rear bumper mounts should be fairly square to the chassis bottom. Since mine's a little more than a flat "plane" with integral roll bar (and other "stuff"), it'll be a little tricky to guestimate the CG. I'm sure I can get it close enough, I really only need to rotate it ~90* as I want to paint the top and bottom in one shot. Lots of tubes and joints to shoot underneath of. I'll do some measuring but I may extend the vertical engine stand sections? I want it low enough so I can later rig up a wooden frame to attach the body for lots of upcoming bodywork, hopefully avoiding too much bending over with all the sanding!
Here's what I'm dealing with....
2012-4-14 - 08 small.jpg
Jeff
You do not have the required permissions to view the files attached to this post.
Ol'fogasaurus
Posts: 17758
Joined: Mon Nov 13, 2006 10:17 pm

Re: Home made rotisserie

Post by Ol'fogasaurus »

With the way the arms are on the engine stand you should be able to raise or lower the chassis a bit for height. If not, since your going this far to make new longer arms shouldn't be too much problem; just time mostly.

Lee
Ol'fogasaurus
Posts: 17758
Joined: Mon Nov 13, 2006 10:17 pm

Re: Home made rotisserie

Post by Ol'fogasaurus »

Jeff, you got me curious so I went out and measured the pan: from the top front of the frame head to the end of the trans mount is roughly 106". From the rear of the trans mount to roughly 85" is about then end of the front of the trans mount. The gap between the two front parts of my rotisserie is something around something like 55" (I would need help from another person to get a good measurement unless I laid on the cold concrete floor and got filthy dirty :lol: .

Depending on where you want the pan to sit for your painting you might need to make a drop for the rear that works on the rear join like my "H"-mount does so some reasonable careful measurement might be needed to go along with the 4 arms of the engine mount. I'm just not sure now just how much adjustment I had using the arms but I did use the engine hoist to put things together.
001.JPG
I did use at least one of those work stations I am modifying to along with the engine hoist. It is pretty close to what the stand might do but it would be wise to check. Getting both ends level is not easy so the work stations helped as an intermediate step but then I was coming off jack stands on wheels too.

Lee
You do not have the required permissions to view the files attached to this post.
User avatar
GS guy
Posts: 909
Joined: Wed Nov 06, 2002 12:01 am

Re: Home made rotisserie

Post by GS guy »

Thanks for the measurements Lee. I'm not sure how much of the original engine yoke I'll end up using, for sure I'll be making a couple bar-shaped pieces to interface chassis to yoke. I guess the other tricky part is the yoke rotation centers (and axis) need to be pretty close to being in a straight line with each other when everything is bolted together. I've got a couple of sturdy saw horses I was originally thinking of adapting to make the rotisserie support stands, until I saw your thread. They'll come in handy as you show above to support the chassis while docking/un-docking with the engine stands.
Jeff
Post Reply