Blast cabinet
-
fusername

- Posts: 6806
- Joined: Sun Jan 28, 2007 11:26 am
Re: Blast cabinet
finally setup, I'll let you guys know when I finally toast my compressor! Still don't have long enough arms to put the screws in for the far side of the glass though, need to find a helper.
give a man a watch and he'll allways know what time it is. give him two and he can never be sure again.
Things are rarely just crazy enough to work, but they're frequently just crazy enough to fail hilariously.
Things are rarely just crazy enough to work, but they're frequently just crazy enough to fail hilariously.
-
Ol'fogasaurus
- Posts: 17756
- Joined: Mon Nov 13, 2006 10:17 pm
Re: Blast cabinet
I had to partly slide my torso inside so it can be done; if you are in the 6' in height area but it is doable but so much easier with a helper. It is the same with the viewing area and changing the inside viewing glass protection, you can do it by yourself but a helper does make it so much easier and reduces the bruising to your torso. 
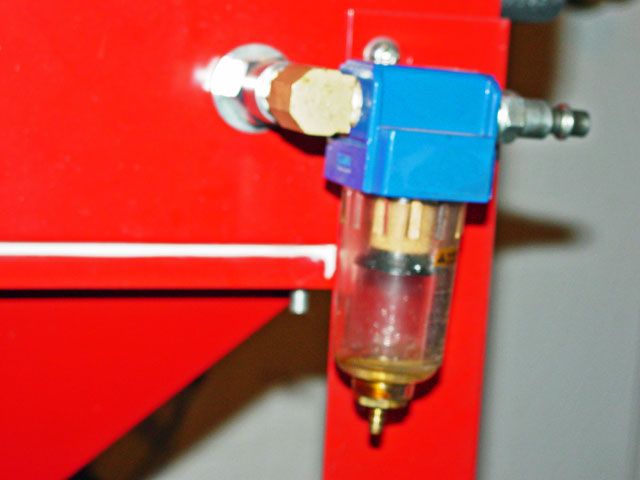
Fuser, get a water separator to add to the inlet of the air hose into the machine, being on the only coast of importance you especially with your nor'easters and other nasty Atlantic storms; like us on the invisible coast, are going to have a lot of moisture in the air/humidity and having the moisture separator does make things a lot easier; besides, it is an automatic thing you usually don't have to pay much attention to. I got one at Lowes for in the $15 area; you will need a 90° brass connection to get it our of your way and quick connect off it. I can take pictures if you want.
Make sure you have a good vac-u-varoom with a good cleanable/replicable filter as you will have to clean the dust out of it... a lot. I also use the vac to double duty and help clean up the sweepings from grinding and other work.
-
SCOTTRODS

- Posts: 625
- Joined: Sun Nov 07, 2010 7:15 am
Re: Blast cabinet
I recommend getting some Riv-Nuts and setting them in each screw location, then on the inside, plug the hole with Epoxy to keep media out..... Get some screws the right length to do the job from the outside only.
I have found them completely missing more than once. - PILEDRIVER
Some pics of My Powder Coating work
http://s244.photobucket.com/albums/gg6/terrellster/
My Facebook Page for Powder Coating
http://www.facebook.com/profile.php?id=100001788886297
Some pics of My Powder Coating work
http://s244.photobucket.com/albums/gg6/terrellster/
My Facebook Page for Powder Coating
http://www.facebook.com/profile.php?id=100001788886297
-
fusername
- Posts: 6806
- Joined: Sun Jan 28, 2007 11:26 am
Re: Blast cabinet
I bought a little HF shop vac just for this purpose. I am gonna use the filter that came w/ it and see how long it lasts. after it needs replacement I will try a "wet" bag, which are usually washable and don't need to be replaced as often.
riv nuts, why didn't I think of that! I have a 100 bag of em, probably the exact right size to re-use the bolts that came w/ it, M4 or M5 i think. When it comes time to re-do it if it leaks everywhere, I will throw those in to save some pain and suffering. the glass I will do ASAP tho, since that will probably be on and off all the time.
also I think I am going to toss the glass protective sheets. they make it hard to see, and since I plan on only using glass bead, i think damage will be minimal. At work we just used plain glass and it was fine for years on end.
Lee, not to make us both sound like idiots, but if you remove one of the gloves, woulnd't it be real easy to reach all those nuts? doh!
give a man a watch and he'll allways know what time it is. give him two and he can never be sure again.
Things are rarely just crazy enough to work, but they're frequently just crazy enough to fail hilariously.
Things are rarely just crazy enough to work, but they're frequently just crazy enough to fail hilariously.
-
Ol'fogasaurus
- Posts: 17756
- Joined: Mon Nov 13, 2006 10:17 pm
Re: Blast cabinet
Yes, I thought about removing the one glove too but I didn't want to chance messing up the gloves; I was warned about the original ones not lasting a long time if you abuse them much ones. As far as the riv-nuts, I hadn't thought about it myself. As long as things are tight I don't see why you couldn't use them.
You are going to find that the glass beads etch things more than one would expect. I let a friend use mine (he later bought a small table top one for his self) and not knowing better (I had to leave for several hours) he wore the paint off the back wall wasted a inner liner in a short time. It depends on how you hold things and the direction you blast on how long things last.
I talked to one of the shops around here and he doesn't use the liners either, he just periodically replaces the window with tempered glass. I don't know the right answer myself so I keep using the liners until I am out of them then I'll have to make a decision.
Lee
-
fusername
- Posts: 6806
- Joined: Sun Jan 28, 2007 11:26 am
Re: Blast cabinet
I'll ask the guy i used to work with if he knows what they used. I am actually throwing out some old windows right now, gonna save the glass from em, might see if I can find a glass cutter in box here and chop it up and throw it in, see how long it lasts. I have 2 spare panes, maybe 4 if I can get two out of each. free but the time to cut em, and like I said at work we got years from each pane.
for those following at home, you can not use lexan/acryilic for the inside glass layer, as it scratches very very easily.
for those following at home, you can not use lexan/acryilic for the inside glass layer, as it scratches very very easily.
give a man a watch and he'll allways know what time it is. give him two and he can never be sure again.
Things are rarely just crazy enough to work, but they're frequently just crazy enough to fail hilariously.
Things are rarely just crazy enough to work, but they're frequently just crazy enough to fail hilariously.
-
sideshow

- Posts: 3428
- Joined: Mon Oct 27, 2003 11:00 am
Re: Blast cabinet
you can also use saran wrap over the glass (float on the inside) to extend life
Yeah some may call it overkill, but you can't have too much overkill.
-
Ol'fogasaurus
- Posts: 17756
- Joined: Mon Nov 13, 2006 10:17 pm
Re: Blast cabinet
I thought I would make an update to this subject after a several weeks of waiting for help.
In the past, one of the common problems with the HF (not sure about others unless they are from the same source and renamed to the company's own name or painted a different color) has been the lighting going out. In the past HF has used a two F18 florescent bulbs unit that is installed in the removable top piece that also is used to support the glass that has a piece of film to protect the glass from etching. The florescent light assembly looks very similar to a standard under cupboard unit. There are two screws in the top of the cover that hold the light assembly in place but don't turn them from the outside as one has the ground wire attached to it and you can damage the wire without knowing it... until you take the top assembly off.
(somewhat redundant) The florescent tubes, for some reason, have a tendency to go out quite quickly which I know irks people to no end. The top is also access to the tempered glass under cover that protects the lights from blasting grit. Again, the tempered glass has a film with double backed tape that holds it to the glass. There is a split bulb seal around the light's opening into the cabinet itself that the glass pushes against. There are several tabs on the cover that hold the glass in place and down on the bulb seal. When you buy the cabinet the cabinet and light assembly are already in place; you just add legs and incidentals and off you go.
(out of sequence) HF (for sure) has done a redesign and the lighting I am talking about has changed so now they use a standard florescent wand like the hand held want you might have. Makes things simpler but I am not sure if the light is the same, better or worse.
When my cabinet lights went out the other day I removed the 10 nuts and bolts (nuts are in the inside so I recommend putting some paper over the screen that you work on in case you drop a nut while reaching for the pair at the other end from the opening. The screws themselves have a slotted and Phillips/cross-head (yes Martha, there is a difference) in the crown of the bolt. Lift the cover straight up and remove it; the glass may or may not slide down the face of the cabinet but there is the surround for the viewing port that (may) keep the glass from sliding off and braking so be warned.
I plugged the light assembly in to check things and... zilch so I went and bought a new pair of lights. First let me say that who ever designed the light assembly... well that person did a great job! Both ends of the light assembly have spring loaded connections that you slide back to remove the bulb so no twisting like normal lights. I replaced the bulbs and plugged it in, turned it on and... nothing so the ballast had gone.
HF parts (1-800-444-3353 have the skew number for the tool/part ready) does not sell the ballast anymore so I was on my own on this. I went to several box stores for help and ended up getting sent to Platt in Everett WA. It is more of a commercial store but was a lot of help. I took the light assembly with me and they spent some time with me to get the right ballast. The stock ballast is a very unique and well designed unit with push pin type of wire connections... it is also unique in size and there is also a cover that goes over the light assembly so it is fairly flat. After a miss-fire where I got a single blub unit instead of a double bulb unit the right one came in. The ballast was a tad too short so I made an adapter then got the idea of washers to adapt it to the studs in the frame which worked. While at the store I was talking to the counter guy and an other guy was standing at the other counter. It turned out that he did florescent lights for a living and he went over what I had and how to hook it up with me in about 2 minutes.
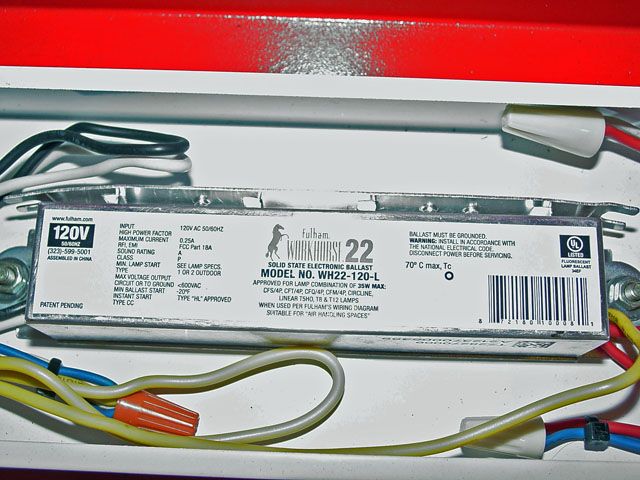
This is the unit I got and you should be able to get the part number from the photo. There are two power wires which are one black and one white. The stock unit had 6 wires coming into the the ballast from the power in end so choose the center black and white wires that come from the switch. The other two wires from each of the light mounts move to one side for later connections. At the other end of the old ballast are 4 wires, again split them in pairs and move them to one side. Remove the old ballast and admire how well is was designed then 86 it.
Wiring of the new ballast is easy but not quite as pretty as with the old ballast. I chose not to shorten the wires on advice from the guys where I got the ballast (I don't think it would have mad a difference but just in case). There are three wires coming out of the one end unlike the old ballast which had, besides the power wires) 4 coming into the ballast at each end of the ballast. Note: there are two red wires and one yellow wire and it does not make a difference which direction they go other than the red pair goes in the same direction/end.
Using some screw nuts connect the yellow wire to the two pairs of wires from one end of the light assembly sockets. Next connect one of the two red wires to both wires of one light fixture socket and the other red wire to the two wires from the other light socket.
Plug in the power cord, stand back and turn the switch on. The lights should come on. I wired ties the groups of wires together to keep them from chafing on the (4) studs
put the cover on the light assembly, clean the glass, both sides and reassemble the light housing on the blast cabinet. Plug in the power cord, check the lights again, slide it back in place... then get to work!
Over kill but am sorry; it took me so long to do this that I wanted to be sure I got everything down so the next person would not have to go through this.
I almost forgot/for what it is worth: in talking to one shop that uses a blast cabinet (we both use glass beads instead of sand or AL oxide grit. Both are hard on nozzles and glass) was that they did not use the protection media as by the time the unprotected glass got that back from the glass bead you would have spent as much or more on the film than just periodically getting new tempered glass replacements.
Lee
In the past, one of the common problems with the HF (not sure about others unless they are from the same source and renamed to the company's own name or painted a different color) has been the lighting going out. In the past HF has used a two F18 florescent bulbs unit that is installed in the removable top piece that also is used to support the glass that has a piece of film to protect the glass from etching. The florescent light assembly looks very similar to a standard under cupboard unit. There are two screws in the top of the cover that hold the light assembly in place but don't turn them from the outside as one has the ground wire attached to it and you can damage the wire without knowing it... until you take the top assembly off.
(somewhat redundant) The florescent tubes, for some reason, have a tendency to go out quite quickly which I know irks people to no end. The top is also access to the tempered glass under cover that protects the lights from blasting grit. Again, the tempered glass has a film with double backed tape that holds it to the glass. There is a split bulb seal around the light's opening into the cabinet itself that the glass pushes against. There are several tabs on the cover that hold the glass in place and down on the bulb seal. When you buy the cabinet the cabinet and light assembly are already in place; you just add legs and incidentals and off you go.
(out of sequence) HF (for sure) has done a redesign and the lighting I am talking about has changed so now they use a standard florescent wand like the hand held want you might have. Makes things simpler but I am not sure if the light is the same, better or worse.
When my cabinet lights went out the other day I removed the 10 nuts and bolts (nuts are in the inside so I recommend putting some paper over the screen that you work on in case you drop a nut while reaching for the pair at the other end from the opening. The screws themselves have a slotted and Phillips/cross-head (yes Martha, there is a difference) in the crown of the bolt. Lift the cover straight up and remove it; the glass may or may not slide down the face of the cabinet but there is the surround for the viewing port that (may) keep the glass from sliding off and braking so be warned.
I plugged the light assembly in to check things and... zilch
HF parts (1-800-444-3353 have the skew number for the tool/part ready) does not sell the ballast anymore so I was on my own on this. I went to several box stores for help and ended up getting sent to Platt in Everett WA. It is more of a commercial store but was a lot of help. I took the light assembly with me and they spent some time with me to get the right ballast. The stock ballast is a very unique and well designed unit with push pin type of wire connections... it is also unique in size and there is also a cover that goes over the light assembly so it is fairly flat. After a miss-fire where I got a single blub unit instead of a double bulb unit the right one came in. The ballast was a tad too short so I made an adapter then got the idea of washers to adapt it to the studs in the frame which worked. While at the store I was talking to the counter guy and an other guy was standing at the other counter. It turned out that he did florescent lights for a living and he went over what I had and how to hook it up with me in about 2 minutes.

This is the unit I got and you should be able to get the part number from the photo. There are two power wires which are one black and one white. The stock unit had 6 wires coming into the the ballast from the power in end so choose the center black and white wires that come from the switch. The other two wires from each of the light mounts move to one side for later connections. At the other end of the old ballast are 4 wires, again split them in pairs and move them to one side. Remove the old ballast and admire how well is was designed then 86 it.

Wiring of the new ballast is easy but not quite as pretty as with the old ballast. I chose not to shorten the wires on advice from the guys where I got the ballast (I don't think it would have mad a difference but just in case). There are three wires coming out of the one end unlike the old ballast which had, besides the power wires) 4 coming into the ballast at each end of the ballast. Note: there are two red wires and one yellow wire and it does not make a difference which direction they go other than the red pair goes in the same direction/end.
Using some screw nuts connect the yellow wire to the two pairs of wires from one end of the light assembly sockets. Next connect one of the two red wires to both wires of one light fixture socket and the other red wire to the two wires from the other light socket.
Plug in the power cord, stand back and turn the switch on. The lights should come on. I wired ties the groups of wires together to keep them from chafing on the (4) studs
put the cover on the light assembly, clean the glass, both sides and reassemble the light housing on the blast cabinet. Plug in the power cord, check the lights again, slide it back in place... then get to work!
Over kill but am sorry; it took me so long to do this that I wanted to be sure I got everything down so the next person would not have to go through this.
I almost forgot/for what it is worth: in talking to one shop that uses a blast cabinet (we both use glass beads instead of sand or AL oxide grit. Both are hard on nozzles and glass) was that they did not use the protection media as by the time the unprotected glass got that back from the glass bead you would have spent as much or more on the film than just periodically getting new tempered glass replacements.
Lee
-
SCOTTRODS
- Posts: 625
- Joined: Sun Nov 07, 2010 7:15 am
Re: Blast cabinet
Lee... On My "other forums", a few of the guys are yanking the Fluorescent bulbs and fixtures and opting for much brighter (and much cooler) LED Strips and panels, you can mount them nearly anywhere inside the cabinet, so it works best for YOU.
Another modification is to replace the lens protectors with Fine mesh Stainless Screen... They say they can see through it as though it's not there... but it completely protects the glass... I'm a bit skeptical, but that's what they say. Might work great... I haven't tried it yet...
Just offering up some more options.
I have found them completely missing more than once. - PILEDRIVER
Some pics of My Powder Coating work
http://s244.photobucket.com/albums/gg6/terrellster/
My Facebook Page for Powder Coating
http://www.facebook.com/profile.php?id=100001788886297
Some pics of My Powder Coating work
http://s244.photobucket.com/albums/gg6/terrellster/
My Facebook Page for Powder Coating
http://www.facebook.com/profile.php?id=100001788886297
-
Ol'fogasaurus
- Posts: 17756
- Joined: Mon Nov 13, 2006 10:17 pm
Re: Blast cabinet
Thanks SCOTTRODS, I meant to put that information in but got in a hurry and forgot to. I looked into LED myself and the costs of the different ways of fixing the problem was as follows:
New ballast to replace the old one: 3 days plus 3 days (they guy ordered a single tube ballast rather than a double tube ballast) at a cost of $35 (rounded off) plus the wasted days getting to find these guys.
A new lamp fixture keeping florescent lights: cost over $50; stock on hand.
Changing over to Led: brighter light and longer lasting. Cost $100 plus (not a firm estimate but it would be over $100).
I figured that I am old and have a second pair of lights plus the ballast going out was pretty rare so hell, let my wife's kids worry about it.
I have to admit, the lights using the same tubes is brighter than the old ones were even when new so I am happy.
Lee
-
SCOTTRODS
- Posts: 625
- Joined: Sun Nov 07, 2010 7:15 am
Re: Blast cabinet
Here's what they're using on the Powder coating Forums... just string the lights back and forth across a board and make one large light out of them... Pretty cheap in my estimation. The ones on ebay have a Power supply in the deal for similar prices...
I have found them completely missing more than once. - PILEDRIVER
Some pics of My Powder Coating work
http://s244.photobucket.com/albums/gg6/terrellster/
My Facebook Page for Powder Coating
http://www.facebook.com/profile.php?id=100001788886297
Some pics of My Powder Coating work
http://s244.photobucket.com/albums/gg6/terrellster/
My Facebook Page for Powder Coating
http://www.facebook.com/profile.php?id=100001788886297
-
Ol'fogasaurus
- Posts: 17756
- Joined: Mon Nov 13, 2006 10:17 pm
Re: Blast cabinet
Interesting Scott! I am not sure I would have gone this direction even if I knew about it at the time. As it is, the opening into the work area is smaller than the original florescent tubes I am using and I am not sure about 12v.
The new blast cabinets look a bit different now because the light housing is gone. On the inside, in that area, there is now mounted what looks like a normal mechanic's hand held florescent light.
I spent an hour plus yesterday bending over a hot blast cabinet with my nose snug up against the window and my big vacuum hooked up to the cabinet. With the new ballast driving the same florescent bulbs brighter it sure made seeing what I was doing easier.... until the light slowly started to dim. I was concerned that I was having problems with the lights already and I started to get a bit irritated maybe irked would be a better word. It was then that I remembered to turn the vacuum on cleaning out the dust in the air and things sharpened up again .
.
Lee
The new blast cabinets look a bit different now because the light housing is gone. On the inside, in that area, there is now mounted what looks like a normal mechanic's hand held florescent light.
I spent an hour plus yesterday bending over a hot blast cabinet with my nose snug up against the window and my big vacuum hooked up to the cabinet. With the new ballast driving the same florescent bulbs brighter it sure made seeing what I was doing easier.... until the light slowly started to dim. I was concerned that I was having problems with the lights already and I started to get a bit irritated maybe irked would be a better word. It was then that I remembered to turn the vacuum on cleaning out the dust in the air and things sharpened up again
Lee
-
Ol'fogasaurus
- Posts: 17756
- Joined: Mon Nov 13, 2006 10:17 pm
Re: Blast cabinet
Scott, I got thinking about the mesh screen you were talking about and I am not sure I would use that either (I'm always open to options). For what its worth on choosing media: http://www.kramerindustriesonline.com/b ... -media.htm I understand that at one time sand was used but the results were very negative to the point of ruining some old classic cars.
I think the AL Oxide is used for aggressive cleaning brake drums and hard materials like that but is hard on the nozzles and softer materials (see the URL above). I use Glass beads for right now but might get some fine or course walnut shell material for some jobs. With soda there is a cloud rising into the air you can see for long distances (one of the guys in the car club I belonged to had his mustang soda blasted and even with the garage opening closed off with tarps I would find is house from over a mile away), glass beads create dust as does walnut shells. I am not sure how much rust dust there would be with AL oxide or sand but there has to be some.
The picture I posted of the inside of the tube case showed the condition of it after quite a bit of part cleanup and notice how clean it is. Literally, there was no media or rust/crap dust inside of it. Granted, there is a cover over the light fixture but it was clean on both the inside and outside of the assembly or the housing. With even a fine screen like you are talking about, that still lets light go through, could the cleanliness still be there?
Anyway, some thoughts on that idea.
Lee
-
Ol'fogasaurus
- Posts: 17756
- Joined: Mon Nov 13, 2006 10:17 pm
Re: Blast cabinet
Since we have been talking about the blast cabinet I got curious about what was on the web about the HF unit and other suppliers but the HF unit was the most talked about. Mostly it was a mixed bag of complaints and opinions with a few good ideas thrown in. It is interesting to see all the different versions of the unit that HF has had over the years and a lot of the on line fixes have been incorporated into the HF unit so maybe they are listening or at least reading.
http://weldingweb.com/showthread.php?15 ... ng-cabinet This was one thing that I did find and there are several videos posted also.
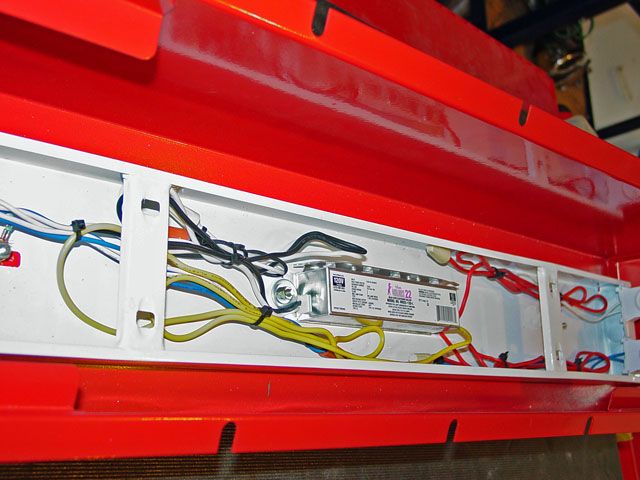
This is the light box that is no more. One of the complaints about the HF unit is the lack of light in the box. The LED conversion would a good choice to make but just the replacement of the ballast made such a difference in mine. I think I am going to have to take the light box off again as I may not have gotten the glass sitting on the seal correctly as there is media all over the place where it wasn't before.
Another of the complaints was the clogging of the gun and the replacement of the gun. The gun that come with the cabinet is not the best you can have for sure so replacing it isn't that bad of an idea. So far I have not had a lot of problem but sometimes things to go slower than I would have liked.
The pinching of the hose that I have read about is not a problem that I have so the manufacture of the cabinet may have read the complaints and fixed it. The clogging of the gun, and even if you got a new one is partly from the moisture in the air coming from the compressor. I solved most of the problem with a water separator I got from Lowes which at the time I put it in was under $15 and may have been less than $10. It is a necessity for sure. If you do get clogging one thing you can do is hold your gloved hand tight against the nozzle and pull the trigger. This blows the pickup line clean as you can see an air blast from the hopper.
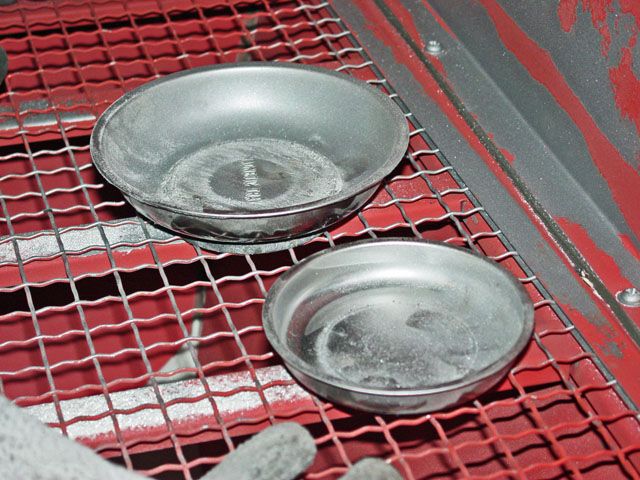
When cleaning small parts or just storing them I got the bright idea of using the magnetic, stainless steel fender trays. Does it work... yep! I have even left small stuff like nuts, washers and sheet metal locking tabs in them to blast in place and have yet to have things blow into the media hopper. The trays are usually under $10 and worth the wasting of them where they could be used in other places too. The shine to them doesn't last long and I would not use the plastic tray version .
I also use a larger vacuum with a three inch dia. hose. The smaller hose units seem to not flow enough air to keep things clear. One of the suggestions was to put steel wool in the outlet where the hose hooks to keep it from removing too much of the larger blast media. A good idea that I will try but I think I will put some screens material up to keep the steel wool in the cabinet not the vacuum.
I still think that if you have the room and the money a blast cabinet is a very good thing to have in your garage. Remember that there is a table top version or two out there too.
Lee
http://weldingweb.com/showthread.php?15 ... ng-cabinet This was one thing that I did find and there are several videos posted also.

This is the light box that is no more. One of the complaints about the HF unit is the lack of light in the box. The LED conversion would a good choice to make but just the replacement of the ballast made such a difference in mine. I think I am going to have to take the light box off again as I may not have gotten the glass sitting on the seal correctly as there is media all over the place where it wasn't before.

Another of the complaints was the clogging of the gun and the replacement of the gun. The gun that come with the cabinet is not the best you can have for sure so replacing it isn't that bad of an idea. So far I have not had a lot of problem but sometimes things to go slower than I would have liked.
The pinching of the hose that I have read about is not a problem that I have so the manufacture of the cabinet may have read the complaints and fixed it. The clogging of the gun, and even if you got a new one is partly from the moisture in the air coming from the compressor. I solved most of the problem with a water separator I got from Lowes which at the time I put it in was under $15 and may have been less than $10. It is a necessity for sure. If you do get clogging one thing you can do is hold your gloved hand tight against the nozzle and pull the trigger. This blows the pickup line clean as you can see an air blast from the hopper.

When cleaning small parts or just storing them I got the bright idea of using the magnetic, stainless steel fender trays. Does it work... yep! I have even left small stuff like nuts, washers and sheet metal locking tabs in them to blast in place and have yet to have things blow into the media hopper. The trays are usually under $10 and worth the wasting of them where they could be used in other places too. The shine to them doesn't last long and I would not use the plastic tray version
I also use a larger vacuum with a three inch dia. hose. The smaller hose units seem to not flow enough air to keep things clear. One of the suggestions was to put steel wool in the outlet where the hose hooks to keep it from removing too much of the larger blast media. A good idea that I will try but I think I will put some screens material up to keep the steel wool in the cabinet not the vacuum.
I still think that if you have the room and the money a blast cabinet is a very good thing to have in your garage. Remember that there is a table top version or two out there too.
Lee
-
SCOTTRODS
- Posts: 625
- Joined: Sun Nov 07, 2010 7:15 am
Re: Blast cabinet
Here's the best idea for Dust collection and Media Separators... Not Free, but very good for the money.
http://www.oneida-air.com/inventoryD.as ... 40A24A4%7D
Like you, I have the same HF cabinet. Mine is the one with the Silly wand light attached inside, from the left wall, just above the Vacuum Connection. The problem with the Losing media by sucking it out, is no big deal if you use the Dust Deputy or something like it. The issue I have is the amount of media that falls on the floor every time I open the door, and the Inlet vent on the back wall, always seems to allow more media on the floor as well. I did a Light modification YEARS AGO, by going to Home Depot and buying some smaller diameter Under Counter lighting that I could Daisy Chain together. I put one over the top where the old unit goes, and the other smaller one between the gloves pointing toward the work piece. I also try to keep the walls free of paint and rust in mine. That HF coating sux, when it gets on your coating parts, if the slightest little bit of that red crap gets on something I'm coating, it ruis the finish and I have to re-do it.
I don't even bother with a Glass protector anymore. I just buy Glass and replace it every now and again. I've learned to make it last pretty well by not shooting media at the glass or in a way that causes the media to return to the glass if at all possible. Sometimes It's just not possible so i try to limit how long I do it that way. I don't use tempered glass... I use 1/4" plate. Coffe table grade stuff. No temper necessary. I pay about 10-12 bux a piece for glass cut to fit.
I primarily use aluminum Oxide media to blast parts for a Powder coating profile. Gotta give it something to grab onto. I also use Coal Slag or Black Beauty or black diamond or whatever it's called this week. 9 bucks for 50 lbs is decent. But it doesn't last long. AO lasts really well. Ruby Garnet media is OK, but some of it causes dust from hell, soe doesn't... Luck of the draw on purchase.
If I need to blast something that requires ZERO substrate damage, I shoot Plastic Media. It's the perfect Paint stripper and works really well on powder coating as well. Plastic media is AWESOME. But you need really good cfm and a large nozzle to do any good...
Also, speaking of guns. I like the el cheapo Blasting guns from Northern tools best - http://www.northerntool.com/shop/tools/ ... 3137_23137 They're pretty easy to find nozzles for in a size I can use... and I can buy Replacement nozzles off ebay in Tungsten Carbide, that last much longer in Aluminum oxide environment. I actually go through the guns almost as often as Nozzles (Tungsten ones, anyway) Now. http://www.ebay.com/itm/Abrasive-Blaste ... 3390c0c44f
I have found them completely missing more than once. - PILEDRIVER
Some pics of My Powder Coating work
http://s244.photobucket.com/albums/gg6/terrellster/
My Facebook Page for Powder Coating
http://www.facebook.com/profile.php?id=100001788886297
Some pics of My Powder Coating work
http://s244.photobucket.com/albums/gg6/terrellster/
My Facebook Page for Powder Coating
http://www.facebook.com/profile.php?id=100001788886297