Shop Press
-
harryset

- Posts: 360
- Joined: Mon Mar 15, 2010 8:16 pm
Shop Press
I got the letter off to Sanity Clause and there's a better than even chance of me adding a 20 ton press to the shop this year. Could have used the heck out of it this past year, but better late than never.
'72 Standard
"I am the proud owner of a "Hoover Bit".
185 60's, EMPI disc kit, EMPI 2 1/2" dropped spindles on the front.
185 65's and stock binders on the back.
SecondSkin - Damplifier Pro and Luxury Liner Pro for sound control.
"I am the proud owner of a "Hoover Bit".
185 60's, EMPI disc kit, EMPI 2 1/2" dropped spindles on the front.
185 65's and stock binders on the back.
SecondSkin - Damplifier Pro and Luxury Liner Pro for sound control.
-
DannyK
- Posts: 551
- Joined: Thu Dec 17, 2009 6:50 pm
Re: Shop Press
I think Santa got me a Tag-Huer for Christmas cuz its on my credit card statement !
-
harryset
- Posts: 360
- Joined: Mon Mar 15, 2010 8:16 pm
Re: Shop Press
Ooooooooh! Sweet.
'72 Standard
"I am the proud owner of a "Hoover Bit".
185 60's, EMPI disc kit, EMPI 2 1/2" dropped spindles on the front.
185 65's and stock binders on the back.
SecondSkin - Damplifier Pro and Luxury Liner Pro for sound control.
"I am the proud owner of a "Hoover Bit".
185 60's, EMPI disc kit, EMPI 2 1/2" dropped spindles on the front.
185 65's and stock binders on the back.
SecondSkin - Damplifier Pro and Luxury Liner Pro for sound control.
-
harryset
- Posts: 360
- Joined: Mon Mar 15, 2010 8:16 pm
Re: Shop Press
Hmmmmmm. Suspiciously my Harbor Freight catalog has disappeared.
'72 Standard
"I am the proud owner of a "Hoover Bit".
185 60's, EMPI disc kit, EMPI 2 1/2" dropped spindles on the front.
185 65's and stock binders on the back.
SecondSkin - Damplifier Pro and Luxury Liner Pro for sound control.
"I am the proud owner of a "Hoover Bit".
185 60's, EMPI disc kit, EMPI 2 1/2" dropped spindles on the front.
185 65's and stock binders on the back.
SecondSkin - Damplifier Pro and Luxury Liner Pro for sound control.
-
harryset
- Posts: 360
- Joined: Mon Mar 15, 2010 8:16 pm
Re: Shop Press
Got a Little Giant ladder instead.
'72 Standard
"I am the proud owner of a "Hoover Bit".
185 60's, EMPI disc kit, EMPI 2 1/2" dropped spindles on the front.
185 65's and stock binders on the back.
SecondSkin - Damplifier Pro and Luxury Liner Pro for sound control.
"I am the proud owner of a "Hoover Bit".
185 60's, EMPI disc kit, EMPI 2 1/2" dropped spindles on the front.
185 65's and stock binders on the back.
SecondSkin - Damplifier Pro and Luxury Liner Pro for sound control.
-
Dale M.

- Posts: 1673
- Joined: Mon Oct 05, 2009 8:09 am
Re: Shop Press
I got a lump of coal....
Dale
Dale
"Fear The Government That Wants To Take Your Guns" - Thomas Jefferson
1970 "Kellison Sand Piper Roadster"
1970 "Kellison Sand Piper Roadster"
-
Ol'fogasaurus
- Posts: 17760
- Joined: Mon Nov 13, 2006 10:17 pm
Re: Shop Press
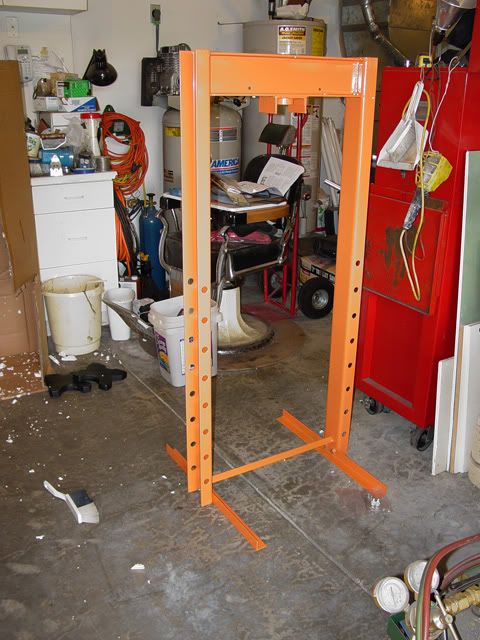
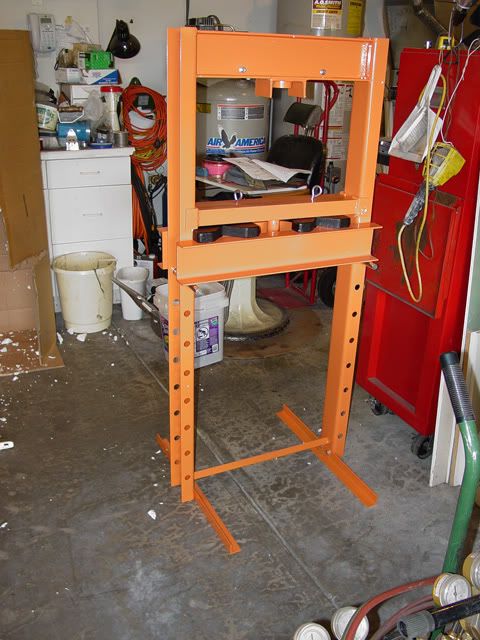
After three tries I finally got my HF 20-ton shop press. It is my kind of unit; as it is so short you will probably have to sit down to use it. It is not space age technology so it is kind of loose on the tolerances so that will be something to watch for. Will I be able to press a length of railroad track through the length of a D-8 Cat, no, not even hardly, but I am hoping that it will do normal around the garage small jobs without too much trouble.
Here it is all assembled:

Some dimensions: the top sits about ~59 ¼ inches off the floor, the top of the platen/table sits ~36 ½ inches off the floor at the highest setting, width is ~26 ½ inches. Advice I have gotten off the web is to be sure to not leave the jack in an extended position as the springs will stretch over time.
It is easy enough for one person to assemble even at my advanced age assuming that that person has all their faculties’ with them at the time of assembly.
Tools needed: a 19mm socket, ratchet w/short extension, and a 19mm combination/box wrench. A 14mm deep socket and ratchet plus a 14mm box or combination end wrench. A 3’ level is almost a must.
Additional parts that I think need to be there are two washers for the eye bolts that are supplied.
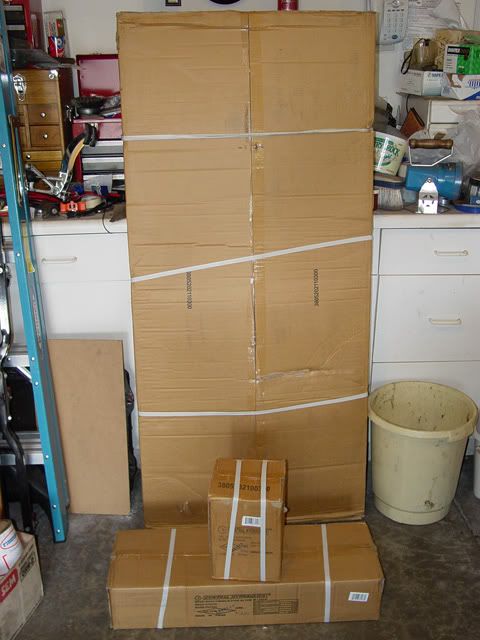
The press comes in three boxes that allow it to be handled quite well. The small box is the 20-ton rated jack and is not too heavy.
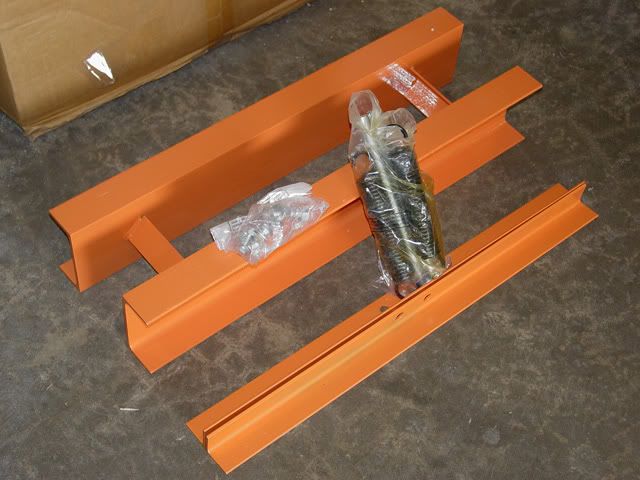
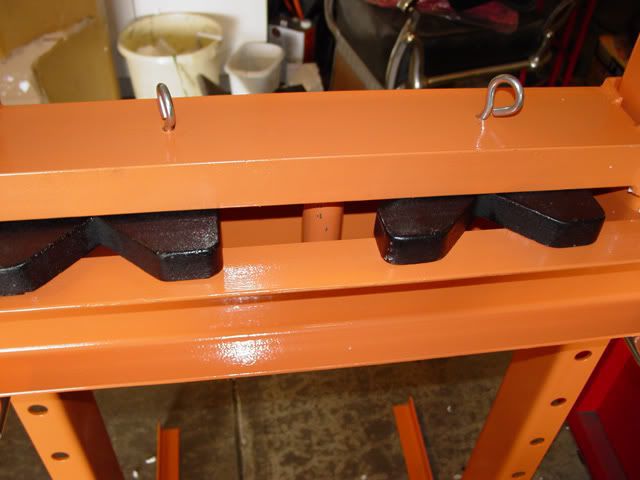
This is the contents of the second box: The platen (they call it a “press apron”), the feet, a bag containing the two springs, a back containing the nuts and bolts for the feet of the frame, two nuts for the eye bolts, and the two bolts for the spring, the two rods (they call them pins) for the platen to sit on and the eye bolts.
The large box contained the main frame, the “jack plate”, the instructions (not complete but OK), and two arbor plates (heavy weight wise).
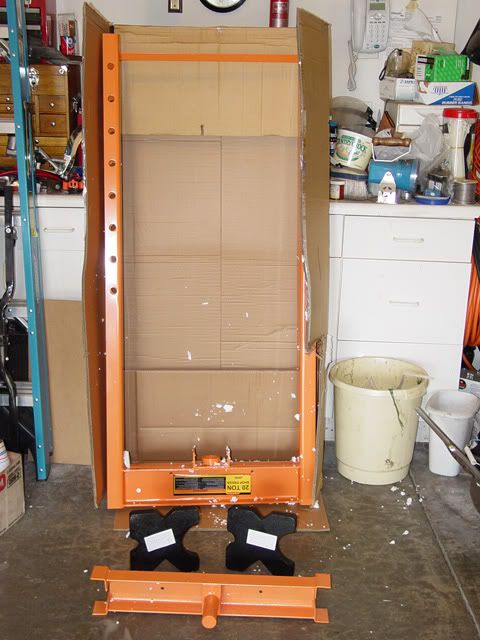
More or less following the instructions, I first installed the feet. I first swept up the area I had planned on having it then put the feet in rough position. I then lifted the main frame and rotated it (it was upside down) and put it down by the feet. I partly installed the bolts in one foot then lifted it up to get the bolts all the way in and put the washer and nut on each bolt and snug’ed them down. I repeated it one the other side making sure that the main frame did not tip over on me. One it was fairly stable I started to tighten the 19mm bolts down using the 3’ level to be sure that the main frame was perpendicular to the floor. I got all four bolts tightened and the unit perpendicular then re-checked the bolts. This is the hardest part of the assembly.
I then slid the two pins/rods in the upper holes and tipped in the platen, it went in so easy and no paint scraped yet. I then tipped in the Jack Plate and let it sit on the platen.
I then lifted up the Jack Plate and put the arbors between it and the platen, giving me room to install the eye bolts.
Here I deviated from the instructions and added those two washers. I didn’t like the small bolts holding the weight they had to hold all by their little selves (they are not much bigger than the holes so I added the washers to spread the load out a little more.
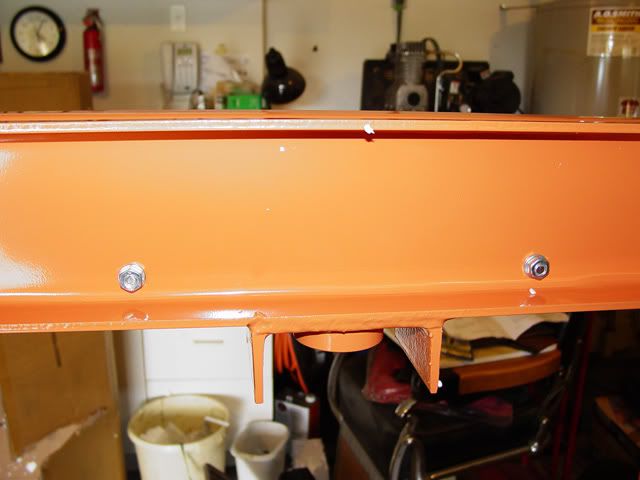
This is the last of the fasteners to be installed. They are the bolts that the springs hook to and the instructions I though were kind of weak here. The springs to between the two pieces of channel iron that is the top and the bolts capture them inside. The instructions say that they do but until you have the bolts in then it becomes obvious what they mean and you pull the nuts and washers off (hopefully you haven’t tightened them) slide the bolt back some and put the eye of the spring up and then slide the bolt though the eye and then the nut and washer. Like I said it is obvious once you stand back and “what”?
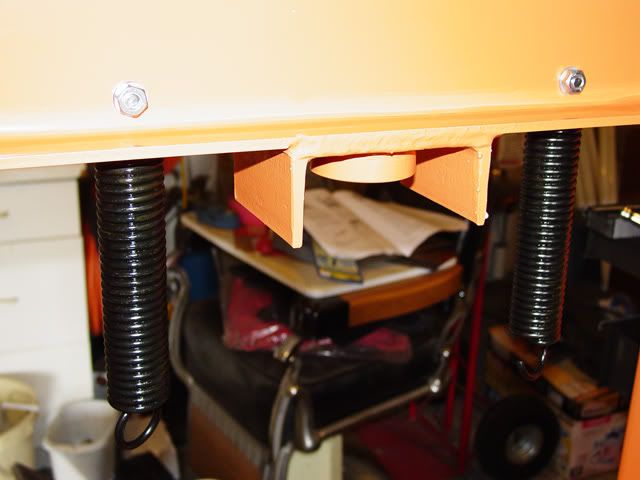
The springs installed. The mounting of the jack really is not covered well, the instructions assume you can figure it out. They do talk about checking the jack and bleeding it. My jack turned out to be short of jack fluid and once I added what I had and cycled it (It still probably needs some after cycling it) and tested it.
I lifted the jack plate up and connected the springs to the eye bolts and then put the jack in place. Once it was in place and the jack’s saddle piece was sitting in the tube for it that was on the top of the main frame I then tightened up the eye bolts until things felt right, the springs were not too stretched and I got and even measurement from the top of the main frame to the jack plate.
I figured that I was done until I could get some more jack fluid before I tried it out.
I hope this helps someone.
Lee
Edited, I had posted the same picture twice. Corrected that.
Here it is all assembled:
Some dimensions: the top sits about ~59 ¼ inches off the floor, the top of the platen/table sits ~36 ½ inches off the floor at the highest setting, width is ~26 ½ inches. Advice I have gotten off the web is to be sure to not leave the jack in an extended position as the springs will stretch over time.
It is easy enough for one person to assemble even at my advanced age assuming that that person has all their faculties’ with them at the time of assembly.
Tools needed: a 19mm socket, ratchet w/short extension, and a 19mm combination/box wrench. A 14mm deep socket and ratchet plus a 14mm box or combination end wrench. A 3’ level is almost a must.
Additional parts that I think need to be there are two washers for the eye bolts that are supplied.
The press comes in three boxes that allow it to be handled quite well. The small box is the 20-ton rated jack and is not too heavy.
This is the contents of the second box: The platen (they call it a “press apron”), the feet, a bag containing the two springs, a back containing the nuts and bolts for the feet of the frame, two nuts for the eye bolts, and the two bolts for the spring, the two rods (they call them pins) for the platen to sit on and the eye bolts.
The large box contained the main frame, the “jack plate”, the instructions (not complete but OK), and two arbor plates (heavy weight wise).
More or less following the instructions, I first installed the feet. I first swept up the area I had planned on having it then put the feet in rough position. I then lifted the main frame and rotated it (it was upside down) and put it down by the feet. I partly installed the bolts in one foot then lifted it up to get the bolts all the way in and put the washer and nut on each bolt and snug’ed them down. I repeated it one the other side making sure that the main frame did not tip over on me. One it was fairly stable I started to tighten the 19mm bolts down using the 3’ level to be sure that the main frame was perpendicular to the floor. I got all four bolts tightened and the unit perpendicular then re-checked the bolts. This is the hardest part of the assembly.
I then slid the two pins/rods in the upper holes and tipped in the platen, it went in so easy and no paint scraped yet. I then tipped in the Jack Plate and let it sit on the platen.
I then lifted up the Jack Plate and put the arbors between it and the platen, giving me room to install the eye bolts.
Here I deviated from the instructions and added those two washers. I didn’t like the small bolts holding the weight they had to hold all by their little selves (they are not much bigger than the holes so I added the washers to spread the load out a little more.
This is the last of the fasteners to be installed. They are the bolts that the springs hook to and the instructions I though were kind of weak here. The springs to between the two pieces of channel iron that is the top and the bolts capture them inside. The instructions say that they do but until you have the bolts in then it becomes obvious what they mean and you pull the nuts and washers off (hopefully you haven’t tightened them) slide the bolt back some and put the eye of the spring up and then slide the bolt though the eye and then the nut and washer. Like I said it is obvious once you stand back and “what”?
The springs installed. The mounting of the jack really is not covered well, the instructions assume you can figure it out. They do talk about checking the jack and bleeding it. My jack turned out to be short of jack fluid and once I added what I had and cycled it (It still probably needs some after cycling it) and tested it.
I lifted the jack plate up and connected the springs to the eye bolts and then put the jack in place. Once it was in place and the jack’s saddle piece was sitting in the tube for it that was on the top of the main frame I then tightened up the eye bolts until things felt right, the springs were not too stretched and I got and even measurement from the top of the main frame to the jack plate.
I figured that I was done until I could get some more jack fluid before I tried it out.
I hope this helps someone.
Lee
Edited, I had posted the same picture twice. Corrected that.
Last edited by Ol'fogasaurus on Thu Jul 14, 2011 10:05 pm, edited 1 time in total.
-
fusername

- Posts: 6806
- Joined: Sun Jan 28, 2007 11:26 am
Re: Shop Press
all the detail pics are great. once I have some room I plan on fashioning a press I can slip my air over hydrauilc 12 ton into. I use it for my tubing bender, its not portable because it leaks, so I figure a second home is good. Has its own springs and everything built in. anyone else build their own press frames?
give a man a watch and he'll allways know what time it is. give him two and he can never be sure again.
Things are rarely just crazy enough to work, but they're frequently just crazy enough to fail hilariously.
Things are rarely just crazy enough to work, but they're frequently just crazy enough to fail hilariously.
-
Ol'fogasaurus
- Posts: 17760
- Joined: Mon Nov 13, 2006 10:17 pm
Re: Shop Press
I was going to buy their bearing splitters but the reviews of them on HF was not encouraging (weak bolts, distortion on the bolts and breaking of the castings). I have to give it to HF though, even if they are negative honest comments, they post them.
I also read the reviews on the 20 Ton shop press before I bought and it did have some negatives mostly distortion on the stronger presses but knowing it up front does make it easier to know when to press and when to stop and go with a pro setup instead.
Lee
I also read the reviews on the 20 Ton shop press before I bought and it did have some negatives mostly distortion on the stronger presses but knowing it up front does make it easier to know when to press and when to stop and go with a pro setup instead.
Lee
-
Dale M.
- Posts: 1673
- Joined: Mon Oct 05, 2009 8:09 am
Re: Shop Press
I would add some braces (45°) to floor angles.... Also the arbor plates are cast "something" and will crack ...
Dale
Dale
"Fear The Government That Wants To Take Your Guns" - Thomas Jefferson
1970 "Kellison Sand Piper Roadster"
1970 "Kellison Sand Piper Roadster"
-
Ol'fogasaurus
- Posts: 17760
- Joined: Mon Nov 13, 2006 10:17 pm
Re: Shop Press
Dale, somebody else had said that on a different string and I think it is a good idea, not only as they are top heavy but you can be working on something that loads the feet causing it to tip if the angle iron flexes. You will notice that it needs bracing when putting it together. The bracing is something I am planning on, I just did not want to disturb the paint until I am sure I am going to keep it (I probably will though even if it is fairly light weight). Thanks for keeping me honest.Dale M. wrote:I would add some braces (45°) to floor angles.... Also the arbor plates are cast "something" and will crack ...
Dale
As a safety note, the bolts that hold the feet on should be re-torqued from time to time or replaced as I am not sure of their quality.
Also, the springs and other parts have a protective coating applied to them to keep them from rusting. I washed my hands several times during assembly so don’t open up the bags or do the assembly in the living room.
During assembly, you get to look at things albeit quickly, then when it is together and you look at it, there are some things that are well thought out and other things that I am not sure of. Since I haven’t tried it yet and observed what is does under strain I have to be cautiously optimistic while still remaining realistic at the same time.
When I looked at it before, several times for that matter while in the HF store; it looked taller there but then you forget the tools there are sitting up on a platform so you can get a better look at them and it keeps people from endangering themselves by playing with them. I am still amazed at people and the things they do.
I also had thought (a moment of brilliance and you know what that is) about adding wheels that could be slightly raised then lowered so I could move it around and store in somewhere out of the way when not in use but that is, if it happens, something to do later.
The arbors cracking; thanks Dale as that one negative that I hadn't heard about before but looking at them it is quite possibly true. I had noticed that the material used is very porous, especially in places (bad mix and or casting process?) and you can (seemingly) feel the weight difference between them. I have not weighed them but lifting them separately, that was the impression I had.
Like all too often, I don't think HF is the only one selling this particular off-shore made shop press as I ran into one somewhere else for sale under a different name. I don’t remember what is was but there are many things like this you run into.
Lee
-
SCOTTRODS

- Posts: 626
- Joined: Sun Nov 07, 2010 7:15 am
Re: Shop Press
Yes they will.... Experience speaking. And I only have a 12 ton HF press.Dale M. wrote:I would add some braces (45°) to floor angles.... Also the arbor plates are cast "something" and will crack ...
Dale
I have found them completely missing more than once. - PILEDRIVER
Some pics of My Powder Coating work
http://s244.photobucket.com/albums/gg6/terrellster/
My Facebook Page for Powder Coating
http://www.facebook.com/profile.php?id=100001788886297
Some pics of My Powder Coating work
http://s244.photobucket.com/albums/gg6/terrellster/
My Facebook Page for Powder Coating
http://www.facebook.com/profile.php?id=100001788886297
-
Ol'fogasaurus
- Posts: 17760
- Joined: Mon Nov 13, 2006 10:17 pm
Re: Shop Press
I finally got a chance to try out my shop press today. As said, I wasn't too confident with the HF bearing splitters so I ordered a 4" bearing splitter though NAPA; I don’t remember the exact price but it came in at the ~$75 area (a 6” bearing splitter was close to $100 more). I had previously tried to use just the arbors but they wanted to spread apart when pressure was applied largely due to the radius on the castings. I wonder if adding non-skid might help with the slickness of the paint.
I had a pro press out the other side at his shop but it wouldn’t budge so he had me heat up the end of the trailing arm a bit and try to drive the BJ a bit both of which I did. That did work and after a little over 12 ½ tons (his has a pressure gauge) of pressure the ball-joint popped loose from the trailing arm with a loud bang.
After adjusting the splitter, sitting on top of the big hole in the arbors, I made my first try at pressing out a ball joint using a Thing front lower trailing arm. I put a lot of pressure on it and, being my first try, I was a little skittish.
After my first attempt failed I thought about it then I took out the smoke wrench and added some heat; not a lot of heat, but it was warm but way short of showing color. I then mounted the arm back on the splitter and had at it again. It seemed to feel different the second time when suddenly, with a loud bang (my wife heard it in the other end of the house), the ball-joint went shooting to the floor, the trailing arm jumped to the top of the press, the splitter shot out in another direction and the arbor went sideways about 4 feet before it hit the floor. It is lucky that I did a pit stop before I started this or I would have had a second mess to clean up.
I was too busy and nervous on the first attempt to notice if the frame of the press was distorting. I will get those foot diagonals done before too long if things let loose that violently.
Anyway, the press works and actually did a pretty good job in my opinion. I think it is a keeper and actually, it really doesn’t take up that much room.
Lee
-
Dale M.
- Posts: 1673
- Joined: Mon Oct 05, 2009 8:09 am
Re: Shop Press
Actually to press in and out ball joints you need some adapters (sleeves tall enough to allow BJ to drop out but does not need to go through hole in arbor plate (old deep well socket?)) that fit arms to support them but allows BJ to pass through and not just rely on arbor plates to support arm... Its really just a thick wall tube ground to allow support for arm and keep it flat in relationship to arbor plates. Also you might try using wood wedges on each side of arbor plates to keep them centered....
Dale
Dale
"Fear The Government That Wants To Take Your Guns" - Thomas Jefferson
1970 "Kellison Sand Piper Roadster"
1970 "Kellison Sand Piper Roadster"
-
Ol'fogasaurus
- Posts: 17760
- Joined: Mon Nov 13, 2006 10:17 pm
Re: Shop Press
Yes. I know about the pressing tools as it was an old impact socket I used to press out the old ball-joint. The advice I have been given was not to throw anything away (within reason) as I might come in useful; you have made several good points to anyone looking to buy a shop press Dale, thanks again.Dale M. wrote:Actually to press in and out ball joints you need some adapters (sleeves tall enough to allow BJ to drop out but does not need to go through hole in arbor plate (old deep well socket?)) that fit arms to support them but allows BJ to pass through and not just rely on arbor plates to support arm... Its really just a thick wall tube ground to allow support for arm and keep it flat in relationship to arbor plates. Also you might try using wood wedges on each side of arbor plates to keep them centered....
Dale
I am lucky on the Thing lower joints as they are pressed in from the opposite side (underneath with the stud pointing up. I have some more work to do to both the upper and lower trailing arms before they can be pressed on though. I have to get back to work on the ball-joint beam build before too long; its been too long between posts). I haven’t looked at the upper ball joints to see which way they go in yet as they have been less of a worry since I was able to find the second Thing eccentric. I do think that they will need a minimum of a 1 3/8 X 4” tall tube (I haven’t been able to find a piece of black pipe that inside diameter to work… yet) to press them in assuming they press in from the bottom, otherwise, it is an easy press with what I have.
Dale, long ago, I lost faith in wood for tools but, your input is valid; I even thought about using clamps to hold the arbors down and in place assuming I have room to do it.
Other than for forming bucks or a back up for drilling holes, I don't normally trust wood as it splinters and can send shards up and flying. I've had seemingly good pieces of wood turnout to be rotten inside, punky or even full of pitch pockets, the same being true for even new pieces of wood. Flying stuff is one of the reasons I still use safety glasses for even the smallest thing especially when wood is concerned (after a session of pulling metal splinters out of my hands last night, I kept saying: “I have to get the habit of wearing my shop gloves” which I usually move over to be out of the way. I usually distain from gloves mainly for lack of feel). If you read much about old wooden sailing ships and the battles they fought, more people are killed or seriously wounded by flying slivers than anything else save drowning (most sailors of the time did not swim as they felt it just prolonged certain death).
Good job guys, keep the tips coming.
Lee