http://www.harborfreight.com/40-lb-capa ... 93608.html
It says $220 here but there is a coupon in the flyer for $200, I got mine for $20 less. I'll post a picture later in you want.
Thank you fuser, I will try the plywood trick as it does make sense. Since the one day of playing with it, I have been too busy doing nothing to get back to it. Actually I am pulling down a BJ front beam to get ready for my black buggy so I will blast the backing plates and other parts I won’t use to prep them for prime and paint before I decide what to do with the unneeded parts. I have to have the front drums mike’d before I decide they are usable and leave them alone, unturned, and decide what to do with them or, if they are not turn-able as brake drums, turn them into hubs for use later on or get rid of them.
I also have to rebuild the rear braking system and will blast that stuff before I paint and put it back together. I think it is going to be very handy tool around.
Lee
Blast cabinet
-
SCOTTRODS

- Posts: 631
- Joined: Sun Nov 07, 2010 7:15 am
Re: Blast cabinet
This is one of my first Posts on this forum, but I have been a VW enthusiast for 25 years probably.... And I am now powder Coating in my garage, as a hobby/extra income.Ol'fogasaurus wrote:http://www.harborfreight.com/40-lb-capa ... 93608.html
It says $220 here but there is a coupon in the flyer for $200, I got mine for $20 less. I'll post a picture later in you want.
Thank you fuser, I will try the plywood trick as it does make sense. Since the one day of playing with it, I have been too busy doing nothing to get back to it. Actually I am pulling down a BJ front beam to get ready for my black buggy so I will blast the backing plates and other parts I won’t use to prep them for prime and paint before I decide what to do with the unneeded parts. I have to have the front drums mike’d before I decide they are usable and leave them alone, unturned, and decide what to do with them or, if they are not turn-able as brake drums, turn them into hubs for use later on or get rid of them.
I also have to rebuild the rear braking system and will blast that stuff before I paint and put it back together. I think it is going to be very handy tool around.
Lee
I have the same HF cabinet, and have done the following modifications,....
1) Cheap replacement gun from Northern tools, with a Tungsten Carbide nozzle. I was wearing out nozzles at a rate of about 1 a day,.... or every 8 hours or so of blast time. The guns will wear out also, but not nearly as fast, and are relatively cheap. 2) I moved the air inlet to the side of the cabinet, just beneath the door, and plugged the original hole with a hard rubber plug. As you can see, I also have multiple air cleaning pieces including a HF water separator, which I only use that piece, as the regulator that comes with it is not very good quality, and apparently I got the only one in the world that doesn't leak. 3) I did the sealer thing too, but I disassembled the whole cabinet and sealed between all the overlaps, then snugged it all up... but not real tight, let it sit for a couple of days, then gave 'em all a fair half turn or so.... Fairly good modification.
4) I use a "catch" bucket, 5 gallon bucket between the Vacuum and the Cabinet. I use a large "Rigid" Brand Vacuum and it would be cheaper if I didn't have to replace it often,... so basically a pre-filter bucket for the Vac. You can buy a lid for a 5 gallon bucket to make a pre-catch/filter bucket, at HF, on their website..... Quick and dirty fix at least. I built my own, but the concept it exactly the same. I also use a hepa filter in my vac,.... a washable one.
5) Good Quality gloves. I bought online over 2 years ago and their still in good shape. I bought longer gloves too, I can reach every corner of the inside of the cabinet with gloves. Make sure you buy the right diameter gloves if you replace them,.... They're an odd size in my cabinet.
For visuals,... I use 1/4" plate cut to fit, purchased at a local glass shower door place near my day job, and I buy some Clear rolls of plastic stuff from Hobby lobby, for inside protection of the glass. I can blast a piece of glass to a nice frost in about 5 hours of blasting time with no protector,.... this is a necessity and about half the cost of the glass,.... much easier to replace though.
Buying replacement nozzles for the cheap gun that comes with the HF unit (or at least the one I have) is a joke. If you buy the Carbide tip, find it online and make sure and get the matching orifice, or you'll be replacing orifices like I used to replace nozzles. I have been using the same nozzle now for over 2 years with no signs of wear on the opening.
Powder coating requires some special things to happen. One, absolutely no contamination of the media, other than dry paint/dirt/rust.... if you get ANYTHING greasy or oily in the cabinet, it has to be emptied, cleaned thoroughly, and refilled with new clean media. The beautiful red coating on the inside of the Cabinet needs to be removed or avoid contact with parts while in the cabinet. It's a red powder coating of some sort (probably a cheap epoxy type) that even a tiny little spec that's missed will bleed through ANY color powder coating during the cure cycle..... So I have blasted away the interior coating on my cabinet as best I can, and continue to be very vigilant about little rub marks of red when removing the parts from my cabinet.
The door allows a drop of media every time you open the door, I just gave up on that, The modifications are just constant.
I use all kinds of media, including the AO, but I don't buy the stuff from HF at all. I buy from a local Abrasives company. They sall Glass bead in many grit sizes, but are numbered kind of backward.... For Powder coating, I need a profile or "tooth" for the powder to hold onto, for durability purposes, so I prefer a Ruby Garnet or Aluminum oxide (around 80 grit, or 100 grit),.... The pick up hose on the cabinet will need occasional replacement if you do a lot of blasting too,... instead of using a blow gun to clear the gun from clogs, I just place my free hand over the nozzle and pull the trigger a few times, this forces air back through the pick up tube and hose, and will blow out clogs quickly. You can throw a couple of handfuls of glass bead in with ANY media, to help keep clogs top a minimum too,... that stuff is like greased Owl poop on a floor,... very good lubricating properties for a dry substance. PM me if you would like further input on the media types and how to use the blast cabinet to get the best results possible... I have lots and lots of experience with this economy level Blast cabinet.
With all that stated above, I still have fine media leaks, and the vent allows grit out a lot. I use safety glasses to avoid getting the stray media in my eyes now,.... and the suggestion for using a respirator or breathing filter of some sort is a good idea. If nothing else,.... The cheapy paper masks from HF or Home depot....
Sorry to be so long winded. I hope some of this helps a lot. (especially the gun and nozzle bits....)
And for those who may doubt my presence in the VW scene, I have 2 (count 'em) "Hoover bits".
You do not have the required permissions to view the files attached to this post.
I have found them completely missing more than once. - PILEDRIVER
Some pics of My Powder Coating work
http://s244.photobucket.com/albums/gg6/terrellster/
My Facebook Page for Powder Coating
http://www.facebook.com/profile.php?id=100001788886297
Some pics of My Powder Coating work
http://s244.photobucket.com/albums/gg6/terrellster/
My Facebook Page for Powder Coating
http://www.facebook.com/profile.php?id=100001788886297
-
Ol'fogasaurus
- Posts: 17881
- Joined: Mon Nov 13, 2006 10:17 pm
Re: Blast cabinet
Thank you very much and not long winded at all. I figured that there would be some things to fix and replace and now knowing what relaxes me a bit. This will be saved for sure.
Oh, I almost forgot, welcome to the forum SCOTTRODS.
Thanks again. Lee
Oh, I almost forgot, welcome to the forum SCOTTRODS.
Thanks again. Lee
-
fusername

- Posts: 6806
- Joined: Sun Jan 28, 2007 11:26 am
Re: Blast cabinet
bump to the top, HF is having a sale on the blast cabinet down the street, 199! unfortunately the press is also on sale, but I think the blast cabinet is way more useful.
give a man a watch and he'll allways know what time it is. give him two and he can never be sure again.
Things are rarely just crazy enough to work, but they're frequently just crazy enough to fail hilariously.
Things are rarely just crazy enough to work, but they're frequently just crazy enough to fail hilariously.
-
Ol'fogasaurus
- Posts: 17881
- Joined: Mon Nov 13, 2006 10:17 pm
Re: Blast cabinet
I got both of mine at different times for $149.99 each (as I remember) so if you’re not in a big hurry... otherwise it still is not that bad of a deal. I use mine a lot so I highly recommend getting one if you have the room for it. The press is one of those things that sit but when you need it wow! The blast cabinet also allows you to do some other very cool things. Do a search on Blast cabinet and you will find some videos like how to make raised letter wooden signs.
Also, look for dimple dies http://www.crankshaftcoalition.com/wiki ... imple_dies
or http://www.thegaragegazette.com/index.php?topic=221.0. HF also sells them.
I recommend doing a search as a couple of years ago I stumbled onto some cheaper dies in a set and posted the URL for them.
I also warn; there is a thickness of sheet, and below, that you do not want to dimple as the standard dimple will fail on you. Since I don’t remember any more and my notes don’t show where the limit is and AL and steel are different; I am sure it is somewhere near the .063 to .090 thick (for AL) material and/or thinner material neighborhood.
For the thinner materials you want to have the hole “flanged” which just means that the dimple is extended into a 90° degree flange about a 10th of an inch long or so after the dimple. It keeps the hole from flattening out into a crease where the loads are going through the dimpled area. If you have ever “worried” a piece of metal until it fractures you know what I mean. The title of this little doozie sounds like it will do both: http://www.ebay.com/itm/JMR-2-Dimple-Di ... 1c16eb2125
You know you are going to end up doing both!
Lee
-
fusername
- Posts: 6806
- Joined: Sun Jan 28, 2007 11:26 am
Re: Blast cabinet
sale at 199 from 299, gonna see if there are any other coupons I can combine. I have been planning on building a press (I have a 20ton air ram from my bender) but the effort of doing that and gettign the scrap metal VS the 200 dollars for one pre built, its hard to say which is worth it. if only there was a scrap place closer by... fortunatly i got one of those baby 1/2 ton arbor presses in a package deal and it should do my immediate need of pressing some bushings into some shocks.
Man I gotta make a list of HF stuff. The grand opening has a tone of stuff for sale, and I seem to need half of it.
But Lee, the blast cabinet is fully worth it then? It is probably the #1 item I miss from working in a shop, number 2 being the parts tank. My birthday is coming up, I;ve been good this year...
give a man a watch and he'll allways know what time it is. give him two and he can never be sure again.
Things are rarely just crazy enough to work, but they're frequently just crazy enough to fail hilariously.
Things are rarely just crazy enough to work, but they're frequently just crazy enough to fail hilariously.
-
Ol'fogasaurus
- Posts: 17881
- Joined: Mon Nov 13, 2006 10:17 pm
Re: Blast cabinet
I let one of my friends use my blast cabinet after offering it to him to use several times; it changed his attitude towards them, now he has one of the smaller table top units.
I am not using their AL Oxide as while it cleans things quickly, it wears the nozzles fast and it compacts metal from what I understand (I think I posted this before but just-in-case: http://www.kramerindustriesonline.com/f ... -chart.htm). I use glass beads which are a little less aggressive and it doesn’t plug things up as easily; Get a good vacuum and check the filter often. Another problem I that the plastic inside and outside liners hazes fast; I talked to a friend who owns a NAPA store with a machine shop attached and he doesn’t use the liners; when the glass gets too foggy to see anything with he goes to the glass store and gets a piece of tempered glass cut to fit. The plastic fogs fast; I just noticed that HF is now selling the liners.
You will want to seal the cabinet from the outside. Even with the stuff they pack and install, you still need the bathroom calk applied to the seams.
I get the HF newspaper the November one is out and currently the 40#, floor mounted blast cabinet is listed at $209.99 so you are saving some. Sometimes you can ask to see what the lowest recount price has been on something but from what I have gathered they never know what is going to happen with prices. I surprised them a couple of times bringing in coupons. My black cart was one of those happy surprises.
Also, I get the on line mailings (email) and they often have coupons for less than the site and the newspaper. Just checked and there is nothing about either of them dealt with in the Nov 6 to 19th email; I just emptied my deleted box or I would have looked old ones up for you.
Like you say, there are a lot of things you “need-to-have”. Just be careful as there are some lower value products there but most are at the OK level and above so as long as you take care of them they will last as well as a lot of other things will.
Lee
-
fusername
- Posts: 6806
- Joined: Sun Jan 28, 2007 11:26 am
Re: Blast cabinet
What does it take to set up a hf blast cabinet? I have now idea how thiers work with regards to the vacuum and glass recirc. Any photos of your setup? Also i only plan on using glass bead anyways, did everything i needed in the past. Also got my hands on a old but quality looking portable gun which i had planned on using sand in for weld prep when a whire wheel dont reach, but maybe ill canibalize it and put it in the tank.
Honeslt i am worried about the unit being too small, can you fit and move a t4 type head in there?
Honeslt i am worried about the unit being too small, can you fit and move a t4 type head in there?
give a man a watch and he'll allways know what time it is. give him two and he can never be sure again.
Things are rarely just crazy enough to work, but they're frequently just crazy enough to fail hilariously.
Things are rarely just crazy enough to work, but they're frequently just crazy enough to fail hilariously.
-
fusername
- Posts: 6806
- Joined: Sun Jan 28, 2007 11:26 am
Re: Blast cabinet
Sorry for the ugly link, but i am on my phone
http://www.google.com/url?sa=t&source=w ... y3QEDdA47A
Nice review, makes sense. Got an upgrade idea allready as to the air inlet, ill let u know when i have a pc infront of me, but moving the fresh air in to the top should keep the glass clearer.
http://www.google.com/url?sa=t&source=w ... y3QEDdA47A
Nice review, makes sense. Got an upgrade idea allready as to the air inlet, ill let u know when i have a pc infront of me, but moving the fresh air in to the top should keep the glass clearer.
give a man a watch and he'll allways know what time it is. give him two and he can never be sure again.
Things are rarely just crazy enough to work, but they're frequently just crazy enough to fail hilariously.
Things are rarely just crazy enough to work, but they're frequently just crazy enough to fail hilariously.
-
Ol'fogasaurus
- Posts: 17881
- Joined: Mon Nov 13, 2006 10:17 pm
Re: Blast cabinet
Look at the bottom for an attachment as I am still having trouble with Photobucket and there new program.
This is it; if you look at the belt line where the legs attach you can see the bead of silicone that I added. If you want, I can go out and take any pictures you want. The is a pretty flat package and the panels have double backed tape already applied where it is necessary. A couple of the screws are going to be awkward to get to so if you are a contortionist and a helper for those few small places you will do OK.
http://www.harborfreight.com/40-lb-capa ... 68893.html. You will find the internal specs for the cabinet here. It think you could get a stock rim in here, heads (never seen a type IV so I can’t answer) yes, I think one of my SBF heads would fit in and you could do it. The brake drums and backing plates I sent Tim fit in real well and I have blasted several pairs of trailing arms although you have a lot of manure-ing of them to do it. You will be able to use most of the area but way to the left and right get awkward.
http://www.harborfreight.com/protection ... 29448.html. This is the film I was talking about; it is held in by double stick tape but it requires you to remove the whole piece of glass from the top; not hard to do but don’t forget to clean the glass with something that does not leave a film (no pun intended). The glass is held in by the outside frame so it is easy to change if you have to.
I am not sure it is worth getting more film as I told you that is doesn’t take long for the film to get scratched enough to obscure your vision. It is one of the costs of having one I guess. I haven’t priced out glass yet so since I still have some of the protective film from when I bought the cabinet, I will continue to use what I have. I also will get an idea of cost before too long also.
Earlier in this string SCOTTRODS made some good posts. Since I have a door by where the inlet for the air comes into the cabinet I could not move my inlet to the side like SCOTTRODS did. I did end up getting a water separator but I got one from Lowes. As long as there is pressure in the line the valve at the bottom is closed but when the pressure is released the moisture trapped drips out.
Changing over to a foot operated pedal is probably a good idea but if you have to sit (awkward height for me to standing and there slump over; the angle of the gloves are off too) on a stool like I do then I am not sure if the foot pedal is much better; at least your meat grabbers won’t get clamped for the liquid refreshment and sustenance you will require. Wear ear protection too, mainly for the vacuum (at least mine. You will have to clean the filter quite often so don’t forget that).
http://www.harborfreight.com/blast-cabi ... 94275.html
There is a hole in the rear wall of the cabinet that is covered over by a long sheet metal hat section that this attaches to. It is always open otherwise to get some circulation. If you use this then you use one of the plugs for the vacuum port.
If you can find them, there are some adapters on HF to adapt smaller hoses to the 3” hose adapter that comes with the cabinet.
Like I said, ask if you want pictures and I will do my best to get measurements and pictures to help you with what you need to know.
Lee
You do not have the required permissions to view the files attached to this post.
-
SCOTTRODS
- Posts: 631
- Joined: Sun Nov 07, 2010 7:15 am
Re: Blast cabinet
Adding to what Lee is offering up.... even if you don't have the room for another fitting on the side instead of the front, you can always put an elbow on it and face it down or to the side.
Also, one of the things I'm learning from the Monstrous cabinets we have at my new job, keep the hoses long enough to reach pretty much everywhere in the cabinet, or at least 2/3 across.... if you have to pull something to shoot it from another angle then at least you can. Keep your hoses out of the way from the areas you will be blasting in, as it really doesn't take long to blast through a supply hose for media or air..... I'm right handed, so keeping them to the right is a must. If you're left handed, I suggest taking a left handed tack....
The cheap assed gloves that come in the HF cabinets are not going to last long. Plan on buying decent ones soon. Measure the hole size where they mount before you trod off to Northern tools thinking you can buy them off the shelf..... the holes will need to be enlarged if you do that, or you can find the proper sized ones online, and pay a decent price.... buy them before you need them.
One good point mentioned on the video posted above, is to use some sort of gloves on your hands before you put on the blasting gloves. It keeps mildew to a minimum, but inevitably, there will be moisture from the heat your hands produce.... The sweat will roll from your fore-arms down inside the gloves as well, so just trying is all you can do.....don't work too long at a time and the sweating is kept to a minimum.... this is OK for your home and personal projects, but I have to use the same gloves EVERYBODY else uses at work, so I use Nitrile gloves to help cut down on possible illness and snot, and things like that, being transferred to my hands via the blasting gloves.
Happy Blasting....
I have found them completely missing more than once. - PILEDRIVER
Some pics of My Powder Coating work
http://s244.photobucket.com/albums/gg6/terrellster/
My Facebook Page for Powder Coating
http://www.facebook.com/profile.php?id=100001788886297
Some pics of My Powder Coating work
http://s244.photobucket.com/albums/gg6/terrellster/
My Facebook Page for Powder Coating
http://www.facebook.com/profile.php?id=100001788886297
-
Chris V
- Posts: 3413
- Joined: Tue Sep 03, 2002 12:01 am
Re: Blast cabinet
I've had mine a few years now...I've changed the lamp, next-up is the media pick-up hose, it's getting quite rigid. I'm still using the tear-offs that came with it.
Finally moved the air compressor to an adjacent garden shed - best thing I've done for it.
Finally moved the air compressor to an adjacent garden shed - best thing I've done for it.
-
fusername
- Posts: 6806
- Joined: Sun Jan 28, 2007 11:26 am
Re: Blast cabinet
looking at that stool, it is shorter than I thought. ah well. I thought I picked up a foot pedal for it when I got my huge pile of wallet emptying tools last month, but a closer look shows it is for Argon, so probably only good to 10 psi... I would think the air valve would wear out pretty quick in the cabinet, being HF and all.
As for noise, the compresser is gonna go in the basement with a switch, and a auto-drain valve since it is hard to get into the basement. someone threw rubble down there years ago and smashed all the stairs, it requires rock climbing skills to get in and out.
But if trailing arms fit in, sounds like it will do what I need! of course I am looking at used commercial ones on CL right now for 4-600 bucks cause I can't help myself, but 200 is much more in this years budget.
give a man a watch and he'll allways know what time it is. give him two and he can never be sure again.
Things are rarely just crazy enough to work, but they're frequently just crazy enough to fail hilariously.
Things are rarely just crazy enough to work, but they're frequently just crazy enough to fail hilariously.
-
Ol'fogasaurus
- Posts: 17881
- Joined: Mon Nov 13, 2006 10:17 pm
Re: Blast cabinet
There is foot stool shown in the picture that you can see and I have another one that sits slightly higher than the foot stool but both are way too low to be of any use there (great for welding or working on those folding work tables/stands at times though). The higher stool, before I put my sorry fanny on it, sits roughly 29" off the floor, the lower part of the opening for your arms to go in is about 9" above it and the bend/seam below the viewing window is about 9" above that if that helps any. When sitting on the stool I have to bend over slightly to view in through the window but not nearly as much as if I was standing up. If you wanted the cabinet to sit higher then put a platform under it to fit it to yourself.
Also, the legs come off so you could make your own if you wanted but that would take some work as you would have to support the hopper. That thing empties the cabinet very quickly; for what it is worth. I store my blast media in a plastic bin that has a fairly air tight cover on it; some are shaped better than others for pouring the media in through the side door. I also have a long piece of ¼” rod that I use to work the media down into the hopper as it will pack to the sides kind of like a sand dune. Use wood or a soft metal like AL.
Lee
-
Ol'fogasaurus
- Posts: 17881
- Joined: Mon Nov 13, 2006 10:17 pm
Re: Blast cabinet
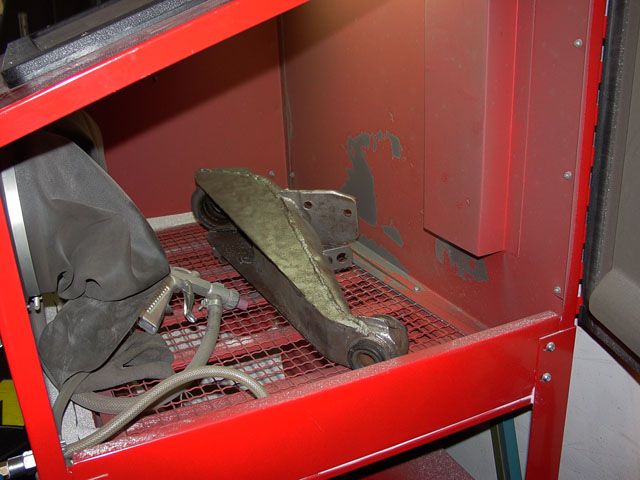
Fuser, I took this especially for you. As you can see, there is room to manure things around on each end of the trailing arm. I am not sure what a 3 X 3 or larger arm would do but I am sure that there is some wiggle room in there that might allow at least the 3 by.
Lee