How NOT to paint your pan!

Need help straightening that dent? Or painting your car? This is the place to be!
User avatar
turbobaja
Posts: 2826
Joined: Fri Sep 14, 2007 4:56 pm

How NOT to paint your pan!

Post by turbobaja »

I'm in the process of painting the pan of my '73 Baja.......... I should say, I just got through painting my pan, and now I'm going to try and do it right.

Here's what happens when you rush through the prepping process before you paint something.

Image

The paint don't stick!


I just got through scraping, stripping, wire wheeling, cleaning and painting my pan with Duplicolor Truck Bed Liner. I would have to say, there's nothing wrong with the product. I brushed it on, so the surface texture was kinda rough. But once it was cured (2 coats, 3 days cured) the stuff was tuff and rubbery. It would have been great if I'd prepped the surface better.

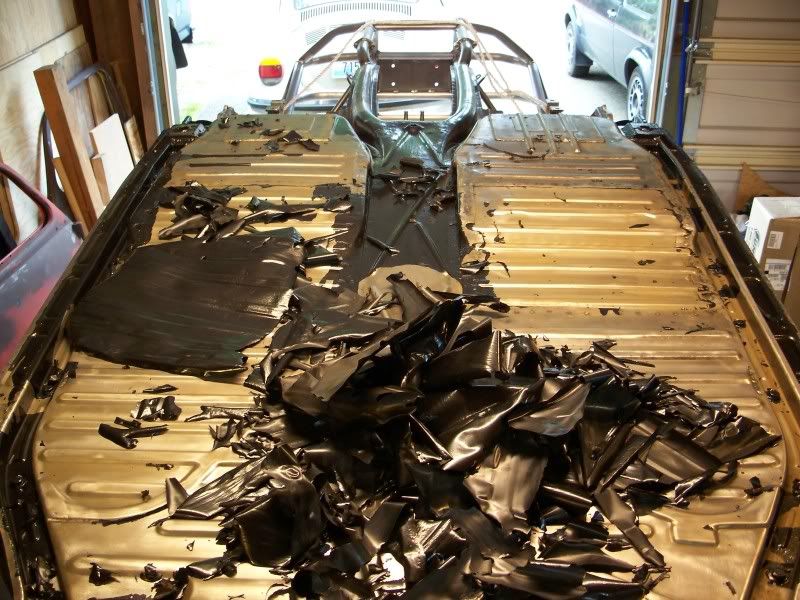
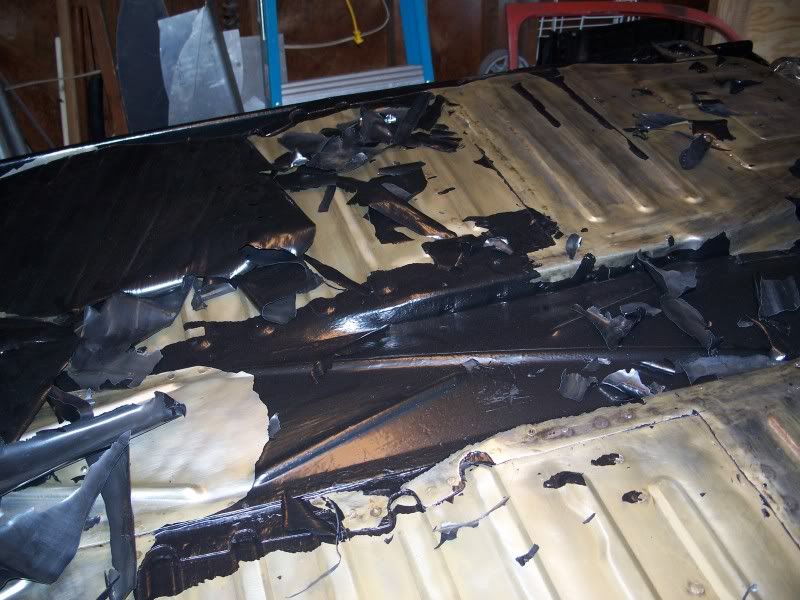
I was running around the edge of the pan with a razor blade to carve off the excess before I painted the heater channels and wheel wells when I noticed it wanting to lift right off the metal from the lip of the body. I gave it another day to finish curing (can says safe to re-enter truck bed in 1-2 hours for second coat, safe to use in 2-3 days), it still wanted to just peel right up. So I took a flat balde to the pan in a few areas to see just how screwed I was, and the stuff comes off in sheets like it ain't nothin'. Right down to ( apparently) dirty bare metal.

Image

I skipped a few critical steps in the prep process. First, you're supposed to start by washing off whatever your painting with soapy water really good, and follow that up with a good session of cleaning with some kind of wax and grease remover. That way you don't rub all the crap that's on the surface, like paint stripper residue, wax, grease, etc. into the metal when you sand it. I though I could get by with waiting till the end and trying to use Acetone to clean every nook and cranny. Well think again! Cause it didn't work so good!

I suppose it might have worked better if I'd really cleaned the holy livin' hell out of it with acetone before I painted it, but I figured after half a pint of and 20-30 1/2 sheets of papertowel I was done cleaning.

I also never actually sanded the pan, for the most part. I went through a couple wire wheels on it, which seemed to polish it more than rough it up. The whole thing was layed out on the under side of the paint as I peeled it off. Every little swipe of the wire wheel was visible, as well as this brownish color in some places. If you look at the pan surface in some of these pics it looks a little brownish, like surface rust already forming between the paint and the metal. The humidity was pretty high the last couple weeks, and the temps havn't been high enough to cure paint worth a darn. I had a space heater in the garage from time to time between coats, but I'm sure it was in the 50s and 60s instead of 70 plus.


My point is: Don't Cut Corners like I did! And don't rush into stuff without a plan and some knowledge of what the hell your doing. I just wasted a weeks worth of painting and ~$100 in materials. It's not the end of the world, but it could have been avoided.


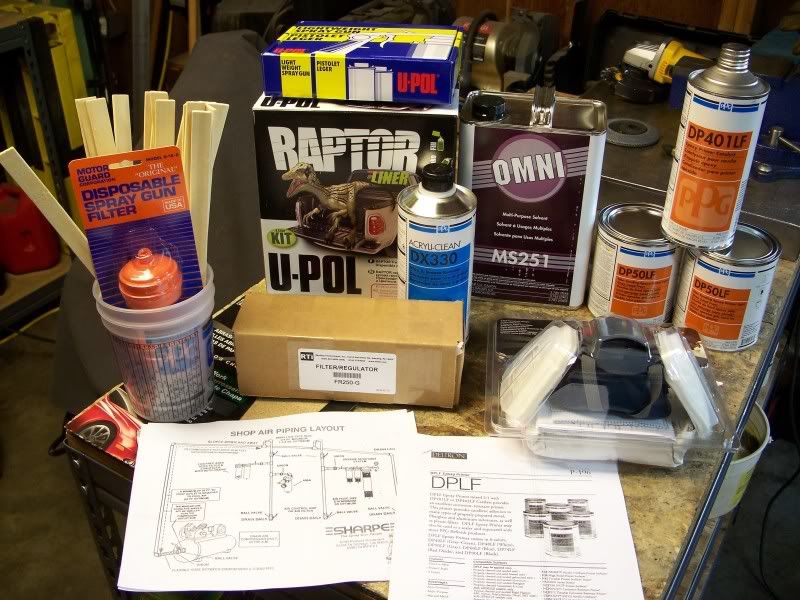
So............I made a trip to Wesco autobody and got schooled up a little on the procedure. I also got some new stuff to try on the pan. It's going to get cleaned and sanded right this time, then epoxy primed, and then sprayed with this Raptor bed liner. I picked up a quality charcoal mask and some other supplies for the job.

Image


Round #2 coming up
Karl

DON'T QUIT
User avatar
MNAirHead
Posts: 9570
Joined: Mon Sep 08, 2003 6:12 am

Post by MNAirHead »

Dang that sucks - I feel for you.

Seems as if we fall into 2 camps ---those who lie about every paint project they've done being perfect OR those who never get around to paint.

If you're open to a suggestion..
  • 1-Sanding the surface to give it some bite is almost more important than anything in this type of failure

    2-Primer - I've had greater success doing something like this with a good connecting primer

    3-Shipping coating - I can't tell you the number of cars I judge at shows that have new metal flaking - the issue is the "shipping primer" should be removed to bare metal before starting your build up.

Thanks for your honesty - you have helped someone
User avatar
doc
Site Admin
Posts: 3578
Joined: Thu Mar 31, 2005 2:38 pm

Post by doc »

Great post! Prep is 95% of painting. Almost everyone learns the hard way.

Have you stuck your finger into "finished" paint yet to see if it was dry and ruined a complete panel? Someone I know has done it more than once.... :oops:

doc
User avatar
turbobaja
Posts: 2826
Joined: Fri Sep 14, 2007 4:56 pm

Post by turbobaja »

Not sure where you are on your plumging the garage project.. the sharpe website has some VERY cool ideas for chillers, drip legs and separators.

I did mine in copper --- one of the best things bout my garage build

glad you're keeping a good outlook on it.

MNAirHead wrote:
  • 1-Sanding the surface to give it some bite is almost more important than anything in this type of failure

    2-Primer - I've had greater success doing something like this with a good connecting primer

    3-Shipping coating - I can't tell you the number of cars I judge at shows that have new metal flaking - the issue is the "shipping primer" should be removed to bare metal before starting your build up.

Thanks for the encouraging words and the advice. I had a really helpful chat with the guys down at Wesco yesterday. One of the first things they asked was if I primed the bare metal. Pretty quick they knew they were dealing with a beginner :oops: . This is the third time I've painted this car over the 12 years I've owned it. First was 7 cans of metalic blue rattle can. Second was a pathetic atempt at a base/clear w/pearl job(HVLP) about 8 or 9 years ago. Both times I used some kind of rattle can primer and performed minimal body work before painting. It feels good to have my hands on some quality Epoxy primer/sealer. I feel like this paint job actually has a chance of turning out good :shock: .

That shipping coating is No Joke either. I replaced the entire left rear quarter panel back when I started this current build and that gray paint is really on there! I've got a couple new doors that still need to be stripped before I can go forward with them as well.


doc, I know a guy who's done the same thing.........it looked so pretty he couldn't keep his fingers off it. :o


Hopefully once I get my garage plumbed with air and the weather warms up a little I can turn this into a success story.
Karl

DON'T QUIT
User avatar
fusername
Posts: 6806
Joined: Sun Jan 28, 2007 11:26 am

Post by fusername »

I had the EXACT same problem with the same product two week ago. I painted the foot step on my bay window bus, all the prep I did was to wash it out good w/ acetone. in places it stuck super good and resists screwdrier scratches, and in others it flaked off in sheets. I blamed having a smooth surface, as that seemed to be where it failed. I have since cleaned my whole bus floor, wire brushed it, scuff sanded hard to reach areas, and spray bombed the whole floor with one heavy coat of DUPIcolor spray on bedliner. This was maybe a week ago, so far no new chips, been driving it daily, but haven't looked to close for peeling corners and such. I painted over paint, not bare metal, so that may have affected it.
give a man a watch and he'll allways know what time it is. give him two and he can never be sure again.

Things are rarely just crazy enough to work, but they're frequently just crazy enough to fail hilariously.
User avatar
turbobaja
Posts: 2826
Joined: Fri Sep 14, 2007 4:56 pm

Post by turbobaja »

Wow. Sorry to hear you've been through the same thing I'm going through. It's just more of a pain in the rear than anything else.

I wouldn't hesitate to use the same product again, it seems like pretty tough stuff. And it actually did stick to a couple small, rough areas here and there on my pan. I wasn't sure if it would work on unpainted bare metal very well, and I definately wouldn't do it that way again. But like you said, the surface has to be rough AND clean for it to stick good. Primer or good scuffed up paint preferably.

I hope your bus floor holds on to the liner good. Sounds like you did it right the second time around.
Karl

DON'T QUIT
User avatar
fusername
Posts: 6806
Joined: Sun Jan 28, 2007 11:26 am

Post by fusername »

well I sprayed the pedals themselves with it, and that was two weeks ago and my feet have yet to wear thru! the plan was to make it so I can clean the floor w/ a hose and to stop water getting under the mat, so I am checkign it off as a win.

also really curios how the next attack goes. they sell Dupicolor in a quart at AZ near by, and I can get raptor cheap online, so if I ever do a high volume job I need to know which product to use. let me know how raptor goes.
give a man a watch and he'll allways know what time it is. give him two and he can never be sure again.

Things are rarely just crazy enough to work, but they're frequently just crazy enough to fail hilariously.
User avatar
turbobaja
Posts: 2826
Joined: Fri Sep 14, 2007 4:56 pm

Post by turbobaja »

fusername wrote:well I sprayed the pedals themselves with it, and that was two weeks ago and my feet have yet to wear thru! the plan was to make it so I can clean the floor w/ a hose and to stop water getting under the mat, so I am checkign it off as a win.

also really curios how the next attack goes. they sell Dupicolor in a quart at AZ near by, and I can get raptor cheap online, so if I ever do a high volume job I need to know which product to use. let me know how raptor goes.

Dang! That's one way to see how durable this stuff is. Sounds like you've got good adhesion to me. I'm almost done scraping and picking off the liner from my pan. It did stick pretty good to some rougher, freshly welded areas around the jacking plates. I'm sure my results with the Duplicolor product were entirely due to poor surface prep :x . I'm kinda glad that my first bit of painting with this build has taught me to take my time and do it right. Hopefully I can learn from my own mistakes this time.

I'll definately post up the results of this Raptor product when I get done applying it. One of the guys @ Wesco used it on a Superbeetle project for his daughter. Said he coated the entire wheel wells with it, inside fenders and all, to help prevent the paint from spider webbing from rocks getting spit off the tire into the fender.

Warmer weather is around the corner. In the mean time, cleaning and sanding will be happening. I've also got to make a new support for the rear of the body so I can remove he rear bumper/substructure for better access to the body. I want to do as much as possible while it's on it's lid.
Karl

DON'T QUIT
User avatar
Leatherneck
Moderator
Posts: 17104
Joined: Sat Jul 01, 2006 6:47 pm

Post by Leatherneck »

That is one of those shake your head and grin, what else ya going to do? Live and learn.
User avatar
turbobaja
Posts: 2826
Joined: Fri Sep 14, 2007 4:56 pm

Post by turbobaja »

Leatherneck wrote:That is one of those shake your head and grin, what else ya going to do? Live and learn.
Ya, I tried to ignore reality for a little when I noticed it flaking up at first. Then I just shook my head and started ripping the paint off with a screw driver. It was almost fun for a while......almost. Sure stripped off easier than all that factory paint did the first time :roll: . It ended up taking almost 2 weeks of spare time to pick/scrape it cleaner than before I painted it to begin with. Then I gave it a good de-greasing and found out just how dirty that thing actually was :shock: .

Once I got the pan clean I found out how good it worked as a work bench. I spent the last week re-springing my bronco front/rear and needed somewhere to lay out all my new parts for that project. I've also got the garage plumbed with air correctly and have been researching a bit on how to control the air and paint vapors during painting.

I've also got a nearby neighbor who's building his own blast booth, powder-coat booth, and oven to start a home business of sorts. He's dead set on using all my parts as practice once he's up and running. So little by little I might be getting a lot of powder/ceramic coating done on the side. We'll see how that goes......
Karl

DON'T QUIT
User avatar
MNAirHead
Posts: 9570
Joined: Mon Sep 08, 2003 6:12 am

Post by MNAirHead »

dang dude.. this bites.. really bites..

wash and scratch the car accordingly
kaiser
Posts: 39
Joined: Tue Oct 17, 2006 1:26 pm

Post by kaiser »

i use the same stuff on my pan, ontop of por15.

i scuffed the por15 and then went to town, i've only had the slightest chip is 2 years.

i feel for ya because i'd sure be pissed if that happened to me.

watch, now i've jinxed myself. lol
***knock on wood***
User avatar
MNAirHead
Posts: 9570
Joined: Mon Sep 08, 2003 6:12 am

Post by MNAirHead »

Kaiser.. how did you scuff the paint --- how long did you have to wait?
kaiser
Posts: 39
Joined: Tue Oct 17, 2006 1:26 pm

Post by kaiser »

i used the red scotch brite pads.

i painted the por15 over a few days (brush on), then i let it sit for a few, then scuffed / cleaned up the scuff and then used duplicolor spray.

worked out pretty well. over two years and still going strong.
User avatar
MNAirHead
Posts: 9570
Joined: Mon Sep 08, 2003 6:12 am

Post by MNAirHead »

Interesting.. I've never tought of another product to encasulate the metal.. then to use a retail rattle can for just the pretty color.
Post Reply