
Drilling, tapping and plugging the oil galleries
-
Dangermouse

- Posts: 153
- Joined: Mon Nov 14, 2005 7:15 pm
Re: Drilling, tapping and plugging the oil galleries
This just isn't going to work, is it...
Last edited by Dangermouse on Thu Jan 11, 2018 6:43 pm, edited 1 time in total.
-
Devastator
- Posts: 3493
- Joined: Tue Nov 06, 2007 6:51 am
Re: Drilling, tapping and plugging the oil galleries
??Dangermouse wrote:This just isn't going to work, is it... Image
Image
Devastator's Build Thread
Sandrail
2.4 liter, supercharged Chevy Ecotec
"If everything seems under control, you're just not
going fast enough."
Mario Andretti
Sandrail
2.4 liter, supercharged Chevy Ecotec
"If everything seems under control, you're just not
going fast enough."
Mario Andretti
-
Dangermouse
- Posts: 153
- Joined: Mon Nov 14, 2005 7:15 pm
Re: Drilling, tapping and plugging the oil galleries
Think you just caught my picture hosting server napping; should be displaying properly now I hope.??
-
Devastator
- Posts: 3493
- Joined: Tue Nov 06, 2007 6:51 am
Re: Drilling, tapping and plugging the oil galleries
You could still use that fitting with a close nipple and a coupling. Screw the nipple into the case, attach your elbow, and then use the coupling to attach the elbow to the barbed fitting.
Devastator's Build Thread
Sandrail
2.4 liter, supercharged Chevy Ecotec
"If everything seems under control, you're just not
going fast enough."
Mario Andretti
Sandrail
2.4 liter, supercharged Chevy Ecotec
"If everything seems under control, you're just not
going fast enough."
Mario Andretti
-
ALB
- Posts: 31
- Joined: Fri May 23, 2008 10:30 pm
Re: Drilling, tapping and plugging the oil galleries
I have used the first 90 degree brass fitting you pictured (it is definitely sleeker than the one you received) and after rounding the outside edge found it fit under the pulley sheetmetal with a little heat and hammerwork; I didn't cut the tin at all and the small bump in the tin clears the pulley easily. I've seen that fitting in hardware stores; it's 3/8" NPT. Maybe someday I'll learn how to post pics....
To use the bulkier fitting you'd have to cut down the face of the boss right next to it (as well as the side) and I'm not familiar enough with engine cases to tell you how far down you can trim it and still plug the passage off properly.
To use the bulkier fitting you'd have to cut down the face of the boss right next to it (as well as the side) and I'm not familiar enough with engine cases to tell you how far down you can trim it and still plug the passage off properly.
-
Dangermouse
- Posts: 153
- Joined: Mon Nov 14, 2005 7:15 pm
Re: Drilling, tapping and plugging the oil galleries
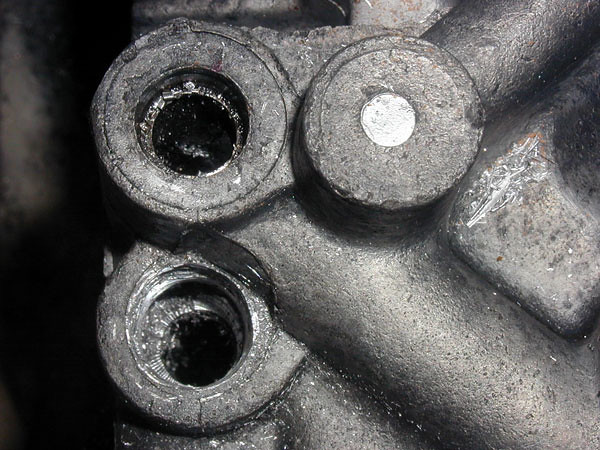
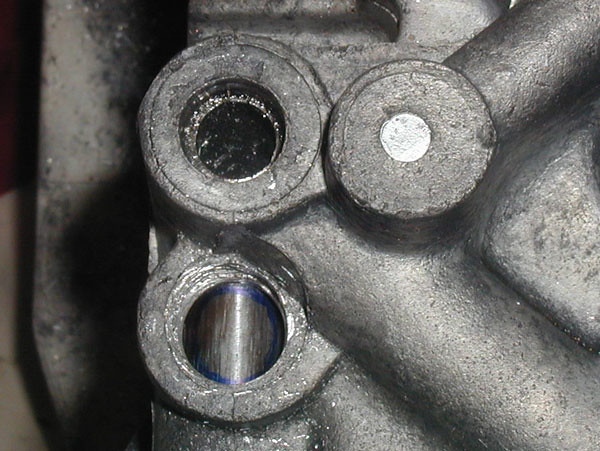
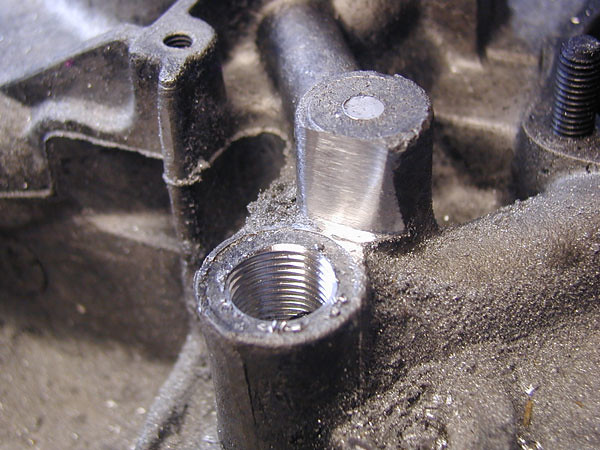
My bits and pieces for doing the tapping have arrived at last so I've started on the aluminium plug removal part. I don't have a slide hammer so here's how I pulled the plugs cleanly.
I centre marked the plug and drilled it...
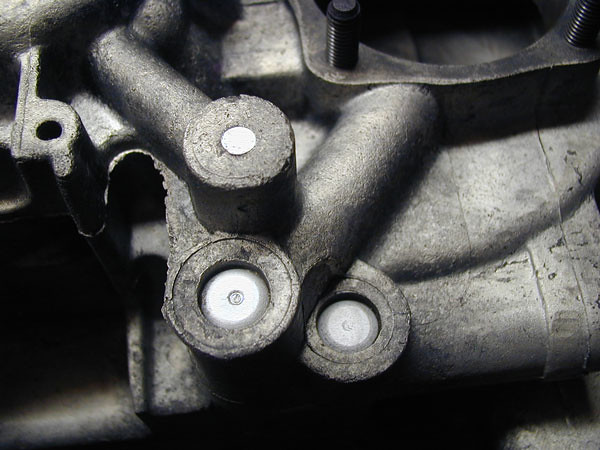
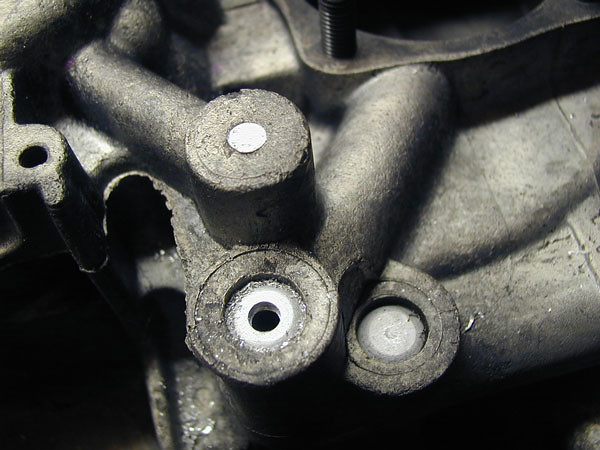
Then I tapped for an M6 bolt...
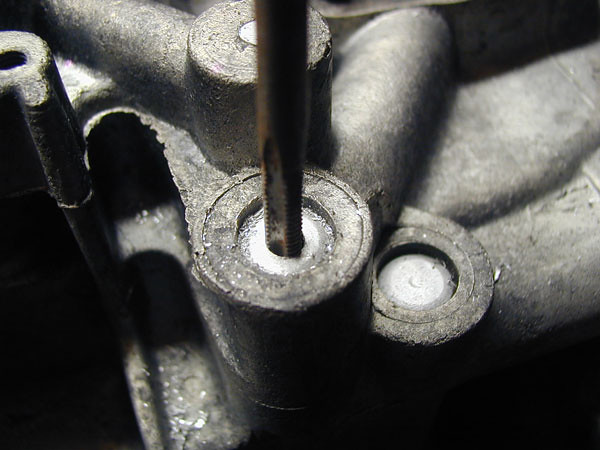
and threaded one into the plug through a washer and socket...
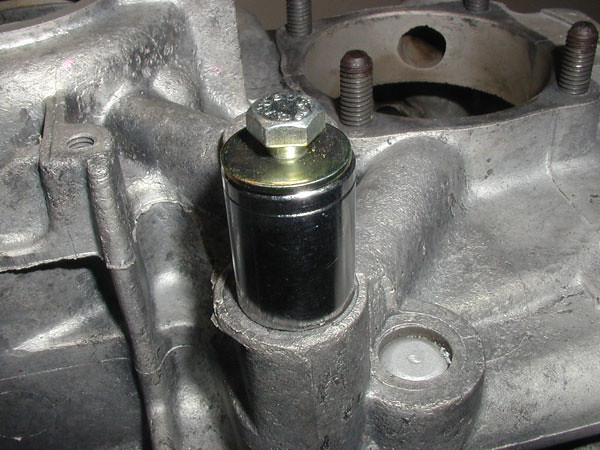
and pulled the plug by tightening the bolt against the socket...
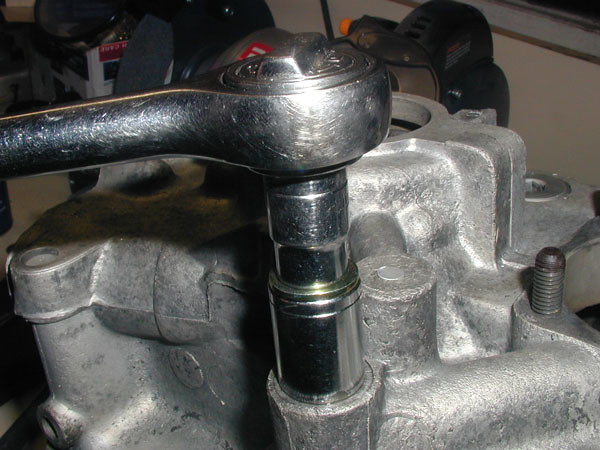

This all worked really well and pulled the plugs straight up and out, nice and clean.
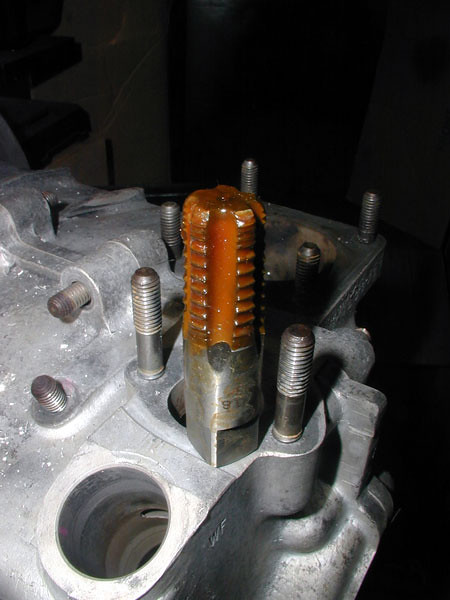
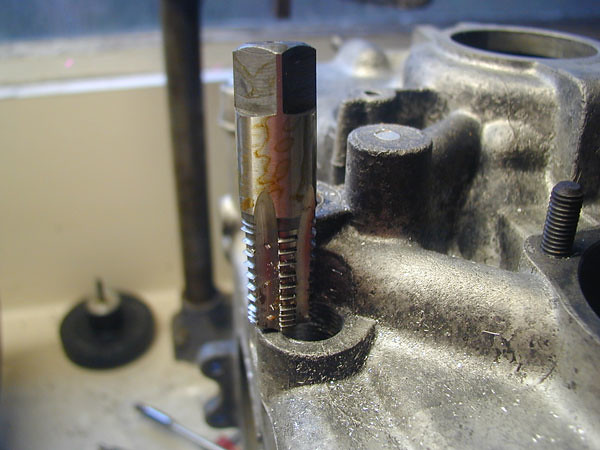
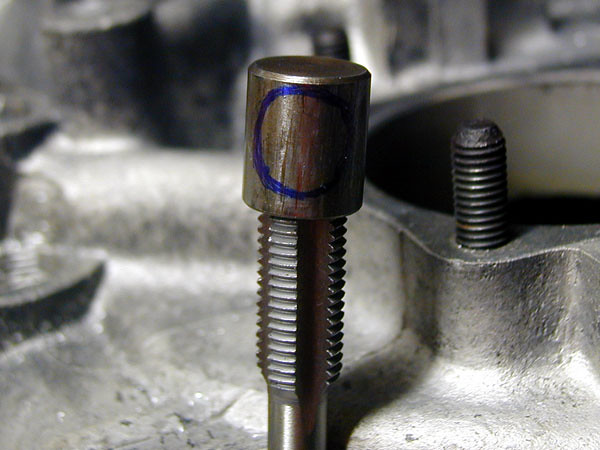
With that done, it's time to tap...
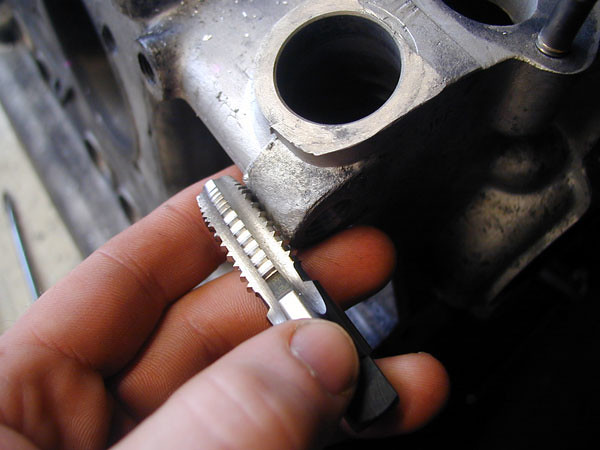
First newb question - two of the taps came covered with a thick, waxy coating presumably to protect them from rust and physical damage. How does this stuff come off??? Mineral spirits or kerosene doesn't seem to touch it...
Next, seeing as what I have are taper taps, does this mean that I have to drill into the oil passage the same depth as the length of the threaded portion of the tap? The threads won't be fully formed until the tap is all the way into the case, right? I can see how plug taps might be preferable for this as you wouldn't have to drill/tap quite so far into the gallery to make fully formed threads for the plugs.
I centre marked the plug and drilled it...
Then I tapped for an M6 bolt...
and threaded one into the plug through a washer and socket...
and pulled the plug by tightening the bolt against the socket...
This all worked really well and pulled the plugs straight up and out, nice and clean.
With that done, it's time to tap...
First newb question - two of the taps came covered with a thick, waxy coating presumably to protect them from rust and physical damage. How does this stuff come off??? Mineral spirits or kerosene doesn't seem to touch it...
Next, seeing as what I have are taper taps, does this mean that I have to drill into the oil passage the same depth as the length of the threaded portion of the tap? The threads won't be fully formed until the tap is all the way into the case, right? I can see how plug taps might be preferable for this as you wouldn't have to drill/tap quite so far into the gallery to make fully formed threads for the plugs.
Last edited by Dangermouse on Thu Jan 11, 2018 6:48 pm, edited 1 time in total.
-
Devastator
- Posts: 3493
- Joined: Tue Nov 06, 2007 6:51 am
Re: Drilling, tapping and plugging the oil galleries
Nice job on removing the plugs. 
This stuff usually just peels off like a bannana peel. Take a knife and cut it from the shank to the cutting tip in one of the "gullets" of the tap, (there's probably 4 of them). After that it should peel off.Dangermouse wrote:two of the taps came covered with a thick, waxy coating presumably to protect them from rust and physical damage. How does this stuff come off??? Mineral spirits or kerosene doesn't seem to touch it...
No. The tip of the tap is smaller than the hole you will be drilling so it will, likely, not cut much of a thread. Standard practice is to drill 3x the tap diameter depth. For example, 3/8" deep for an 1/8NPT, 3/4 for a 1/4NPT, and so on. The good news here is that if you drill a little too deep, it usually doesn't hurt anything since it's just a fluid passage anyway. NPT taps are "full form" taps in that they cut the complete thread profile, unlike straight cut taps that cut only the thread major diameter, the pitch diameter, and not the minor diameter, (which is cut be the drill). This is why NPT taps need so much torque and can crack thin web bosses, especially on the bigger taps, (which is why I recommended the tapered reamers for these larger sizes).Dangermouse wrote:Next, seeing as what I have are taper taps, does this mean that I have to drill into the oil passage the same depth as the length of the threaded portion of the tap?
You will NOT be cutting to the full depth of the tap most likely. Tap until you have a few threads and check your plug. Tap a little deeper until the plug starts. Remove the plug and go a little deeper. re-check until you get the plug to be flush, (without sealing compound). Remove the plug, dope it up, and tighten it down. You'll get a feel for the depth after the first few holes.ALB wrote:The threads won't be fully formed until the tap is all the way into the case, right?
Devastator's Build Thread
Sandrail
2.4 liter, supercharged Chevy Ecotec
"If everything seems under control, you're just not
going fast enough."
Mario Andretti
Sandrail
2.4 liter, supercharged Chevy Ecotec
"If everything seems under control, you're just not
going fast enough."
Mario Andretti
-
ALB
- Posts: 31
- Joined: Fri May 23, 2008 10:30 pm
Re: Drilling, tapping and plugging the oil galleries
I said that?ALB wrote:The threads won't be fully formed until the tap is all the way into the case, right?
-
Dangermouse
- Posts: 153
- Joined: Mon Nov 14, 2005 7:15 pm
Re: Drilling, tapping and plugging the oil galleries
This stuff is more like resin than wax. A couple of hours sitting in kerosene loosened it up though.Devastator wrote:This stuff usually just peels off like a bannana peel. Take a knife and cut it from the shank to the cutting tip in one of the "gullets" of the tap, (there's probably 4 of them). After that it should peel off.Dangermouse wrote:two of the taps came covered with a thick, waxy coating presumably to protect them from rust and physical damage. How does this stuff come off??? Mineral spirits or kerosene doesn't seem to touch it...
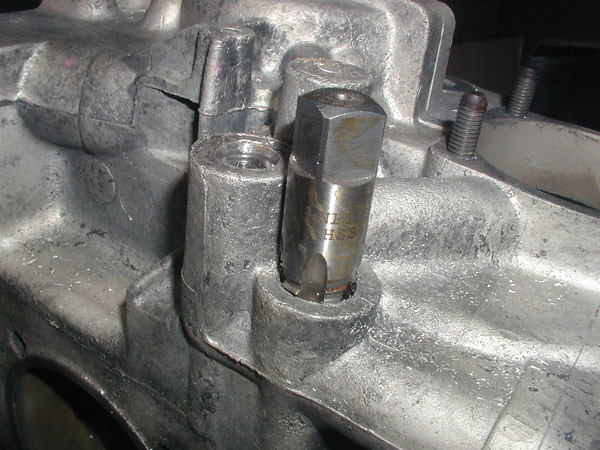
In my first attempt, I pretty much had to go almost to the hilt on the 1/4" tap to get the plug approaching flush. It's still got a couple of threads showing but I'll leave it slightly proud of the case.Devastator wrote:The tip of the tap is smaller than the hole you will be drilling so it will, likely, not cut much of a thread. Standard practice is to drill 3x the tap diameter depth. For example, 3/8" deep for an 1/8NPT, 3/4 for a 1/4NPT, and so on. The good news here is that if you drill a little too deep, it usually doesn't hurt anything since it's just a fluid passage anyway. NPT taps are "full form" taps in that they cut the complete thread profile, unlike straight cut taps that cut only the thread major diameter, the pitch diameter, and not the minor diameter, (which is cut be the drill). This is why NPT taps need so much torque and can crack thin web bosses, especially on the bigger taps, (which is why I recommended the tapered reamers for these larger sizes).
You will NOT be cutting to the full depth of the tap most likely. Tap until you have a few threads and check your plug. Tap a little deeper until the plug starts. Remove the plug and go a little deeper. re-check until you get the plug to be flush, (without sealing compound). Remove the plug, dope it up, and tighten it down. You'll get a feel for the depth after the first few holes.
That's ok in this sort of blind ending where it doesn't make much difference but my worry is where the depth of the tapping could change the size of something important, like in the area of the relief valve where I'm guessing it's important not to go in too deep or change the oriface size. An article on Cal-Look.com warns against drilling too deeply and describes taking 1/4" off the bottom of the tap (essentially turning it into a plug tap) http://www.cal-look.com/tapping-oil-galleries/. Maybe I just worry too much
Last edited by Dangermouse on Thu Jan 11, 2018 6:51 pm, edited 1 time in total.
-
Devastator
- Posts: 3493
- Joined: Tue Nov 06, 2007 6:51 am
Re: Drilling, tapping and plugging the oil galleries
Actually, that article states not to install the plug too deep. He also had to grind his tap because it was not a bottoming tap. I believe yours are bottoming taps. Keep going. You're doing great. You will know if you need to grind the end of the tap or not.
Devastator's Build Thread
Sandrail
2.4 liter, supercharged Chevy Ecotec
"If everything seems under control, you're just not
going fast enough."
Mario Andretti
Sandrail
2.4 liter, supercharged Chevy Ecotec
"If everything seems under control, you're just not
going fast enough."
Mario Andretti
-
Devastator
- Posts: 3493
- Joined: Tue Nov 06, 2007 6:51 am
Re: Drilling, tapping and plugging the oil galleries
Sorry ALB. My bad. I hit the wrong quote button.ALB wrote:ALB wrote:
The threads won't be fully formed until the tap is all the way into the case, right?
I said that?
Dev
Devastator's Build Thread
Sandrail
2.4 liter, supercharged Chevy Ecotec
"If everything seems under control, you're just not
going fast enough."
Mario Andretti
Sandrail
2.4 liter, supercharged Chevy Ecotec
"If everything seems under control, you're just not
going fast enough."
Mario Andretti
-
Dangermouse
- Posts: 153
- Joined: Mon Nov 14, 2005 7:15 pm
Re: Drilling, tapping and plugging the oil galleries
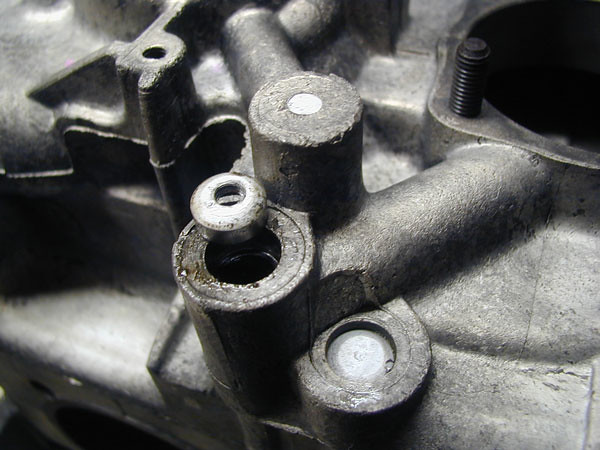
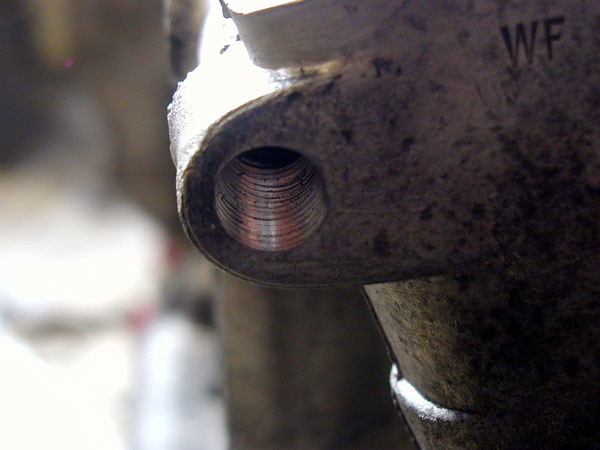
The first of the 3/8" holes was a frankly harrowing experience  The drill tended to grab a bit and wallowed out the hole a bit more than I was happy with, but the reamer and tap cleaned it up for the most part. But it meant I had to sink the plug a bit further than I had intended. It's slightly countersunk but still not protruding into the relief valve bore so I'm hoping that's going to be ok.
But how can this not interfere with the characteristics of the pressure relief valve? I'm really concerned about the piston cocking in its bore here where the it's been enlarged here.

But how can this not interfere with the characteristics of the pressure relief valve? I'm really concerned about the piston cocking in its bore here where the it's been enlarged here.
Last edited by Dangermouse on Thu Jan 11, 2018 6:54 pm, edited 1 time in total.
-
Dangermouse
- Posts: 153
- Joined: Mon Nov 14, 2005 7:15 pm
Re: Drilling, tapping and plugging the oil galleries
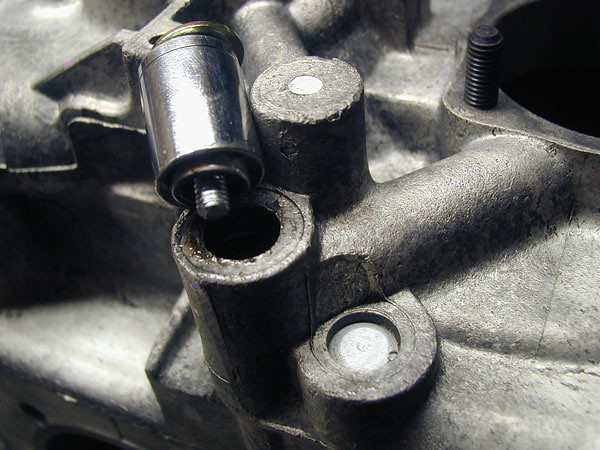
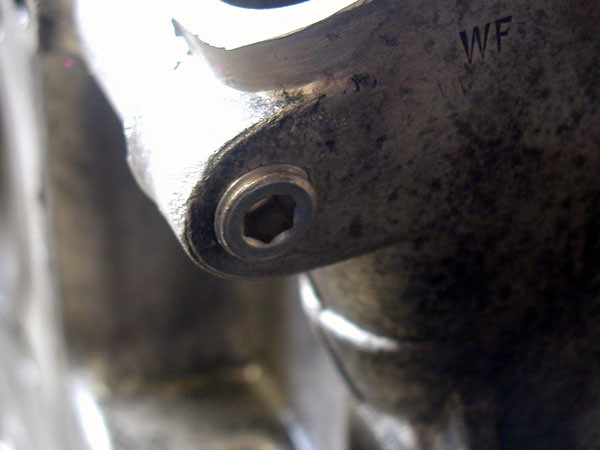
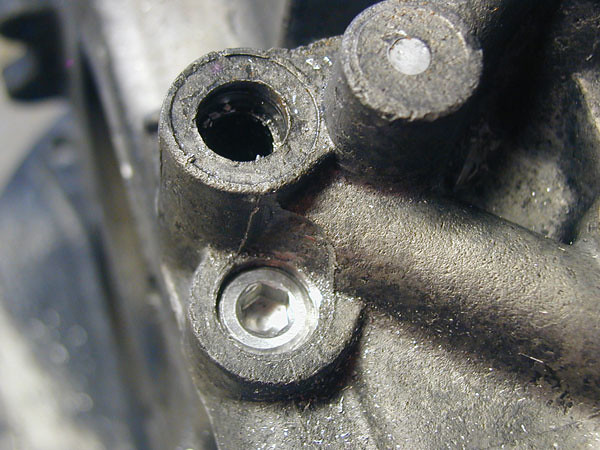
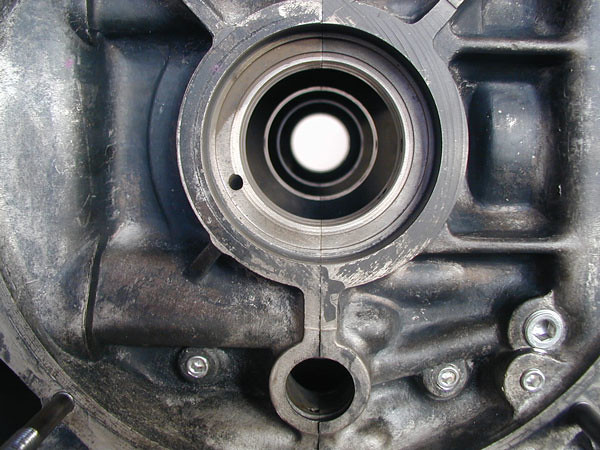
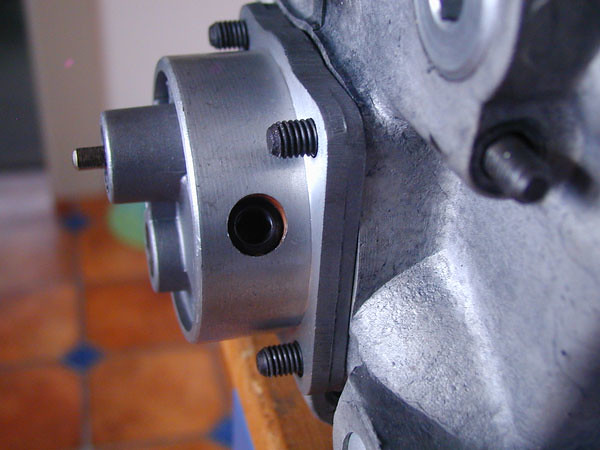
The relief valve piston is still free to travel in its bore -
and here's where the enlarged passage intersects the piston -
Will I get away with it do you think?
and here's where the enlarged passage intersects the piston -
Will I get away with it do you think?
Last edited by Dangermouse on Thu Jan 11, 2018 6:55 pm, edited 1 time in total.
-
Devastator
- Posts: 3493
- Joined: Tue Nov 06, 2007 6:51 am
Re: Drilling, tapping and plugging the oil galleries
You should be fine. Remember that the other 270 degrees of the piston is still engaged in it's bore, and that there was always a hole where you are tapping, (it was just smaller).Dangermouse wrote:Will I get away with it do you think?
Devastator's Build Thread
Sandrail
2.4 liter, supercharged Chevy Ecotec
"If everything seems under control, you're just not
going fast enough."
Mario Andretti
Sandrail
2.4 liter, supercharged Chevy Ecotec
"If everything seems under control, you're just not
going fast enough."
Mario Andretti
-
Dangermouse
- Posts: 153
- Joined: Mon Nov 14, 2005 7:15 pm
Re: Drilling, tapping and plugging the oil galleries
And I think we're done. Thank you Dev & Co. for the tips and reassurance (especially about the interrupted taps); very much appreciated. I hope the info and pics on here will be helpful for others, it really wasn't so bad... Now I place my trust in the miracle of thread sealer - last question on this, will threadlocker (Blue Loctite) do the job or should I use proper pipe thread sealer?
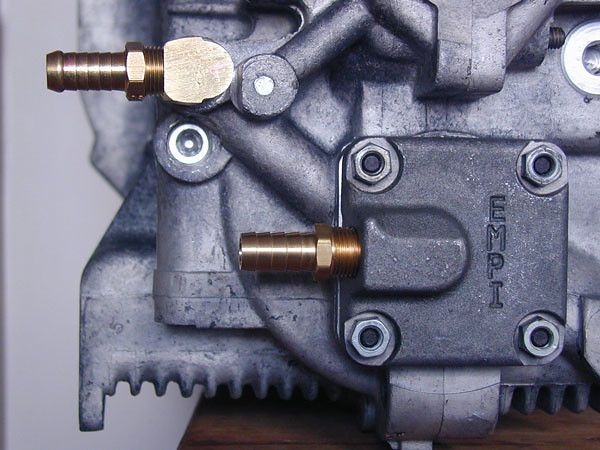
The supplier who provided the first return fitting replaced it with the proper one. I found a little rounding off of the edges greatly reduced the amount of clearancing necessary to turn it into the case. The clearancing was easily done with a flat file.
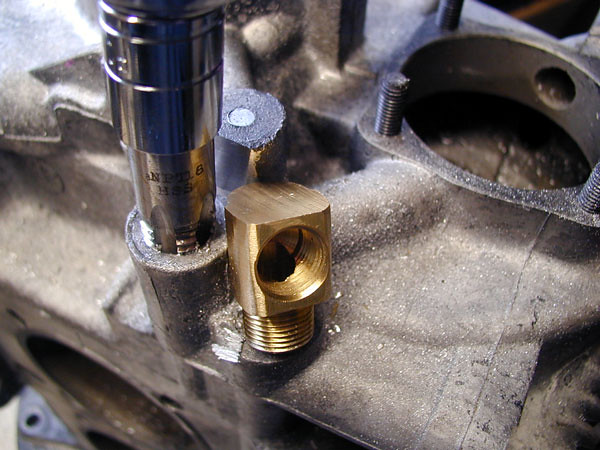
Plugging the oil pump outlet bore in the case...


Plugged pump (yes I know it's inside out...)...
The supplier who provided the first return fitting replaced it with the proper one. I found a little rounding off of the edges greatly reduced the amount of clearancing necessary to turn it into the case. The clearancing was easily done with a flat file.
Plugging the oil pump outlet bore in the case...
Plugged pump (yes I know it's inside out...)...
Last edited by Dangermouse on Thu Jan 11, 2018 7:01 pm, edited 1 time in total.