jeff
dude that looks awesome!
Deserter GS to Suby EJ20 Turbo
-
RonW

- Posts: 544
- Joined: Tue Jan 03, 2006 8:31 am
Re: Deserter GS to Suby EJ20 Turbo
912R + STi 2.0 Turbo JDM v8
-
GS guy

- Posts: 909
- Joined: Wed Nov 06, 2002 12:01 am
Re: Deserter GS to Suby EJ20 Turbo
Thanks Ron. That's a pretty big milesonte getting the radiator done to this stage, especially when I wasn't even planning on getting anything done with it until spring. Couple bouts of mild (for winter) weather and figured what the heck - I can make some progress on this! To complete the cooling system connecting pieces I really need to finish up the full on front suspension mock-up first. Too many things trying to occupy the same space up there. That will definitely have to wait until spring. Back to some inside jobs - tweaking my MS for extra, replacing the valve cover gaskets on the donor engine and finish replacing some rusting rotor bolts with ARPs. 
Jeff
Jeff
-
ambrynmc
- Posts: 335
- Joined: Thu Dec 03, 2009 3:04 pm
Re: Deserter GS to Suby EJ20 Turbo
Wow, beautiful work!
1971 Truckaru (WRX eng/trans powered Domus flatbed bug-truck) - build thread
-
GS guy
- Posts: 909
- Joined: Wed Nov 06, 2002 12:01 am
Re: Deserter GS to Suby EJ20 Turbo
Not too much action with the cooling system lately - although I did order a couple of radiator hoses from NAPA that should help getting around my front suspension. The on-line NAPA catalog is a great resource for shaped radiator hoses, including "adapter" hoses that go from one size to another. I needed an S bend for the return to engine side and a tight 90 degree with transition from 1.25" to 1" for the engine to radiator side. These should be getting in next week.
During the cold temp days I have to work in my basement shop, so good time to tackle converting the ECU to "Extra" configuration and install a boost controller circuit. Programmable boost baby!
I built the MS ECU a couple of years ago (when EDIS ignition was the "hot" set-up). As time marched on they introduced the "extra" configuration with additional control features. The boost control peaked my interst, especially since it was minimal $$$ and should keep the wastegate from opening until reaching the desired boost level, vs whenever the WG spring decides to let it open. After building the unit originally, I dropped out of MS mode, not following the boards, etc. so took a bit of time re-introducing myself to MS to wrap my head around it again!
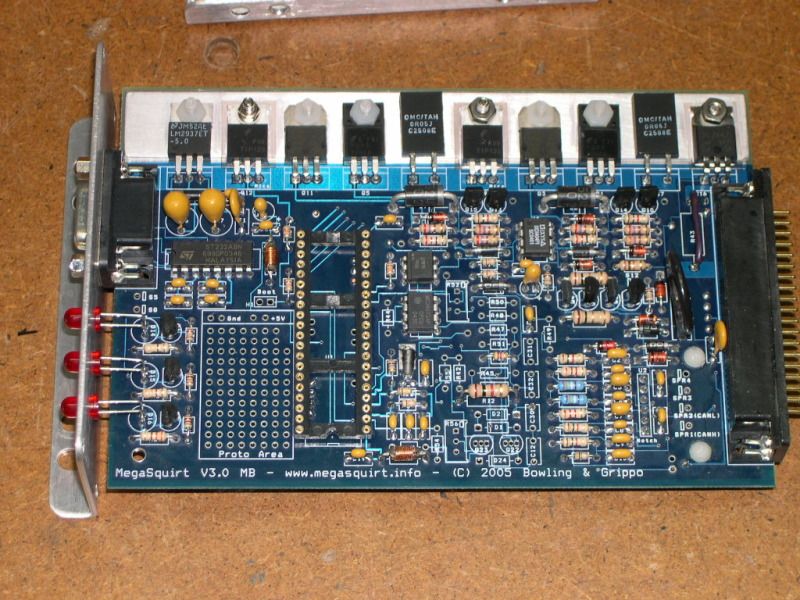
There were a few wiring changes to implement the "extra" features, and then the rather confusing boost control circuit. I guess the SOP for this is to install it sort of "remotely" from the main board, or if on the board heat-sink strip, have wires running all over. I ended up integrating it into the Q16 circuit, which is pretty much taylor made for it! This keeps all the jumper wiring on the back of the board and allows the transistor to mount just like the others on the heat sink. Looks "factory"!
The results of my labor, MS2 V3.0 board, with EDIS ignition, stepper IAC & boost control, with everything running through the relay board (tricky with that boost controller!):
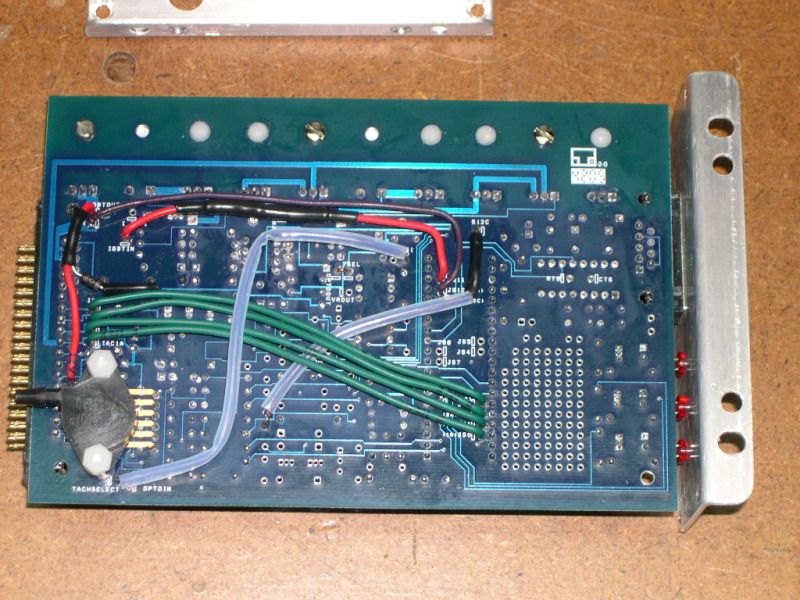
And the messier "jumper" side:
Tomorrow I'm going to try loading the latest firmware into the new laptop, along with tuner studio, hook it back up to my Stim and see what happens!
Jeff
During the cold temp days I have to work in my basement shop, so good time to tackle converting the ECU to "Extra" configuration and install a boost controller circuit. Programmable boost baby!
I built the MS ECU a couple of years ago (when EDIS ignition was the "hot" set-up). As time marched on they introduced the "extra" configuration with additional control features. The boost control peaked my interst, especially since it was minimal $$$ and should keep the wastegate from opening until reaching the desired boost level, vs whenever the WG spring decides to let it open. After building the unit originally, I dropped out of MS mode, not following the boards, etc. so took a bit of time re-introducing myself to MS to wrap my head around it again!
There were a few wiring changes to implement the "extra" features, and then the rather confusing boost control circuit. I guess the SOP for this is to install it sort of "remotely" from the main board, or if on the board heat-sink strip, have wires running all over. I ended up integrating it into the Q16 circuit, which is pretty much taylor made for it! This keeps all the jumper wiring on the back of the board and allows the transistor to mount just like the others on the heat sink. Looks "factory"!
The results of my labor, MS2 V3.0 board, with EDIS ignition, stepper IAC & boost control, with everything running through the relay board (tricky with that boost controller!):
And the messier "jumper" side:
Tomorrow I'm going to try loading the latest firmware into the new laptop, along with tuner studio, hook it back up to my Stim and see what happens!
Jeff
-
Piledriver

- Moderator
- Posts: 22520
- Joined: Sat Feb 16, 2002 12:01 am
Re: Deserter GS to Suby EJ20 Turbo
Don't forget to secure all those wires with 5 minute epoxy, both at the joints and every ~1".
(dusts easy with a soldering iron, but acts as strain relief,prevents vibration-based cracking/borkage at the solder>wire joints... Sometimes even horrible glue has it's uses. Do NOT use hot melt if you ever may need to fix it later)
(dusts easy with a soldering iron, but acts as strain relief,prevents vibration-based cracking/borkage at the solder>wire joints... Sometimes even horrible glue has it's uses. Do NOT use hot melt if you ever may need to fix it later)
Addendum to Newtons first law:
zero vehicles on jackstands, square gets a fresh 090 and 1911, cabby gets a blower.
EZ3.6 Vanagon after that.(mounted, needs everything finished) then Creamsicle.
zero vehicles on jackstands, square gets a fresh 090 and 1911, cabby gets a blower.
EZ3.6 Vanagon after that.(mounted, needs everything finished) then Creamsicle.
-
trailb396
- Posts: 3
- Joined: Thu Feb 07, 2013 9:04 pm
Re: Deserter GS to Suby EJ20 Turbo
YOU HAVE ALOT OF INFO THANKS. I JUST PICKED UP MY EJ20T MOTOR TODAY AND TRYING TO FIGURE OUT WHAT I CAN TAKE OFF OF IT AND HOW THE WIREING WORKS ITS GOING INTO A 1963 NOTCHBACK
-
panel

- Posts: 4201
- Joined: Sun Sep 24, 2000 12:01 am
Re: Deserter GS to Suby EJ20 Turbo
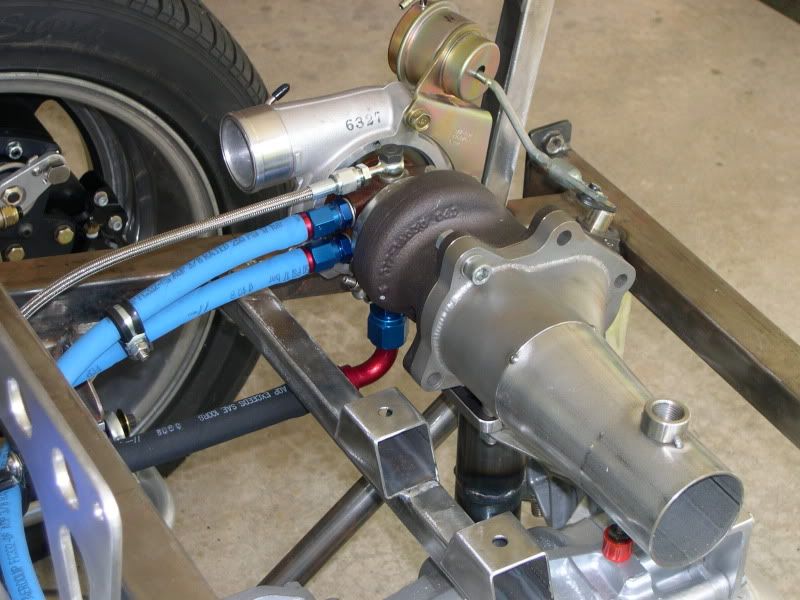
GS.....my local hose supply guys are having a hard time finding the coolant fittings. I think we've found the ones that thread (M12 x 1.25) into the turbo but what are the 2 'straight socketless fittings' for your 3/8 water line? What is your M12 x 1.25 to ?
Mine are more like 12mm?
Mine are more like 12mm?
'65 Bus with a JDM Subaru EJ20 Turbo
Built by Germans powered by Japanese and brought together by Canadians
Built by Germans powered by Japanese and brought together by Canadians
-
GS guy
- Posts: 909
- Joined: Wed Nov 06, 2002 12:01 am
Re: Deserter GS to Suby EJ20 Turbo
Hey Panel,
The adapter fittings are (Weber, Dellorto) carb fittings, with metric (I believe the M12 x 1.25?) on one side - seals with a crush washer - and AN6 on the other. The connection fittings are straight AN6 socketless hose ends. I converted all my plumbing to AN sizes, mostly Aeroquip - though the socketless hose are true ID size (AN6 = 3/8"ID, unlike the braided SS hoses). I see there are 2 different adapter fitting sizes available: M12 x 1.5 and M12 x 1.25. I'm not sure now which one matches the turbo threads? I'm pretty sure the same "carb" adapter fitting screw into the water outlet on the head too.
Jeff
-
ambrynmc
- Posts: 335
- Joined: Thu Dec 03, 2009 3:04 pm
Re: Deserter GS to Suby EJ20 Turbo
Mine were 12mm x 1.25 and I went with AN-6 fittings
Earl's plumbing part number 991945ERL in blue or AT991945ERL for black
Fragola 491954 (BL for black)

Earl's plumbing part number 991945ERL in blue or AT991945ERL for black
Fragola 491954 (BL for black)
1971 Truckaru (WRX eng/trans powered Domus flatbed bug-truck) - build thread
-
GS guy
- Posts: 909
- Joined: Wed Nov 06, 2002 12:01 am
Re: Deserter GS to Suby EJ20 Turbo
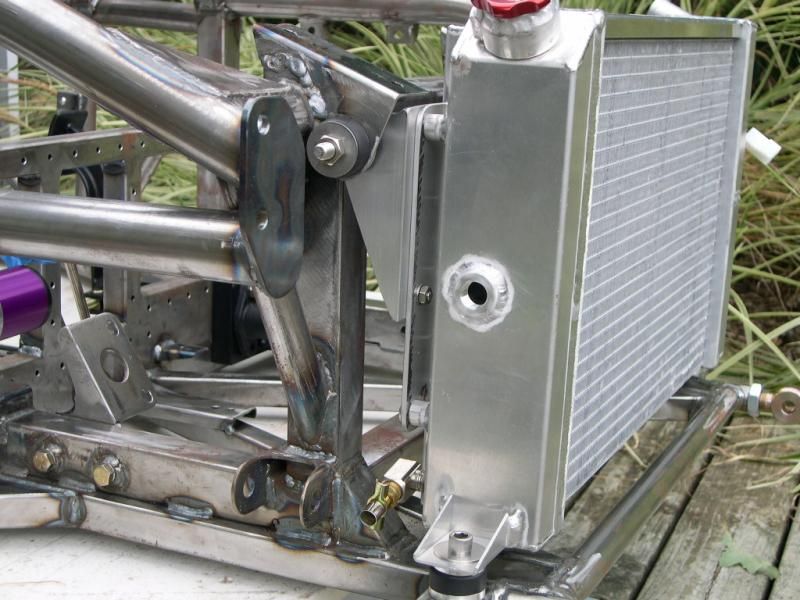
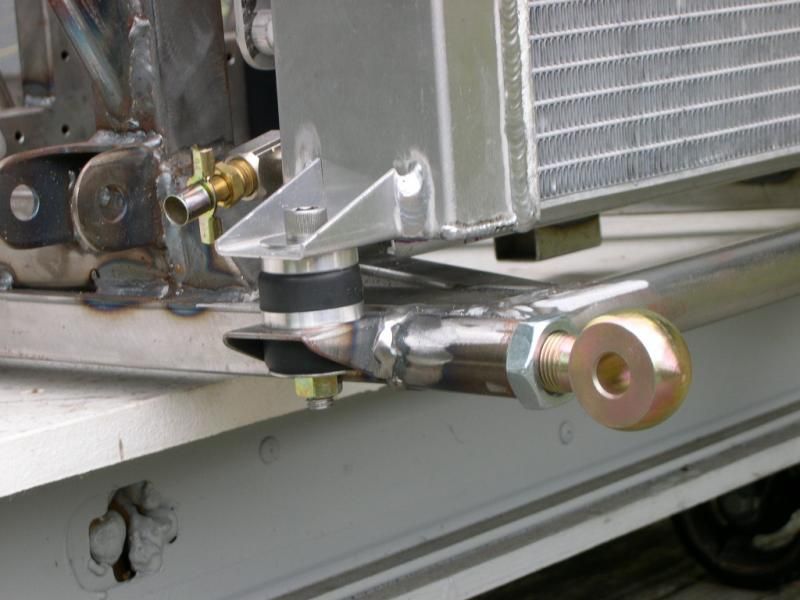
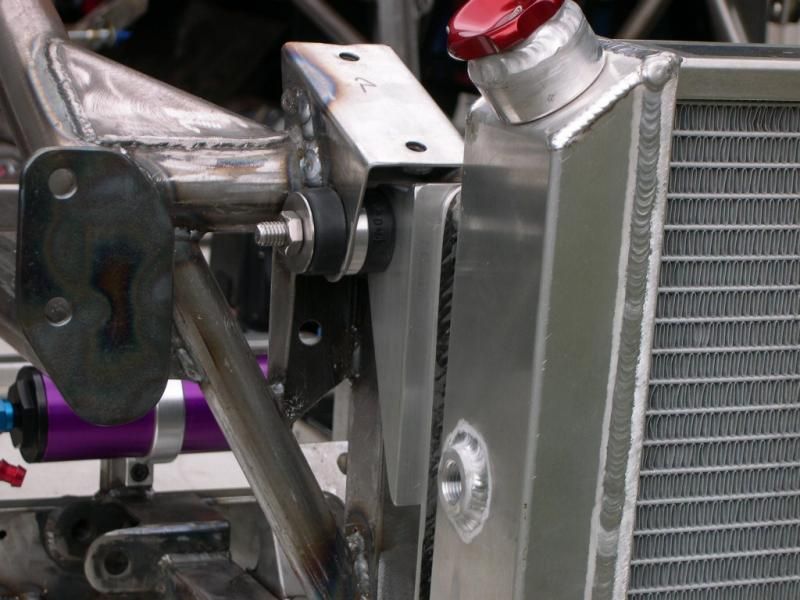
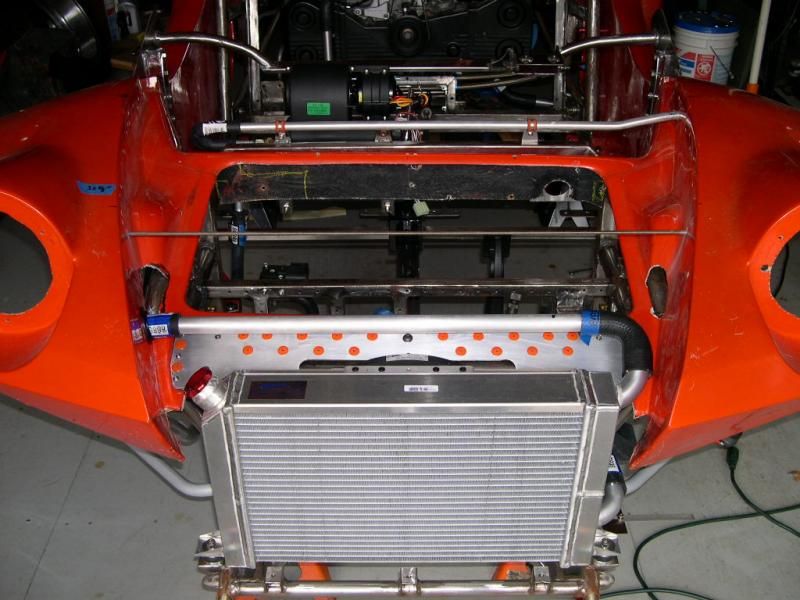
A little more progress with the cooling system. Completed the upper radiator mounts and got the radiator mounted back in place. These mounts also serve as forward body mounts. I'm using rubber sandwich mounts to hold the radiator in place, providing some vibratin and shock isolation. Now I can get to work on completing the front to rear cooling lines and heater installation.
Jeff
Jeff
-
volksnut

- Posts: 1167
- Joined: Tue Jun 26, 2001 12:01 am
Re: Deserter GS to Suby EJ20 Turbo
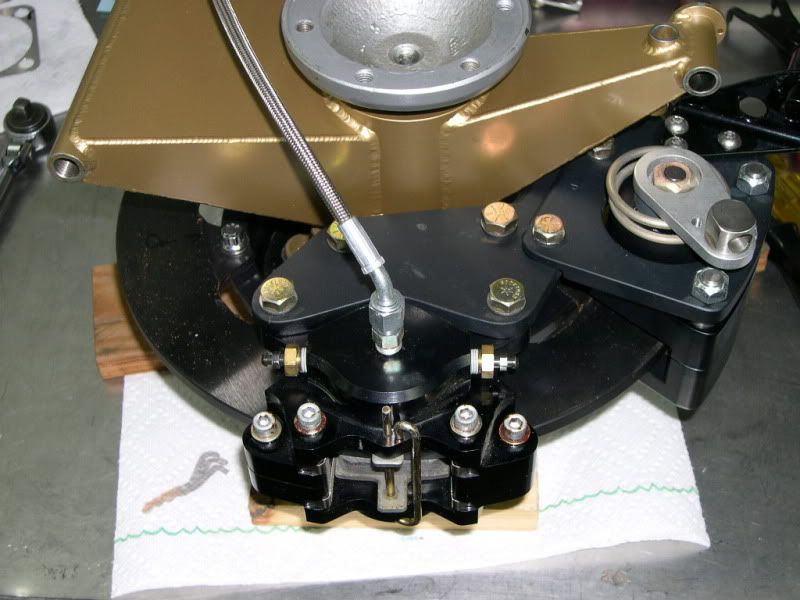
It's funny, I found what leaded to this post after looking for pinion bearing parking brake calipers. Jeff that's some excellent work you got going on there. I'm gonna follow along to this one.
-
GS guy
- Posts: 909
- Joined: Wed Nov 06, 2002 12:01 am
Re: Deserter GS to Suby EJ20 Turbo
Wow, been over a year since updating this thread. Time sure flies! Progress has been slow on the GS build, but definitely some progress has been made since last time. Over this past summer I had to re-install the engine and trans to check where to position a couple of components that needed brackets welded to the chassis. No fudging on this car, just no room to make any mistakes on positioning of things. I completed the shift linkage installation, and front to rear cooling lines, plus I'm 90% mocked up on the heater install.
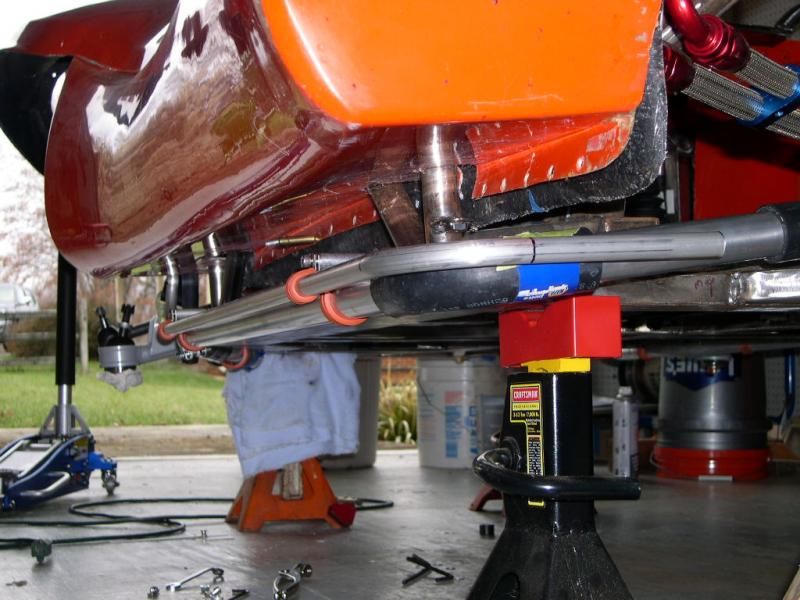
For the cooling lines, these are aluminum tubing running around the bottom perimeter of the chassis. It was tricky determining how they would route through the front suspension, but not too bad in the end.
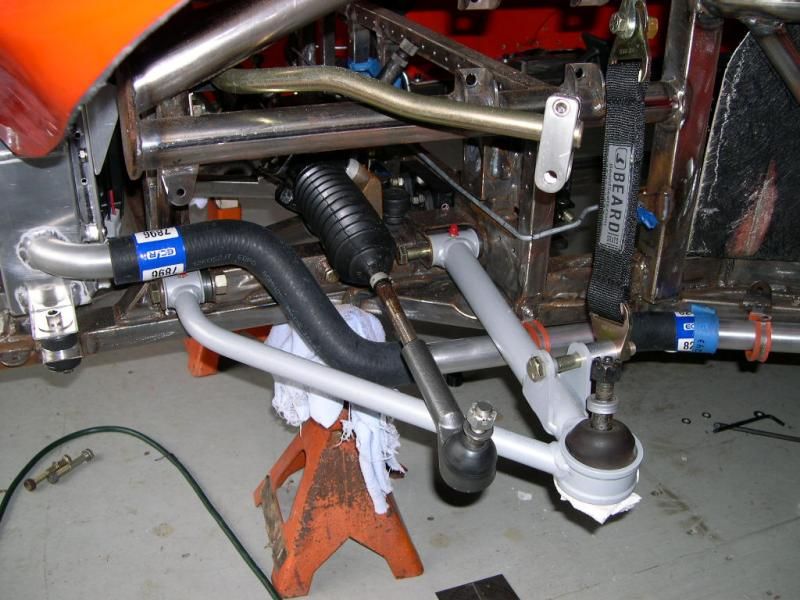
Here's the passenger side, engine return to radiator line. It snakes up through the lower A-arm and then up to near the top of the fender before entering the area under the hood, just behind the radiator:
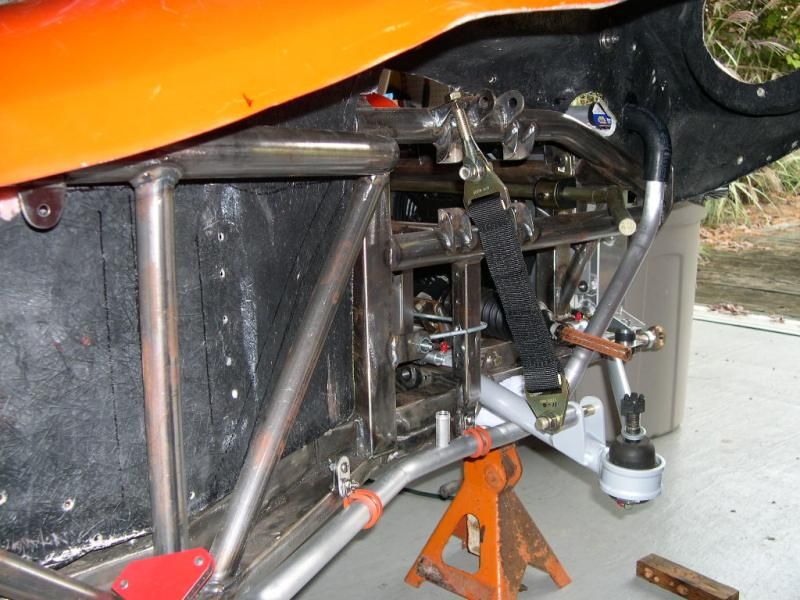
You can also make out the fitting mocked up on top of the return tube, up near the foot-box area. This will feed the heater core.
Here is where the heater feed line comes in the lower cockpit area, then does a 180 up to the control valve. From there is goes up and into the core inlet.

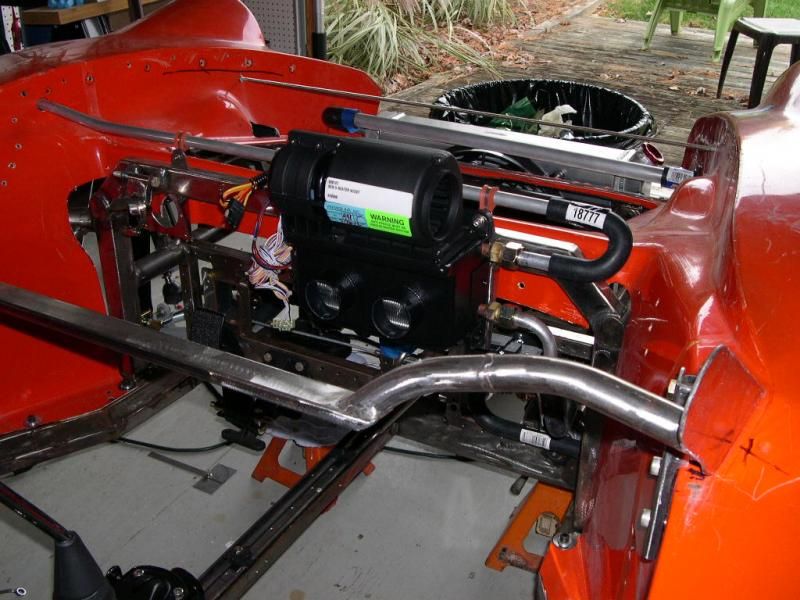
The heater installed to a cross brace. This is as high as I could mount it, and I'll be covering up the heater valve and hoses shown above with an angled kick-panel. The rearward facing outlets will duct up to defroster vents at the windshield base. You can also see the radiator return line crossing over just behind the upper radiator and connecting up on the drivers side. The double pass radiator means everything connects on one side only (with lots of crossing over).
Exiting the core, the flow does another 180 to run across the forward firewall area and out the drivers fender well. I'll install a bleed fitting in this line to extract any air. From the fender well, the line 90's down to the lower chassis and back to the engine, paralleling the main radiator return line. (Sorry, no pics of this just yet.) It took a lot of time searching, ordering and fitting all these molded hose shapes, but I think overall it came out pretty clean considering all the convolutions!
At this point our weather turned bad with early cold spells, which put a damper on further progress. I need to do some final bracket welding on the chassis (fuel filter mount, and Y fitting mount for the heater return hose) and a few other odds and ends. That's not likely to happen until spring at this point. So plenty of time for more planning!
Jeff
For the cooling lines, these are aluminum tubing running around the bottom perimeter of the chassis. It was tricky determining how they would route through the front suspension, but not too bad in the end.
Here's the passenger side, engine return to radiator line. It snakes up through the lower A-arm and then up to near the top of the fender before entering the area under the hood, just behind the radiator:
You can also make out the fitting mocked up on top of the return tube, up near the foot-box area. This will feed the heater core.
Here is where the heater feed line comes in the lower cockpit area, then does a 180 up to the control valve. From there is goes up and into the core inlet.
The heater installed to a cross brace. This is as high as I could mount it, and I'll be covering up the heater valve and hoses shown above with an angled kick-panel. The rearward facing outlets will duct up to defroster vents at the windshield base. You can also see the radiator return line crossing over just behind the upper radiator and connecting up on the drivers side. The double pass radiator means everything connects on one side only (with lots of crossing over).
Exiting the core, the flow does another 180 to run across the forward firewall area and out the drivers fender well. I'll install a bleed fitting in this line to extract any air. From the fender well, the line 90's down to the lower chassis and back to the engine, paralleling the main radiator return line. (Sorry, no pics of this just yet.) It took a lot of time searching, ordering and fitting all these molded hose shapes, but I think overall it came out pretty clean considering all the convolutions!
At this point our weather turned bad with early cold spells, which put a damper on further progress. I need to do some final bracket welding on the chassis (fuel filter mount, and Y fitting mount for the heater return hose) and a few other odds and ends. That's not likely to happen until spring at this point. So plenty of time for more planning!
Jeff
-
surfbeetle

- Posts: 423
- Joined: Sun Apr 01, 2007 10:20 pm
-
GS guy
- Posts: 909
- Joined: Wed Nov 06, 2002 12:01 am
Re: Deserter GS to Suby EJ20 Turbo
Got a couple more pics of the cooling lines.
Here's another radiator shot showing the crossover from the passenger side return to radiator hose. The elbow transitions from 1" tube up to 1.25" at the radiator inlet.
The engine end of that return line. Made 2 transitions here, engine outlet 1.5" - 1.25" at the elbow, than 1.25" down to 1" at the lower elbow:

Back at the radiator, here's the line going back to the water pump from the lower rad. outlet:
And back under the drivers side side-pod (viewed from the rear fender well):
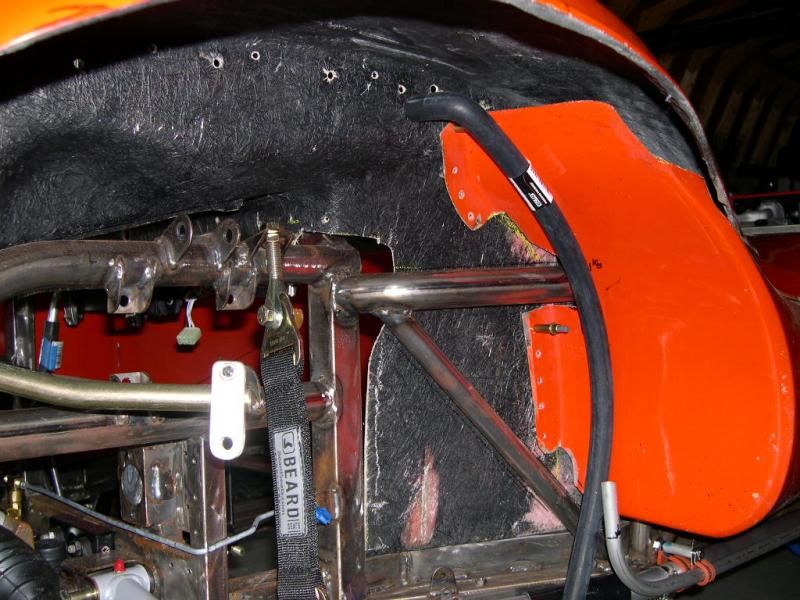
And last, the heater return to engine coming from the cockpit, into the fender well and down along the side pod. It will connect to the aluminum tube at the bottom, whenever I can get the other end connections completed.
Here's another radiator shot showing the crossover from the passenger side return to radiator hose. The elbow transitions from 1" tube up to 1.25" at the radiator inlet.
The engine end of that return line. Made 2 transitions here, engine outlet 1.5" - 1.25" at the elbow, than 1.25" down to 1" at the lower elbow:
Back at the radiator, here's the line going back to the water pump from the lower rad. outlet:
And back under the drivers side side-pod (viewed from the rear fender well):
And last, the heater return to engine coming from the cockpit, into the fender well and down along the side pod. It will connect to the aluminum tube at the bottom, whenever I can get the other end connections completed.
-
surfbeetle
- Posts: 423
- Joined: Sun Apr 01, 2007 10:20 pm
Re: Deserter GS to Suby EJ20 Turbo
On the coolant lines, did you just get some straight hose and curve it or did you have to get pre-curved pieces? I'm dreading going into Pep Boys or wherever and asking for hose. I'm thinking on mine that I may just get some pipe and hose like you have done rather than have pipe all bent up.