Head porting progress Pics and exhaust port questions

This is the place to discuss, or get help with any of your Type 4 questions.
User avatar
Bobby74
Posts: 1747
Joined: Wed Feb 21, 2001 12:01 am

Head porting progress Pics and exhaust port questions

Post by Bobby74 »

Hi guys,

I have been hard at work on my heads. Here are some pics of what I've been up to. I also have a question...

On the exhaust port, Should I be opening it up to the size of the copper gasket or the size of the 1 1/2" ID Stub pipes? Do I touch the guide boss or just smooth it? I'm trying to stay away from the short radius.

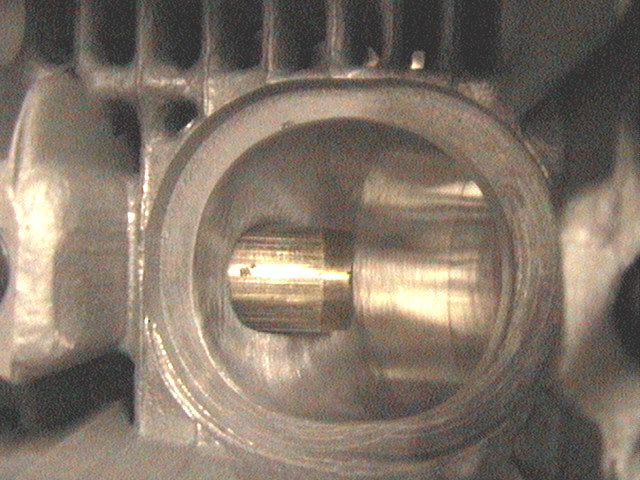
On this intake port pic, it looks like I removed too much from the intake boss or chipped, but I didn't-its some weird shaddow.

almost untouched port on left, Unfinished port on right.
Image

Look how bad the manifolds normally line up!
Image
Image

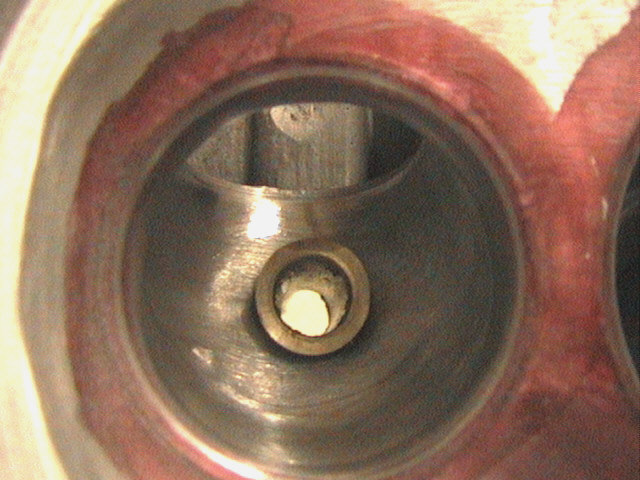
Exhaust port, mostly polished, but unfinished. This is the guide boss I'm questioning what I should do on..
Image

This is just a few mins worth of work. I hope to have most of them complete later tomorrow. I'm using 6" shank double-cut carbide burrs. A good supplier is PalmAbrasives. They run about $14 per bit. I will finish with cones and flap wheels.

What should I do about the guide boss? I've been reading HAM Inc's posts and they AWESOME, exactly the info I've been looking for!

Thanks!
-Bobby


[/img]
User avatar
Bobby74
Posts: 1747
Joined: Wed Feb 21, 2001 12:01 am

Post by Bobby74 »

Here's a pic of the combustion chamber side. The parts in black are ones that I'm questioning on if and how much I should remove....

Image

I think that if I make small ramps near the spark plug it should be able to channel the charge towards the plug? What do you think?
I'm going to polish the whole chamber once I'm done...
User avatar
dstar5000
Posts: 4555
Joined: Tue Feb 12, 2002 12:01 am

Post by dstar5000 »

Welcome to the world of porting.....YMMV....

Never port with the guides installed.

Don
‎"Let me say it as simply as I can: transparency and the rule of law will be the touchstones
of this presidency,".. Barack Obama January 21, 2009, 30 minutes before he signed the law
sealing all his personal information....
User avatar
Bobby74
Posts: 1747
Joined: Wed Feb 21, 2001 12:01 am

Post by Bobby74 »

I know Don.... I wish I could've done it without the guides installed but I didn't want to break anything removing them, or take them back and forth from the machine shop. I did bump the exhaust guide a little. It got jammed up against the guide before I could stop it.

I've done a few sets of T1 heads but this is my first go at T4 heads. I'm mostly polishing, not trying to reshape the ports too much. Mostly straightening the flow and unshrouding around the guides and valves from the combustion chamber side.

There were some HUGE "dingleberries" in the intake port. Some were the size of marbles. I'm so glad I didn't just bolt them on and go. There is so much room for improvement.

Here is a parts/cost breakdown.

AMC 2L heads off Ebay
SI Valves, 44 x 36mm
Bugpack Titainium retainers
hardened keepers
Guides, Seats
+ labor and machine work = ~$500. I'm pretty happy :)
Last edited by Bobby74 on Fri Jan 30, 2004 11:09 am, edited 1 time in total.
kdanie
Posts: 976
Joined: Mon Feb 26, 2001 12:01 am

Post by kdanie »

Check the pics on my website http://myspot.neteze.com/~kdanielson go the the VW project page and you will find the pics at the bottom.

I agree, you can't do a very effective porting job with the guides in, that boss needs trimmed down a lot or removed alltogether. There is a nasty flat spot behind the guide that needs some help.

Hope they help,
ken
User avatar
Bobby74
Posts: 1747
Joined: Wed Feb 21, 2001 12:01 am

Post by Bobby74 »

Thanks for the pics Kdanie. I'm just worried about removing too much of the boss and not leaving enough support for the guide.


Here's some pics from the exhaust port side.

Stock
http://home.comcast.net/~vwbobby/exhauststock.jpg

Ported
http://home.comcast.net/~vwbobby/exhaustported.jpg

Stock Intake
http://home.comcast.net/~vwbobby/intakeunfinished.jpg

Intake Ported
http://home.comcast.net/~vwbobby/intakebuffed.jpg
[/url]


Its really hard to see how much the port has been improved, but I estimate at least a 20-30% flow increase! When I would first blow the shavings out of the port, they would fling straight back towards my face, now they head towards the floor, with no reversion.

The sides next to the boss have a LOT of room for improvement. IF you can keep it a ramp angle, and not too steep, you can make a lot of improvement without making the port too wide.
turboteener
Posts: 319
Joined: Mon Jan 29, 2001 12:01 am

Post by turboteener »

You should remove the guides, but if you are not you need to remove the bump in the exhaust port some how. you should also take your die grinder and smooth and shape the guide end in the port. The exhaust port should be rounded and smoothed. Do not open the port up past the gasket. You want a step all the way around the port to cut down on reversion. You should open the pipe up marginally to help create this step.

On the intake side do not open up the port mouth more than about .030-.060 bigger than the diameter of the intake. You are trying to creat the step there as well. you want the manifold smaller than the intake port. you must smooth the guide and make the tear drop in front of the sharper and more defined and smooth out the area behind it so that there is not just a turbulent void back there. Be very careful about what you do around the bowl but make sure the port taper is no larger than the ID of the valve seat otherwise you will kill flow. I would not reccomend a major work over with out some flowbench examples as guides.

On the chamber side smooth and polish everything. Open the chamber sides up to match the edges of the cylinder bore. Make sure that you don't have any sharp edges overhanging the chamber. do your best to unshroud the valves with out making the chambers un-necessarily large. Set the deck height at .040 and have a good valve job and flycut on the head and you should be good to go.
kdanie
Posts: 976
Joined: Mon Feb 26, 2001 12:01 am

Post by kdanie »

Not to start a disagreement but the latest header/port tech. indicates that the step from port dia. to header dia. is not as good as port matched headers. This is from 2 different competing state of the art header designers/fabicators with extensive dyno time.

Any step in the exhaust path causes a pressure change and loss of velocity. The steps also trigger a pressure wave reflection, which must be timed correctly (by location) or the reflection has a negative effect on the port.

ken
User avatar
Bobby74
Posts: 1747
Joined: Wed Feb 21, 2001 12:01 am

Post by Bobby74 »

Thanks for your help Turboteener!

Yes, Kdanie is correct. However, There has even been effort as to leave a small step in the intake manifold to port relation to help block reversion waves traveling back up the intake ports. I don't know if it would work for exhaust, but wouldn't be needed with a properly tunned system. This is what you were mentioning also in your post Turbo.
turboteener
Posts: 319
Joined: Mon Jan 29, 2001 12:01 am

Post by turboteener »

Yes you will cause all kinds of hell with exhaust flow if you step from 1 1/2 pipe to a 1 3/4 but what I am referring to is a .060 step on the tops and bottom of the port and a .045 step on the sides. I can assure you this is much more effective than a port matched header. This is very common technique used in Prostock drag racing and Winston Cup.
kdanie
Posts: 976
Joined: Mon Feb 26, 2001 12:01 am

Post by kdanie »

Ummm... not any more.... That's who my sources build headers for.
ken
Billyisgr8

Post by Billyisgr8 »

Here's mine from Adrian at headflowmasters 36 valve 128cfm @ .500 lift

Kevin

Image


Image
turboteener
Posts: 319
Joined: Mon Jan 29, 2001 12:01 am

Post by turboteener »

Would you care to share the name of your source? What type of engines are we referring to and under what type of conditions?
User avatar
Bobby74
Posts: 1747
Joined: Wed Feb 21, 2001 12:01 am

Post by Bobby74 »

AWESOME!!! Thank you guys!

I'm heading back out to get some good old aluminum on my sleeves.

Kevin,
I remember my 914 2L heads looking a little like your ports... I didn't have them long enough to take pics of the exhaust.

That should help me quite a bit. I was just worried about the exhaust gude getting chipped by not being supported. I guess there's nothing to worry about? right?

Thanks again,
-Bobby

P.S. I'm going to leave a 40 thou step on the exhaust because I don't want the port to melt and collapse in. I have a head where this has happened, and although I don't plan on killing my engine like that, I don't like to leave a potential for a problem.
User avatar
Bobby74
Posts: 1747
Joined: Wed Feb 21, 2001 12:01 am

Post by Bobby74 »

Now that I have been looking at your ports Kevin, I think I might have removed a little too much from the sides. I didn't go wild on anything, but my ports look a little wider. It looks like I have room for improvement around the guide though, yours are more un-shrouded than mine.

What I'm trying to do is create a low pressure area under the valve to help pull the exhaust out of the port. I'm not so sure how this will work, but its what I've used in everything from Briggs and Stratton, honda motorcycles to Type 1's.... and I noticed a big improvement, so its worth a shot. I could always build up a set of other heads I have laying around if it isn't so hot. I've only worked on small engines, and the differences you make in them, almost multiply on larger engines so hopefully I'm going down the right track.
Post Reply