Page 8 of 12
Re: T4 Tear Down / Rebuild in Jax FL
Posted: Fri Nov 03, 2017 2:56 pm
by wreck
I went through this recently , the case spigots may not be flat and as Ray and Pile have mentioned any burrs or differences in rod length /crank stroke show up . I ended up taking .003 of the top off 2 pistons to get the deck with in .001 . In a relatively standard engine I would not of gone to the trouble .
something worth doing is to put some sealant on the base of the cylinders ,torque the heads down ,then after the sealant has cured ,carefully remove the heads and check the cylinders are even ,use a small 6inch straight edge and slide it across the top of the cylinders .They should be dead flat . this is more important than getting the decks dead even .
Re: T4 Tear Down / Rebuild in Jax FL
Posted: Sat Nov 04, 2017 7:09 am
by Clatter
Has the case been decked?
There's a bit about this buried in my build thread.
After 40 hard years pushing a bus, most cases need decked;
Best by a guy who counts how many thou it takes to clean them up.
You hope for only a couple thou to clean up,
And toss the case in the bin if it takes .004 or .005"..
Look real real careful like at a straightedge across the tops of two cylinders, in the case, on the deck.
You will typically see the area right between them a bit 'high',
Indicating a spread center main.
They all have it, the question is how much.
Unless it just got decked, of course..

Re: T4 Tear Down / Rebuild in Jax FL
Posted: Sat Nov 04, 2017 7:21 am
by Clatter
Oh, and those cylinders suck for how different they are in length.
They should all be dead nuts, or at least within .001".
Are you _sure_ there's that much variation? Calipers aren't always the best for pulling tight measurements.
Those are maybe the Mahles with the AA cylinders?
Look for the little flat spot cast into the fin area near the cylinder base.
It's at the bottom of the flat area where the cylinder fins are clearanced for the other cylinder..
A little flat area about 1/2 cm square, where they cast in AA if it's an AA, or not, if it's to be packaged as a Mahle.
Alas, just because it says Mahle on the box, doesn't mean it's a Mahle cylinder (or that it's made correctly).
If you have that much variation, anyone half-way decent with an old manual lathe can make them right.
Metallurgy with AA stuff is hit-or-miss, but most often good.
Bad machining can often be corrected.
So chin up!

Think of how so many people just throw these things together straight out of the box,
Thinking it's still the old days,
And the inevitable results that follow..
You have had some real poop luck so far, but are still on track to success no doubt..
Re: T4 Tear Down / Rebuild in Jax FL
Posted: Sat Nov 04, 2017 9:37 am
by analogtherapy
Clatter wrote: ↑Sat Nov 04, 2017 7:21 am
Those are maybe the Mahles with the AA cylinders?
Well...about those Mahles...
The Mahle set that I got looked great upon visual inspection. Forward 5 months-ish later, and one was bent ever so slightly at the lower circumference of the cylinder, enough that you could just baaarely see it, but also enough that the piston wouldn't fit into the cylinder at all. A second was just off enough to be a snug fit when sliding the piston in. The remaining 2 had no issue at all. And you know what? You can't buy the Mahle's without the pistons. Since I didn't need a full complete set, I opted to go with a set of AA's, just the cylinders, since they sell them that way. The only other cylinders sold by themselves like that are no-name brands that I didn't want to gamble with. Sucks, but, I'm at the end of my budget and that's just how it is.
Clatter wrote: ↑Sat Nov 04, 2017 7:21 amYou have had some real poop luck so far, but are still on track to success no doubt..
Thanks man. It has been frustrating for sure. I'm still hopeful that I can finish this before the end of the year.
OK...so I switched the #2 and #4 rods since it seemed that they were the opposite. One being high, and the other a bit low. Got everything tightened up again, and here are my latest measurements:
#3
Piston/Cylinder DH = .010 (.25mm)
Total DH = 1.05mm
CR: 7.8
#4
Piston/Cylinder DH = .014 (.35mm)
Total DH = 1.15
CR: 7.8
#1
Piston/Cylinder DH = .011 (.28mm)
Total DH = 1.08mm
CR: 7.8
#2
Piston/Cylinder DH = .010 (.25mm)
Total DH = 1.05
CR: 7.8
HAM Heads step + .8mm to DH
Bore = 94
Stroke = 71
CC's 64.5 (15cc piston dish + 49.5cc head)
So....can I get excited yet?!
The only thing is, is that I'm aiming for between 7.5 - 7.75 CR, so I'm a tad high for the Web 142...
Re: T4 Tear Down / Rebuild in Jax FL
Posted: Sat Nov 04, 2017 9:44 am
by analogtherapy
Looking over my numbers, am I right in thinking that if I switch out the cylinder gasket with an .010 spacer, that will get me to 7.6 CR?
Re: T4 Tear Down / Rebuild in Jax FL
Posted: Wed Nov 08, 2017 12:38 pm
by Clatter
7.75.. 7.8.. Same difference.
A smidge more compression sounds about perfect.
As long as you tune it well, you'll be fine.
Just make sure to run premium fuel,
At least until it get 20-30K miles on the clock, and loosens up anyways..
Re: T4 Tear Down / Rebuild in Jax FL
Posted: Sun Nov 26, 2017 1:01 pm
by analogtherapy
Slowly making progress!

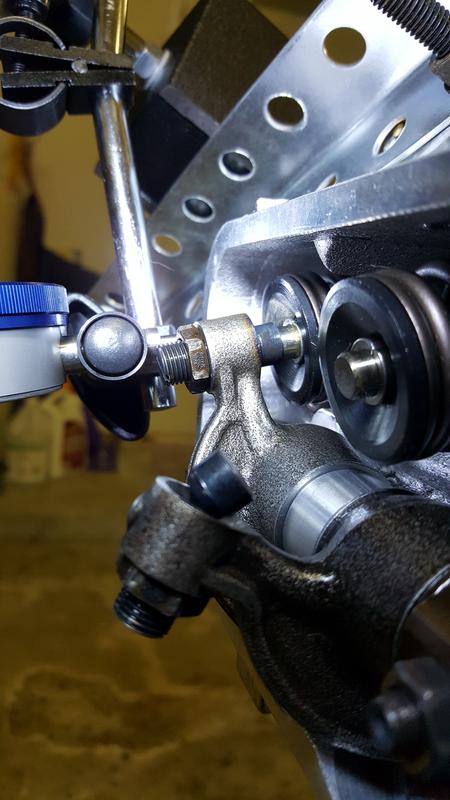
Alright, I'm currently wrapping my head around the rockers. I'm using 10mm swivel foot adjusters, and I've got my adjustable push rod tool mocked up. I've found (at least I think I've found) half-lift, and here is the photo:
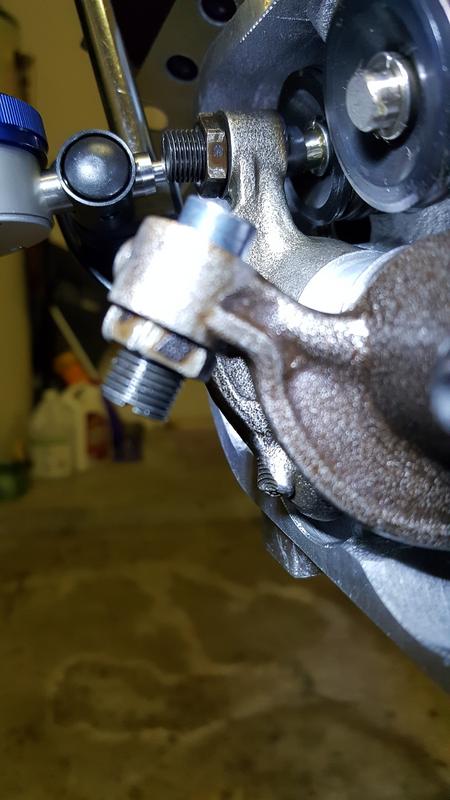
I know I'm supposed to get the valve adjuster as close to in-line with the valve stem as possible, and as the photo shows, I've got some work to do still.
My question right now is....how far in/out should my adjuster be?
Re: T4 Tear Down / Rebuild in Jax FL
Posted: Sun Nov 26, 2017 8:14 pm
by raygreenwood
This is my opinion and experience. At full lift....you need enough clearance between the adjuster and rocker arm that the cuff of the swivel foot cup.....is bare minimum ....two full threads away from the rocker arm.
So if you meaure in thousandths....how much an entire thread rotation of the valve adjustment screw is...two full rotations of spare space before contact of the cuff of the swivel foot cup is quite a lot.
But there will be some valve wear over time. If a type 4 is built correctly.....100k-150k miles should be the norm.
You will get some small amount of wear of the ball in the cup. You will have your valves tighten up over time...maybe .001" max every 3-4 regular valve adjustments. Call it .0007" or so every 10k miles just to be safe. Having 2.5-3.0 threads of spare is better. This is why when setting up valve geometry.....if you are going to make new pushrods.....lock the swivel foot at the amount of thread and swivel length you want. Then adjust the pushrod length to give you correct geometry without making changes to the swivel foot. Ray
Re: T4 Tear Down / Rebuild in Jax FL
Posted: Sun Nov 26, 2017 8:40 pm
by Piledriver
Good point, but IME that's ~about where you end up anyway.
Its good to have a certain reserve for adjustment as a starting point, but you can cut back the rocker as needed to a point.
Looking at the pic above he needs 2-3 turns to get ~inline with the valve..
Re: T4 Tear Down / Rebuild in Jax FL
Posted: Mon Nov 27, 2017 12:41 pm
by analogtherapy
Thank you both for the assistance.
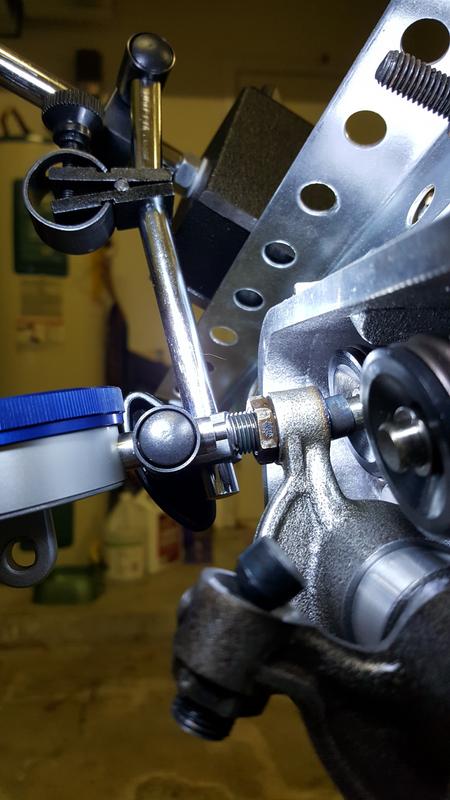
Here is where things currently look:
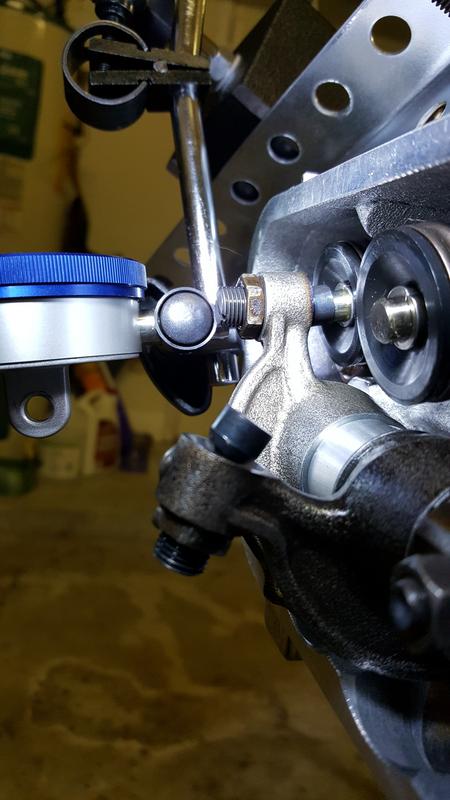
I adjusted the ...adjusters, and added 1.5mm shims. My push rod tool (EMPI) is at the shortest it can be. I re-measured 1/2 lift after adding the shims, but still need to take photos of full and zero lift positions.
This looks more in line to me than before...but still not perfectly straight. I haven't tried stacking the .5mm and 1mm shims yet. Should I?
Re: T4 Tear Down / Rebuild in Jax FL
Posted: Mon Nov 27, 2017 3:29 pm
by Clatter
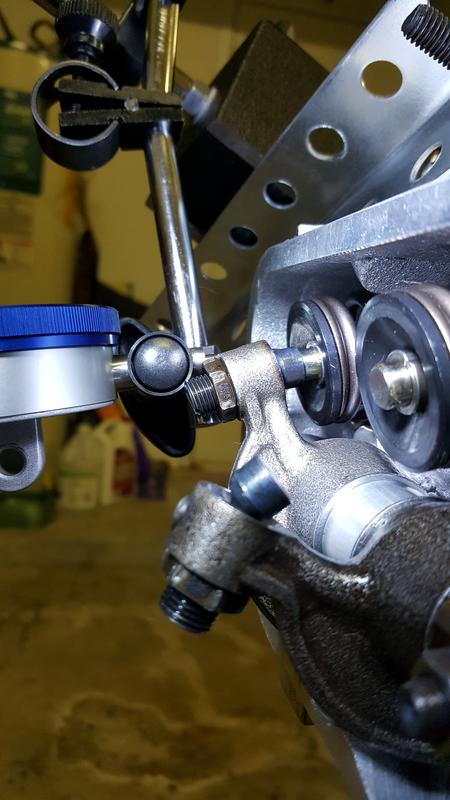
Did you take the typical .060" off the 'face' of the rocker - to clear the swivel foot?
Can't tell for sure by looking at your pics..
The bigger adjusters might like a bit more than .060".
Where the oil hole ends up usually becomes my primary 'removal indicator'.
Said another way - I like to remove enough that there are a couple of threads left between the oil hole and the last thread before the adjuster clearance.
Also like to take a teeny triangle jeweler's file and make a tiny oil groove thru the those last coupla threads to spray into the swivel foot cup..
If that makes any sense at all..
FWIW, unless there's a big (like .010-.020"+) difference between ideal pushrod lengths between holes,
it's a good idea to make them all the same size, so they don't have to be kept track of in the future.
Sometimes, there ends up being a 'right set' of pushrods, and a 'left set', depending upon where the crank centerline was in the case, etc..
On a milder motor, like a bus, going exactly to .001" from ideal on each pushrod is total overkill.
Once you get your adjustable rod set so it seems perfect on one hole,
try it out on the others, and adjust to a good compromise on them all with one length (if you can).
Re: T4 Tear Down / Rebuild in Jax FL
Posted: Mon Nov 27, 2017 7:02 pm
by Piledriver
The deck is ~10mm less on a T4 vs a T1 and the pushrods are usually shorter.
You may need to lop a bit off the EMPI adjustable PR.
With a 163/86B in my sons motor I ended up with intake and exhaust length sets.
From memory they were ~1mm difference.
Re: T4 Tear Down / Rebuild in Jax FL
Posted: Tue Nov 28, 2017 5:36 am
by analogtherapy
You know, not once did I consider comparing the adjustable push rod tool to the original push rods, and you know what....you're right, they're much shorter.
I'm going to try mocking everything up again, this time using the stock rod, and see what I get and go from there. If it's too short, I guess I need to figure out how to shorten this push rod tool while retaining its adjustability...
Thanks for the info gents!
Re: T4 Tear Down / Rebuild in Jax FL
Posted: Tue Nov 28, 2017 5:44 am
by analogtherapy
Clatter wrote: ↑Mon Nov 27, 2017 3:29 pm
Did you take the typical .060" off the 'face' of the rocker - to clear the swivel foot?
Can't tell for sure by looking at your pics..
Yessir, the rockers have been face'd for the swivel adjusters.
Clatter wrote: ↑Mon Nov 27, 2017 3:29 pm
Where the oil hole ends up usually becomes my primary 'removal indicator'.
Said another way - I like to remove enough that there are a couple of threads left between the oil hole and the last thread before the adjuster clearance.
Right now, I have the oil hole just peeking out and not covered by any of the adjuster threads. Like this: //////o-{ ]
'////' (adjuster threads)
'o' (oil hole on rocker)
'-{ ]' swivel cup
It sounds like from your description that I should cover the oil hole with a couple of threads (so bringing the swivel cup a bit closer to the rocker). Am I following you correctly?
Re: T4 Tear Down / Rebuild in Jax FL
Posted: Tue Nov 28, 2017 2:25 pm
by analogtherapy
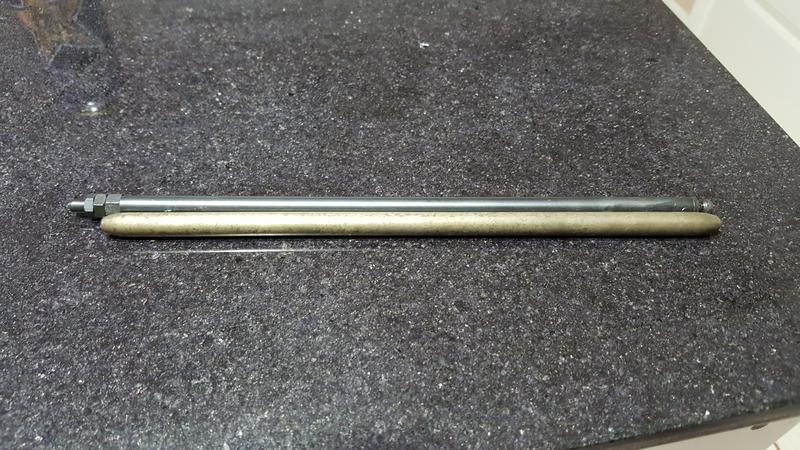
OK, my stock type 4 (hydraulic) push rod is too short, and wouldn't tighten. So I removed the lock nut from the EMPI push rod tool as an attempt to get closer to the measurement I need (but before cutting anything)....and here are the results:
Zero lift:
Half lift:
Full lift:
Am I right in thinking this looks good??