Did you ever find a set of '72-'74 heater boxes for it?
If you plan on keeping to warm climes,
The 411/412 'pre-heater' boxes are much lighter, and warm plenty for a place like FL.
Otherwise, a set of those EMW heater box eliminator pipes give more equal length and a slight bump in size..
'75-up exhaust was smaller then ideal.
Supposedly, VW had the idea that stacking up the heat into the motor would help emissions at the time..
T4 Tear Down / Rebuild in Jax FL
-
Clatter

- Posts: 2034
- Joined: Sun Apr 28, 2002 1:01 am
Re: T4 Tear Down / Rebuild in Jax FL
Speedier than a Fasting Bullet!
Beginners' how-to Type 4 build thread ---> http://shoptalkforums.com/viewtopic.php?f=1&t=145853
Beginners' how-to Type 4 build thread ---> http://shoptalkforums.com/viewtopic.php?f=1&t=145853
-
analogtherapy

- Posts: 80
- Joined: Sat Apr 22, 2017 6:45 am
Re: T4 Tear Down / Rebuild in Jax FL
Aren't the '79 heater boxes the same as the '72-'74, but with the square ports vs the oval? I have the set of '79 heater boxes that came with my engine, and they're in excellent shape. I just spent the afternoon primering and painting them in high heat paint.
I am currently in FL and plan to be here for the next couple of years or so, but do plan on moving north eventually (NC, VA, something like that).
I am currently in FL and plan to be here for the next couple of years or so, but do plan on moving north eventually (NC, VA, something like that).
-
Clatter
- Posts: 2034
- Joined: Sun Apr 28, 2002 1:01 am
Re: T4 Tear Down / Rebuild in Jax FL
Depends upon CA or federal..
Pics?
Pics?
Speedier than a Fasting Bullet!
Beginners' how-to Type 4 build thread ---> http://shoptalkforums.com/viewtopic.php?f=1&t=145853
Beginners' how-to Type 4 build thread ---> http://shoptalkforums.com/viewtopic.php?f=1&t=145853
-
Piledriver

- Moderator
- Posts: 22520
- Joined: Sat Feb 16, 2002 12:01 am
Re: T4 Tear Down / Rebuild in Jax FL
4 tube type is fine. (federal)
Cali 2 tube muffler uses the infamous "F" shaped head pipes and cooks heads.
The latter is worth $omething to late model folk in California, as replacement parts are made from purest unobtanium.
Cali 2 tube muffler uses the infamous "F" shaped head pipes and cooks heads.
The latter is worth $omething to late model folk in California, as replacement parts are made from purest unobtanium.
Addendum to Newtons first law:
zero vehicles on jackstands, square gets a fresh 090 and 1911, cabby gets a blower.
EZ3.6 Vanagon after that.(mounted, needs everything finished) then Creamsicle.
zero vehicles on jackstands, square gets a fresh 090 and 1911, cabby gets a blower.
EZ3.6 Vanagon after that.(mounted, needs everything finished) then Creamsicle.
-
analogtherapy
- Posts: 80
- Joined: Sat Apr 22, 2017 6:45 am
Re: T4 Tear Down / Rebuild in Jax FL
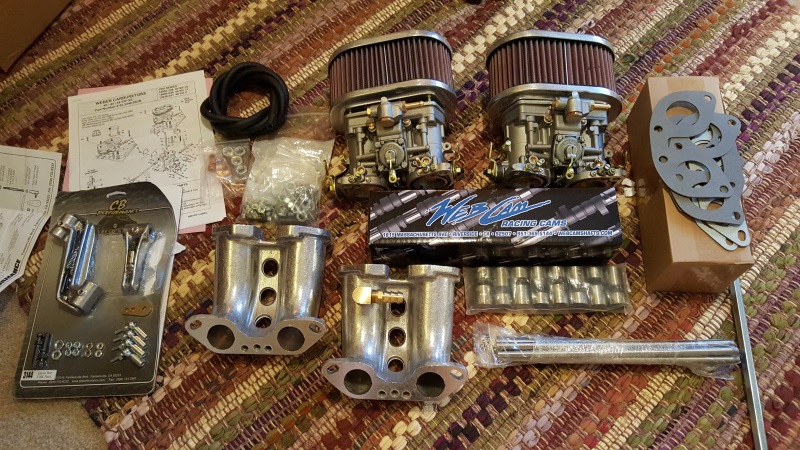
Got a few toys in the mail...
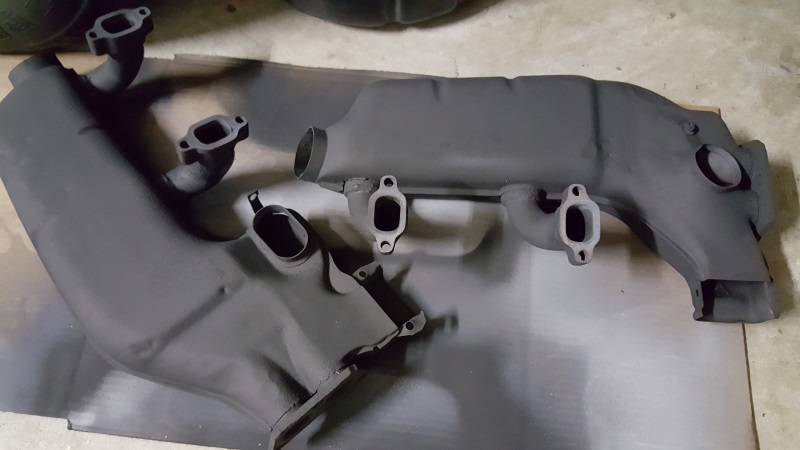
Heater boxes primed and painted
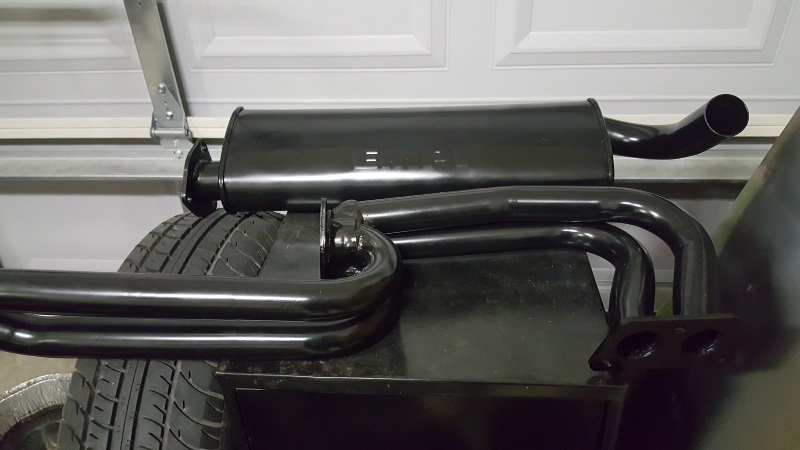
This is the new exhaust I'll be using (I've kept the original, and may still use it once it's been cleaned up and the cat's been removed). The EMPI exhaust has been stripped and re-painted.
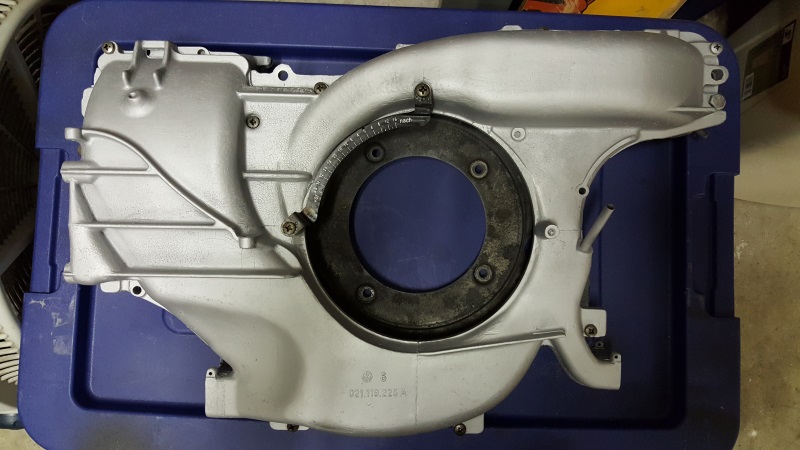
Fan shroud cleaned and painted. Not really happy with the paint though. It's got a bit of a flat finish, and shows dirt really easily. Might paint over it with an enamel that's a bit easier to keep clean.
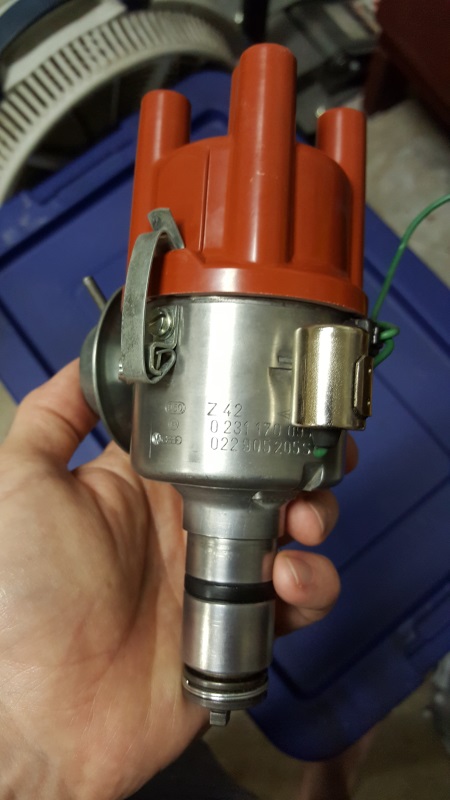
Original Bosch 205S distributor cleaned up really nicely! Had it rebuilt by Bill (wcfvw69) on The Samba. Freshly lubed up, and tons of life left! Pretty stoked!
EMW has and is currently working on the case. Should be getting a call from them any day now.
Also, I found some of the lower tin (which conceal the push rod tubes) NOS on a UK website for less than most people are trying to sell rusty pieces for. Yea, I gotta pay for international shipping, but it STILL ended up being cheaper. I also realized that I was missing the two rear right and left cylinder tins (bummer), and missing the rubber oil cooler tin seal. All of those are now on the way.
Bonus: I decided to spring a bit extra for my fuel pressure regulator, and go for one of the nicer Malpassi Filter King units, with the built in guage Like this:

Heater boxes primed and painted
This is the new exhaust I'll be using (I've kept the original, and may still use it once it's been cleaned up and the cat's been removed). The EMPI exhaust has been stripped and re-painted.
Fan shroud cleaned and painted. Not really happy with the paint though. It's got a bit of a flat finish, and shows dirt really easily. Might paint over it with an enamel that's a bit easier to keep clean.
Original Bosch 205S distributor cleaned up really nicely! Had it rebuilt by Bill (wcfvw69) on The Samba. Freshly lubed up, and tons of life left! Pretty stoked!
EMW has and is currently working on the case. Should be getting a call from them any day now.
Also, I found some of the lower tin (which conceal the push rod tubes) NOS on a UK website for less than most people are trying to sell rusty pieces for. Yea, I gotta pay for international shipping, but it STILL ended up being cheaper. I also realized that I was missing the two rear right and left cylinder tins (bummer), and missing the rubber oil cooler tin seal. All of those are now on the way.
Bonus: I decided to spring a bit extra for my fuel pressure regulator, and go for one of the nicer Malpassi Filter King units, with the built in guage
Last edited by analogtherapy on Thu Apr 26, 2018 9:23 am, edited 2 times in total.
-
Lo Cash John

- Posts: 1089
- Joined: Thu Jun 14, 2001 12:01 am
Re: T4 Tear Down / Rebuild in Jax FL
Malpassi makes some NICE stuff. I'm surprised they aren't more common in the US car market.
Since you're "doing the details" I highly recommend detailing that header. Use a die grinder or Dremel type tool with rotary rasp bit. The goal is to remove and weld/slag that blocks the inlet tubes or the collector. The inside of a header should function like the smooth surface of a wing and any imperfections that disrupt airflow robs horsepower. Once done, use a large bastard file and make sure the flanges are dead flat.
If you need any welding done (break through the tubing while cleaning welds) let me know and I can TIG it up for you.
Oh yeah, if you want powder coating done, go see Richard at PowderTech Plus in Orange Park and tell him Lester and John sent you. Richard is a long time VW guy and his 62 ragtop bug was cover car in VW Trends back in 99 or 2000. He always takes good care of the VW guys.
-
analogtherapy
- Posts: 80
- Joined: Sat Apr 22, 2017 6:45 am
Re: T4 Tear Down / Rebuild in Jax FL
All parts have arrived and I'm slowly getting moving on the rebuild again.
For the most part I'm using Tom Wilson's book as my guide, but I need some help understanding what I need to do to set correct distributor drive shaft end play. He mentions that a minimum of .020 between the shim and the case.
In my photo below, there is no space between the shim and the case. Does this mean I need to create a space of at lease .020 by pushing up on the shaft, and then lock the distributor in its clamp at that point?
Where should this measurement be taken?
-
Piledriver
- Moderator
- Posts: 22520
- Joined: Sat Feb 16, 2002 12:01 am
Re: T4 Tear Down / Rebuild in Jax FL
I suspect there is a typo or a misunderstanding.
There should be space above the distributor drive, which is taken up by the spring.
A small amount of clearance is needed so the spring force sets the downforce, rather than a clamped in too long distributor (have never seen that...)
The law of gravity prevents a space under the distributor drive. It is filled by the single thrust shim.
Addendum to Newtons first law:
zero vehicles on jackstands, square gets a fresh 090 and 1911, cabby gets a blower.
EZ3.6 Vanagon after that.(mounted, needs everything finished) then Creamsicle.
zero vehicles on jackstands, square gets a fresh 090 and 1911, cabby gets a blower.
EZ3.6 Vanagon after that.(mounted, needs everything finished) then Creamsicle.
-
analogtherapy
- Posts: 80
- Joined: Sat Apr 22, 2017 6:45 am
Re: T4 Tear Down / Rebuild in Jax FL
I think you're right, and came to the conclusion that perhaps it applies to a type 1, but not a type 4.
Got the distributor notch, distributor shaft, and rotor aligned, then rotated the #1 rod to TDC and set the shaft into it's place.
This is what I ended up with. I believe this is 12 degrees. Does this look right?:
(if this image doesn't shop up for you, please let me know. Thanks)

-
Piledriver
- Moderator
- Posts: 22520
- Joined: Sat Feb 16, 2002 12:01 am
Re: T4 Tear Down / Rebuild in Jax FL
It only matters if you have a vacuum can on a distributor that hits the fan housing if indexed wrong.
I have a 009 in mine but it's gutted and only contains a 36-2 timing wheel and pickup, it's been awhile since I saw the "right" setup.
Refer to the Bentley.
Here's an ancient thread that explains it well, Wilson seems to have been talking about dist. drive to dist shaft clearance as I thought:
http://www.shoptalkforums.com/viewtopic.php?t=117900
Addendum to Newtons first law:
zero vehicles on jackstands, square gets a fresh 090 and 1911, cabby gets a blower.
EZ3.6 Vanagon after that.(mounted, needs everything finished) then Creamsicle.
zero vehicles on jackstands, square gets a fresh 090 and 1911, cabby gets a blower.
EZ3.6 Vanagon after that.(mounted, needs everything finished) then Creamsicle.
-
analogtherapy
- Posts: 80
- Joined: Sat Apr 22, 2017 6:45 am
Re: T4 Tear Down / Rebuild in Jax FL
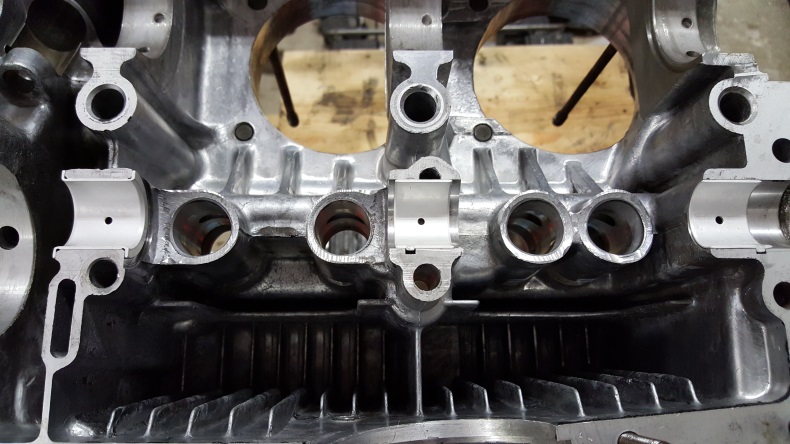
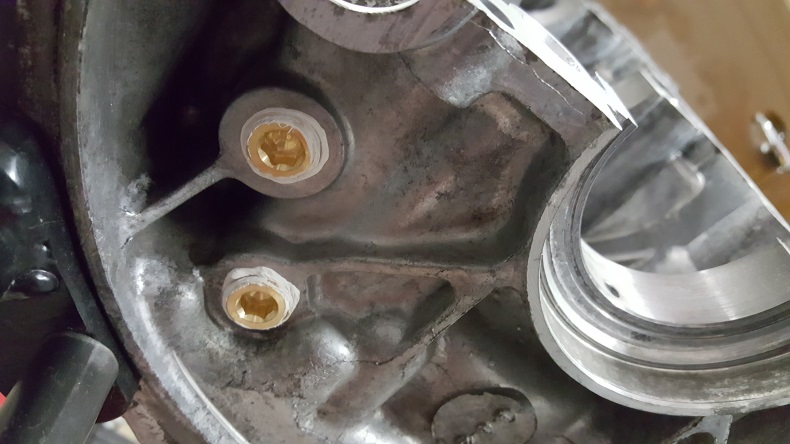
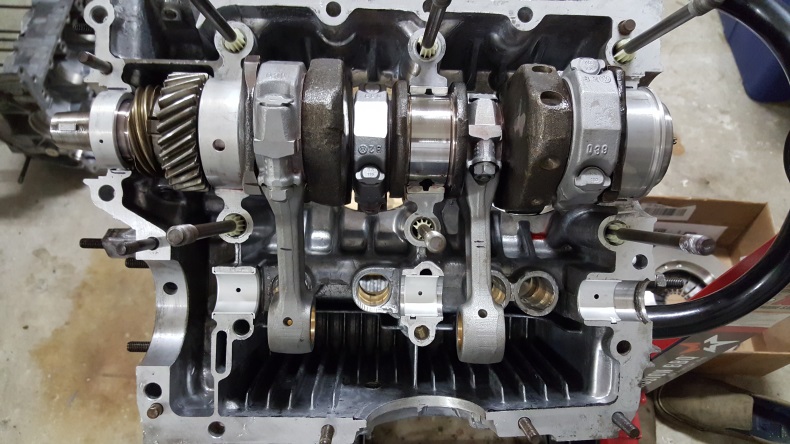
A few more photos if this weekends work:
Cam bearings in place:
Oil galley plugs:
Case through bolts in, rods installed on the crank, main bearings lubed and crank set into the case:
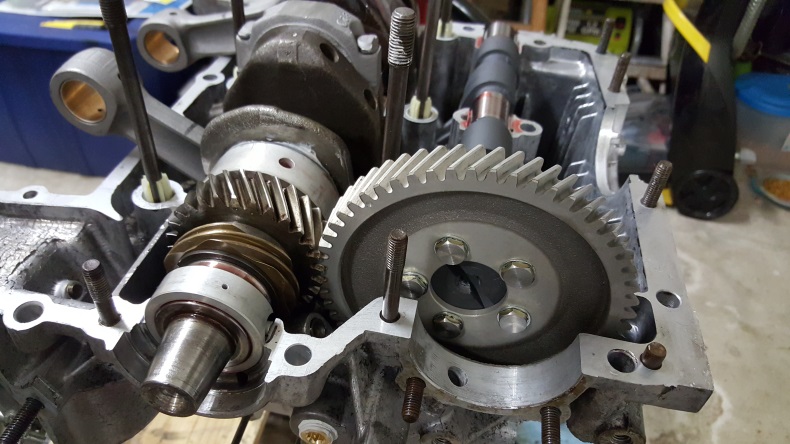
Camshaft and gear in place and aligned with the crankshaft gear:
Cam bearings in place:
Oil galley plugs:
Case through bolts in, rods installed on the crank, main bearings lubed and crank set into the case:
Camshaft and gear in place and aligned with the crankshaft gear:
Last edited by analogtherapy on Thu Apr 26, 2018 9:27 am, edited 2 times in total.
-
analogtherapy
- Posts: 80
- Joined: Sat Apr 22, 2017 6:45 am
Re: T4 Tear Down / Rebuild in Jax FL
Well, it seems that my images are broken again. My most recent pic is still there, but the old ones are gone. Man, this whole Photobucket debacle has really become a pain. I recently found out that Amazon does photo hosting if you're a Prime member, and that worked for a short time. But they recently changed something in the way they generate photo URL's, and now those URL's are temporary....and change over time, which breaks photos linked in forums. Dang. The search continues...
Sorry for the broken pics. I'm still looking for a solution.
Sorry for the broken pics. I'm still looking for a solution.
-
analogtherapy
- Posts: 80
- Joined: Sat Apr 22, 2017 6:45 am
Re: T4 Tear Down / Rebuild in Jax FL
Alright, all images should be fixed now...
-
Lo Cash John
- Posts: 1089
- Joined: Thu Jun 14, 2001 12:01 am
Re: T4 Tear Down / Rebuild in Jax FL
Post images at that other big ass VW site (rhymes with Mamba). From there you can link them here.
-
Clatter
- Posts: 2034
- Joined: Sun Apr 28, 2002 1:01 am
Re: T4 Tear Down / Rebuild in Jax FL
MMmmmMMMmm, That's some nice looking stuff all clean like that.
Love them lifter bore sleeves..
Did you ever have your crank/flywheel/pressure plate/fan spin-balanced as an assembly?
That's worth doing for sure, when you have everything apart like this..
Don't forget to check your oil pump out,
And make sure your timing mark is er, marked accurately.
FWIW, I have never had any luck whatsoever getting paint or powder or polish or anything to stick to a mag fan shroud long term.
Speedier than a Fasting Bullet!
Beginners' how-to Type 4 build thread ---> http://shoptalkforums.com/viewtopic.php?f=1&t=145853
Beginners' how-to Type 4 build thread ---> http://shoptalkforums.com/viewtopic.php?f=1&t=145853